Ultra Messaging® Concepts
Copyright © 2004 - 2014 Informatica Corporation
March 2014
Informatica Ultra Messaging
Version 5.3
March 2014
Copyright (c) 1998-2014 Informatica Corporation. All rights reserved.
This software and documentation contain proprietary information of Informatica Corporation and are provided under a license agreement containing restrictions on use and disclosure and are also protected by copyright law. Reverse engineering of the software is prohibited. No part of this document may be reproduced or transmitted in any form, by any means (electronic, photocopying, recording or otherwise) without prior consent of Informatica Corporation. This Software may be protected by U.S. and/or international Patents and other Patents Pending.
Use, duplication, or disclosure of the Software by the U.S. Government is subject to the restrictions set forth in the applicable software license agreement and as provided in DFARS 227.7202-1(a) and 227.7702-3(a) (1995), DFARS 252.227-7013(c)(1)(ii) (OCT 1988), FAR 12.212(a) (1995), FAR 52.227-19, or FAR 52.227-14 (ALT III), as applicable.
The information in this product or documentation is subject to change without notice. If you find any problems in this product or documentation, please report them to us in writing.
Informatica, Informatica Platform, Informatica Data Services, PowerCenter, PowerCenterRT, PowerCenter Connect, PowerCenter Data Analyzer, PowerExchange, PowerMart, Metadata Manager, Informatica Data Quality, Informatica Data Explorer, Informatica B2B Data Transformation, Informatica B2B Data Exchange Informatica On Demand, Informatica Identity Resolution, Informatica Application Information Lifecycle Management, Informatica Complex Event Processing, Ultra Messaging and Informatica Master Data Management are trademarks or registered trademarks of Informatica Corporation in the United States and in jurisdictions throughout the world. All other company and product names may be trade names or trademarks of their respective owners.
Portions of this software and/or documentation are subject to copyright held by third parties, including without limitation: Copyright DataDirect Technologies. All rights reserved. Copyright (c) Sun Microsystems. All rights reserved. Copyright (c) RSA Security Inc. All Rights Reserved. Copyright (c) Ordinal Technology Corp. All rights reserved.Copyright (c) Aandacht c.v. All rights reserved. Copyright Genivia, Inc. All rights reserved. Copyright Isomorphic Software. All rights reserved. Copyright (c) Meta Integration Technology, Inc. All rights reserved. Copyright (c) Intalio. All rights reserved. Copyright (c) Oracle. All rights reserved. Copyright (c) Adobe Systems Incorporated. All rights reserved. Copyright (c) DataArt, Inc. All rights reserved. Copyright (c) ComponentSource. All rights reserved. Copyright (c) Microsoft Corporation. All rights reserved. Copyright (c) Rogue Wave Software, Inc. All rights reserved. Copyright (c) Teradata Corporation. All rights reserved. Copyright (c) Yahoo! Inc. All rights reserved. Copyright (c) Glyph & Cog, LLC. All rights reserved. Copyright (c) Thinkmap, Inc. All rights reserved. Copyright (c) Clearpace Software Limited. All rights reserved. Copyright (c) Information Builders, Inc. All rights reserved. Copyright (c) OSS Nokalva, Inc. All rights reserved. Copyright Edifecs, Inc. All rights reserved. Copyright Cleo Communications, Inc. All rights reserved. Copyright (c) International Organization for Standardization 1986. All rights reserved. Copyright (c) ej-technologies GmbH. All rights reserved. Copyright (c) Jaspersoft Corporation. All rights reserved. Copyright (c) is International Business Machines Corporation. All rights reserved. Copyright (c) yWorks GmbH. All rights reserved. Copyright (c) Lucent Technologies. All rights reserved. Copyright (c) University of Toronto. All rights reserved. Copyright (c) Daniel Veillard. All rights reserved. Copyright (c) Unicode, Inc. Copyright IBM Corp. All rights reserved. Copyright (c) MicroQuill Software Publishing, Inc. All rights reserved. Copyright (c) PassMark Software Pty Ltd. All rights reserved. Copyright (c) LogiXML, Inc. All rights reserved. Copyright (c) 2003-2010 Lorenzi Davide, All rights reserved. Copyright (c) Red Hat, Inc. All rights reserved. Copyright (c) The Board of Trustees of the Leland Stanford Junior University. All rights reserved. Copyright (c) EMC Corporation. All rights reserved. Copyright (c) Flexera Software. All rights reserved. Copyright (c) Jinfonet Software. All rights reserved. Copyright (c) Apple Inc. All rights reserved. Copyright (c) Telerik Inc. All rights reserved.
This product includes software developed by the Apache Software Foundation (http://www.apache.org/), and/or other software which is licensed under various versions of the Apache License (the "License"). You may obtain a copy of these Licenses at http://www.apache.org/licenses/. Unless required by applicable law or agreed to in writing, software distributed under these Licenses is distributed on an "AS IS" BASIS, WITHOUT WARRANTIES OR CONDITIONS OF ANY KIND, either express or implied. See the Licenses for the specific language governing permissions and limitations under the Licenses.
This product includes software which was developed by Mozilla (http://www.mozilla.org/), software copyright The JBoss Group, LLC, all rights reserved; software copyright (c) 1999-2006 by Bruno Lowagie and Paulo Soares and other software which is licensed under various versions of the GNU Lesser General Public License Agreement, which may be found at http:// www.gnu.org/licenses/lgpl.html. The materials are provided free of charge by Informatica, "as-is", without warranty of any kind, either express or implied, including but not limited to the implied warranties of merchantability and fitness for a particular purpose.
The product includes ACE(TM) and TAO(TM) software copyrighted by Douglas C. Schmidt and his research group at Washington University, University of California, Irvine, and Vanderbilt University, Copyright (c) 1993-2006, all rights reserved.
This product includes software developed by the OpenSSL Project for use in the OpenSSL Toolkit (copyright The OpenSSL Project. All Rights Reserved) and redistribution of this software is subject to terms available at http://www.openssl.org and http://www.openssl.org/source/license.html.
This product includes Curl software which is Copyright 1996-2007, Daniel Stenberg, <daniel@haxx.se>. All Rights Reserved. Permissions and limitations regarding this software are subject to terms available at http://curl.haxx.se/docs/copyright.html. Permission to use, copy, modify, and distribute this software for any purpose with or without fee is hereby granted, provided that the above copyright notice and this permission notice appear in all copies.
The product includes software copyright 2001-2005 (c) MetaStuff, Ltd. All Rights Reserved. Permissions and limitations regarding this software are subject to terms available at http://www.dom4j.org/ license.html.
The product includes software copyright (c) 2004-2007, The Dojo Foundation. All Rights Reserved. Permissions and limitations regarding this software are subject to terms available at http://dojotoolkit.org/license.
This product includes ICU software which is copyright International Business Machines Corporation and others. All rights reserved. Permissions and limitations regarding this software are subject to terms available at http://source.icu-project.org/repos/icu/icu/trunk/license.html.
This product includes software copyright (c) 1996-2006 Per Bothner. All rights reserved. Your right to use such materials is set forth in the license which may be found at http:// www.gnu.org/software/ kawa/Software-License.html.
This product includes OSSP UUID software which is Copyright (c) 2002 Ralf S. Engelschall, Copyright (c) 2002 The OSSP Project Copyright (c) 2002 Cable & Wireless Deutschland. Permissions and limitations regarding this software are subject to terms available at http://www.opensource.org/licenses/mit-license.php.
This product includes software developed by Boost (http://www.boost.org/) or under the Boost software license. Permissions and limitations regarding this software are subject to terms available at http:/ /www.boost.org/LICENSE_1_0.txt.
This product includes software copyright (c) 1997-2007 University of Cambridge. Permissions and limitations regarding this software are subject to terms available at http:// www.pcre.org/license.txt.
This product includes software copyright (c) 2007 The Eclipse Foundation. All Rights Reserved. Permissions and limitations regarding this software are subject to terms available at http:// www.eclipse.org/org/documents/epl-v10.php.
This product includes software licensed under the terms at http://www.tcl.tk/software/tcltk/license.html, http://www.bosrup.com/web/overlib/?License, http://www.stlport.org/doc/ license.html, http:// asm.ow2.org/license.html, http://www.cryptix.org/LICENSE.TXT, http://hsqldb.org/web/hsqlLicense.html, http://httpunit.sourceforge.net/doc/ license.html, http://jung.sourceforge.net/license.txt , http://www.gzip.org/zlib/zlib_license.html, http://www.openldap.org/software/release/license.html, http://www.libssh2.org, http://slf4j.org/license.html, http://www.sente.ch/software/OpenSourceLicense.html, http://fusesource.com/downloads/license-agreements/fuse-message-broker-v-5-3- license-agreement; http://antlr.org/license.html; http://aopalliance.sourceforge.net/; http://www.bouncycastle.org/licence.html; http://www.jgraph.com/jgraphdownload.html; http://www.jcraft.com/jsch/LICENSE.txt; http://jotm.objectweb.org/bsd_license.html; . http://www.w3.org/Consortium/Legal/2002/copyright-software-20021231; http://www.slf4j.org/license.html; http://nanoxml.sourceforge.net/orig/copyright.html; http://www.json.org/license.html; http://forge.ow2.org/projects/javaservice/, http://www.postgresql.org/about/licence.html, http://www.sqlite.org/copyright.html, http://www.tcl.tk/software/tcltk/license.html, http://www.jaxen.org/faq.html, http://www.jdom.org/docs/faq.html, http://www.slf4j.org/license.html; http://www.iodbc.org/dataspace/iodbc/wiki/iODBC/License; http://www.keplerproject.org/md5/license.html; http://www.toedter.com/en/jcalendar/license.html; http://www.edankert.com/bounce/index.html; http://www.net-snmp.org/about/license.html; http://www.openmdx.org/#FAQ; http://www.php.net/license/3_01.txt; http://srp.stanford.edu/license.txt; http://www.schneier.com/blowfish.html; http://www.jmock.org/license.html; http://xsom.java.net; and http://benalman.com/about/license/; https://github.com/CreateJS/EaselJS/blob/master/src/easeljs/display/Bitmap.js; http://www.h2database.com/html/license.html#summary; and http://jsoncpp.sourceforge.net/LICENSE.
This product includes software licensed under the Academic Free License http://www.opensource.org/licenses/afl-3.0.php), the Common Development and Distribution License (http://www.opensource.org/licenses/cddl1.php) the Common Public License (http://www.opensource.org/licenses/cpl1.0.php), the Sun Binary Code License Agreement Supplemental License Terms, the BSD License (http:// www.opensource.org/licenses/bsd-license.php) the MIT License (http://www.opensource.org/licenses/mit-license.php) and the Artistic License (http://www.opensource.org/licenses/artistic-license-1.0).
This product includes software copyright (c) 2003-2006 Joe WaInes, 2006-2007 XStream Committers. All rights reserved. Permissions and limitations regarding this software are subject to terms available at http://xstream.codehaus.org/license.html. This product includes software developed by the Indiana University Extreme! Lab. For further information please visit http://www.extreme.indiana.edu/.
This Software is protected by U.S. Patent Numbers 5,794,246; 6,014,670; 6,016,501; 6,029,178; 6,032,158; 6,035,307; 6,044,374; 6,092,086; 6,208,990; 6,339,775; 6,640,226; 6,789,096; 6,820,077; 6,823,373; 6,850,947; 6,895,471; 7,117,215; 7,162,643; 7,243,110, 7,254,590; 7,281,001; 7,421,458; 7,496,588; 7,523,121; 7,584,422; 7676516; 7,720,842; 7,721,270; and 7,774,791, international Patents and other Patents Pending.
DISCLAIMER: Informatica Corporation provides this documentation "as is" without warranty of any kind, either express or implied, including, but not limited to, the implied warranties of noninfringement, merchantability, or use for a particular purpose. Informatica Corporation does not warrant that this software or documentation is error free. The information provided in this software or documentation may include technical inaccuracies or typographical errors. The information in this software and documentation is subject to change at any time without notice.
NOTICES
This Informatica product (the "Software") includes certain drivers (the "DataDirect Drivers") from DataDirect Technologies, an operating company of Progress Software Corporation ("DataDirect") which are subject to the following terms and conditions:
1. THE DATADIRECT DRIVERS ARE PROVIDED "AS IS" WITHOUT WARRANTY OF ANY KIND, EITHER EXPRESSED OR IMPLIED, INCLUDING BUT NOT LIMITED TO, THE IMPLIED WARRANTIES OF MERCHANTABILITY, FITNESS FOR A PARTICULAR PURPOSE AND NON-INFRINGEMENT.
2. IN NO EVENT WILL DATADIRECT OR ITS THIRD PARTY SUPPLIERS BE LIABLE TO THE END-USER CUSTOMER FOR ANY DIRECT, INDIRECT, INCIDENTAL, SPECIAL, CONSEQUENTIAL OR OTHER DAMAGES ARISING OUT OF THE USE OF THE ODBC DRIVERS, WHETHER OR NOT INFORMED OF THE POSSIBILITIES OF DAMAGES IN ADVANCE. THESE LIMITATIONS APPLY TO ALL CAUSES OF ACTION, INCLUDING, WITHOUT LIMITATION, BREACH OF CONTRACT, BREACH OF WARRANTY, NEGLIGENCE, STRICT LIABILITY, MISREPRESENTATION AND OTHER TORTS.
- Table of Contents
- 1. Introduction
- 2. Fundamental Concepts
- 3. UM Objects
- 4. Architecture
- 5. UMS Features
- 6. Monitoring UMS
- 7. Manpage for lbmrd
This document introduces important fundamental design concepts behind Ultra Messaging® high performance message streaming. Understanding these concepts is important to software developers designing and writing application code that uses the Ultra Messaging Application Programming Interface (API). For information about Parallel Persistence® and queuing, see The Ultra Messaging Guide for Persistence and Queuing.
1. Introduction
Ultra Messaging comprises a software layer, supplied in the form of a dynamic library (shared object), plus a daemon that implements persistence and queuing capabilities. These components provide applications with message delivery functionality that adds considerable value to the basic networking services contained in the host operating system. Applications access Ultra Messaging features through the Ultra Messaging Application Programming Interface (API).
There are actually four APIs: the UM C API, the UM Java API, the UM .NET API and the JMS API . These APIs are very similar, and for the most part this document concentrates on the C API. The translation from C functions to Java or .NET methods should be reasonably straightforward; see the UM Quick Start Guide for sample applications in Java and .NET.
The three most important design goals of Ultra Messaging are to minimize message latency (the time that a given message spends "in transit"), maximize throughput, and insure delivery of all messages under a wide variety of operational and failure scenarios. Ultra Messaging achieves these goals by not duplicating services provided by the underlying network whenever possible. Instead of implementing special messaging servers and daemons to receive and re-transmit messages, Ultra Messaging routes messages primarily with the network infrastructure at wire speed. Placing little or nothing in between the sender and receiver is an important and unique design principle of Ultra Messaging.
2. Fundamental Concepts
A UM application can function either as a source or a receiver. A source application sends messages, and a receiver application receives them. (It is also common for an application to function as both source and receiver; we separate the concepts for organizational purposes.)
This section discusses the following concepts.
2.1. Topic Structure and Management
UM offers the Publish/Subscribe model for messaging ("Pub/Sub"), whereby one or more receiver programs express interest in a topic, and one or more source programs send to that topic. So, a topic can be thought of as a data stream that can have multiple producers and multiple consumers. One of the functions of the messaging layer is to make sure that all messages sent to a given topic are distributed to all receivers listening to that topic. UM does this through an automatic process known as topic resolution.
A topic is just an arbitrary string. For example:
| Deals |
| Market/US/DJIA/Sym1 |
It is not unusual for an application system to have many thousands of topics, perhaps even more than a million, with each one carrying a very specific range of information (e.g. quotes for a single stock symbol).
It is also possible to configure receiving programs to match multiple topics using wildcards. UM uses powerful regular expression pattern matching to allow applications to match topics in a very flexible way. At the present time, messages cannot be sent to wildcarded topic names. See Wildcard Receiver.
2.2. Persistence
UMP - which contains the Ultra Messaging Streaming Edition (UMS) functionality - includes a component known as the persistent store, which provides stable storage (disk or memory) of message streams. UMP delivers a persisted message stream to receiving applications with no additional latency in the vast majority of cases. This offers the functionality of durable subscriptions and confirmed message delivery. Ultra Messaging streaming applications build and run with the UMP persistence feature without modification. See The Ultra Messaging Guide for Persistence and Queuing for more information.
2.3. Queuing
UMQ - which contains both the Ultra Messaging Streaming Edition (UMS) functionality and the Ultra Messaging Persistence Edition (UMP) functionality - includes message queuing capabilities that allows sources to submit messages asynchronously to a queue and permits receivers to retrieve messages from a queue in an entirely different asynchronous manner. UMQ also supports Once and Only Once (OAOO) delivery and Application Sets that allow you to load balance processing or support multiple processing purposes for single topics. See The Ultra Messaging Guide for Persistence and Queuing for more information.
2.4. Late Join
In many applications, a new receiver may be interested in messages that were sent before it existed. UM provides a late join feature that allows a new receiver to join a group of others already listening to a source. Without the late join feature, the joining receiver would only receive messages sent after the time it joined. With late join, the source stores sent messages according to its Late Join configuration options so a joining receiver can receive any of these messages that were sent before it joined the group. See Using Late Join.
2.5. Request/Response
UM also offers a Request/Response messaging model. A sending application (the requester) sends a message to a topic. Every receiving application listening to that topic gets a copy of the request. One or more of those receiving applications (responder) can then send one or more responses back to the original requester. UM sends the request message via the normal pub/sub method, whereas UM delivers the response message directly to the requester.
An important aspect of UM's Request/Response model is that it allows the application to keep track of which request corresponds to a given response. Due to the asynchronous nature of UM requests, any number of requests can be outstanding, and as the responses come in, they can be matched to their corresponding requests.
Request/Response can be used in many ways and is often used during the initialization of UM receiver objects. When an application starts a receiver, it can issue a request on the topic the receiver is interested in. Source objects for the topic can respond and begin publishing data. This method prevents the UM source objects from publishing to a topic without subscribers.
Be careful not to be confused with the sending/receiving terminology. Any application can send a request, including one that creates and manages UM receiver objects. And any application can receive and respond to a request, including one that creates and manages UM source objects.
2.6. Transports
A source application uses an UMS transport to send messages to a receiver application. A UM transport is built on top of a standard IP protocol. The different UM transport types have different tradeoffs in terms of latency, scalability, throughput, bandwidth sharing, and flexibility. The sending application chooses the transport type that is most appropriate for the data being sent, at the topic level. A programmer might choose different transport types for different topics within the same application.
A UM sending application can make use of very many topics (over a million). UM maps those topics onto a much smaller number of transport sessions. A transport session can be thought of as a specific instance of a transport type. A given transport session might carry a single topic, or might carry hundreds of thousands of topics. A receiving application may express interest in a small set of those topics, in which case UM will join the transport session, receiving messages for all topics carried on that transport session. UM will then discard any messages for topics that the application is not interested in. This user-space filtering does consume system resources (primarily CPU and bandwidth), and can be minimized by carefully mapping topics onto transport sessions according to receiving application interest.
Note: Non-multicast UM transport types can also use source-side filtering to decrease user-space filtering on the receiving side by doing the filtering on the sending side. However, while this might sound attractive at first glance, be aware that system resources consumed on the source side affect all receivers, and that the filtering for multiple receivers must be done serially, whereas letting the receivers do the filtering allows that filtering to be done in parallel, only affecting those receivers that need the filtering.
See Transport Objects.
2.6.1. Multi-Transport Threads
Part of UM's design is a single threaded model for message data delivery which reduces latency in the receiving CPU. UM, however, also has the ability to distribute data delivery across multiple CPUs by using a receiving thread pool. Receivers created with the configuration option, use_transport_thread set to 1 use a thread from the thread pool instead of the context thread. The option, receive_thread_pool_size controls the pool size.
As receivers discover new sources through Topic Resolution, UM assigns the network sockets created for the receivers to receive data to either the context thread (default) or to a thread from the pool if use_transport_thread is set for the receiver. It is important to understand that thread assignment occurs at the socket level - not the transport level. Transports aggregated on to the same network socket use the same thread.
UM distributes data from different sockets to different threads allowing better process distribution and higher aggregate throughput. Distributing transports across threads also ensures that activity on each transport has no impact on transports assigned to other threads leading to lower latencies in some traffic patterns, e.g. heavy loss conditions.
The following lists restrictions to using multi-transport threads.
Only LBT-RM, LBT-RU, TCP and TCP-LB transport types may be distributed to threads.
Multi-Transport threads are not supported under sequential mode.
UM processes sources using the same transport socket, e.g. multicast address and port, on the same thread (regardless of the use_transport_thread setting. To leverage threading of different sources, assign each source to a different transport destination, e.g. multicast address/port.
Hot failover sources using LBT-RM on the same topic must not be distributed across threads because they must share the same multicast address and port.
Hot failover sources using other transport types may not be distributed across threads and must use the context thread.
Each transport thread has its own Unicast Listener (request) port. Ultra Messaging recommends that you expand the range request_tcp_port_low - request_tcp_port_high to a larger range when using transport threads. When late join is occurring, UM creates a TCP connection from the transport thread to the source.
Multi-transport threads are not recommended for use over the UM Gateway.
Multi-Transport Threads do not support persistent stores (UMP) or persistent receivers
Multi-Transport Threads do not support queues (UMQ) or queing receivers.
Multi-Transport Threads are not compatible with UMDS Server or UMCache
2.7. Event Delivery
There are many different events that UM may want to deliver to the application. Many events carry data with them (e.g. received messages); some do not (e.g. end-of-stream events). Some examples of UM events:
A received message on a topic that the application has expressed interest in.
A timer expiring. Applications can schedule timers to expire in a desired number of milliseconds (although the OS may not deliver them with millisecond precision).
An application-managed file descriptor event. The application can register its own file descriptors with UM to be monitored for state changes (readable, writable, error, etc).
New source notification. UM can inform the application when sources are discovered by topic resolution.
Receiver loss. UM can inform the application when a data gap is detected that could not be recovered through the normal retransmission mechanism.
End of Stream. UM can inform a receiving application when a data stream (transport session) has terminated.
UM delivers events to the application by
callbacks. The application explicitly gives
UM a pointer to one of its functions to be the handler for a
particular event, and UM calls that function to deliver the event,
passing it the parameters that the application requires to process the
event. In particular, the last parameter of each callback type is a
client data pointer (clientdp).
This pointer can be used at the application's discretion for any purpose.
It's value is specified by the application when the callback function is
identified to UM (typically when UM objects are created), and
that same value is passed back to the application when the callback
function is called.
There are two methods that UM can use to call the application callbacks: through context thread callback, or event queue dispatch.
In the context thread callback method (sometimes called direct callback), the UM context thread calls the application function directly. This offers the lowest latency, but imposes significant restrictions on the application function. See Event Queue Object.
The event queue dispatch of application callback introduces a dynamic buffer into which the UM context thread writes events. The application then uses a thread of its own to dispatch the buffered events. Thus, the application callback functions are called from the application thread, not directly from the context thread.
With event queue dispatching, the use of the application thread to make the callback allows the application function to make full, unrestricted use of the UM API. It also allows parallel execution of UM processing and application processing, which can significantly improve throughput on multi-processor hardware. The dynamic buffering provides resilience between the rate of event generation and the rate of event consumption (e.g. message arrival rate v.s. message processing rate).
In addition, an UM event queue allows the application to be warned when the queue exceeds a threshold of event count or event latency. This allows the application to take corrective action if it is running too slow, such as throwing away all events older than a threshold, or all events that are below a given priority.
2.8. Rate Controls
For UDP-based transports (LBT-RU and LBT-RM), UM network stability is insured through the use of rate controls. Without rate controls, sources can send UDP data so fast that the network can be flooded. Using rate controls, the source's bandwidth usage is limited. If the source attempts to exceed its bandwidth allocation, it is slowed down.
2.9. Operational Statistics
UM maintains a variety of transport-level statistics which gives a real-time snapshot of UM's internal handling. For example, it gives counts for transport messages transferred, bytes transferred, retransmissions requested, unrecoverable loss, etc.
The UM monitoring API provides framework to allow the convenient gathering and transmission of UM statistics to a central monitoring point. See Monitoring UMS.
3. UM Objects
Many UM documents use the term object. Be aware that with the C API, they do not refer to formal objects as supported by C++ (i.e. class instances). The term is used here in an informal sense to denote an entity that can be created, used, and (usually) deleted, has functionality and data associated with it, and is managed through the API. The handle that is used to refer to an object is usually implemented as a pointer to a data structure (defined in lbm.h), but the internal structure of an object is said to be opaque, meaning that application code should not read or write the structure directly.
However, the UM Java JNI and C# .NET APIs are object oriented, with formal Java/C# objects. See the Java documentation and .NET documentation for more information.
This section discusses the following objects.
3.1. Context Object
A UM context object conceptually is an environment in which UM runs. An application creates a context, typically during initialization, and uses it for most other UM operations. In the process of creating the context, UM normally starts an independent thread (the context thread) to do the necessary background processing such as the following.
Topic resolution
Enforce rate controls for sending messages
Manage timers
Manage state
Implement UM protocols
Manage transport sessions
You create a context with lbm_context_create().
Your application can give a context a name with lbm_context_set_name().
Context names are optional but should be unique. UM does not enforce uniqueness, rather issues a log warning
if it encounters duplicate context names. Each context maintains a cache of other contexts it learns
about through context advertisements, which UM sends according to
resolver_context_advertisement_interval.
Context advertisement contains the context's name (if assigned), IP address, request port
(
request_tcp_port)
and a Context Instance ID - an internal value assigned by UM.
If a context needs to know about a context that is not in its cache, it sends a context query, which the
"unknown" context replies to with a context advertisement. This mechanism for naming and
advertising UM contexts facilitates UM Gateway operation
especially for UMP
.
One of the more important functions of a context is to hold configuration information that is of context scope. See the UM Configuration Guide for options that are of context scope.
Most UM applications create a single context. However, there are some specialized circumstances where an application would create multiple contexts. For example, with appropriate configuration options, two contexts can provide separate topic name spaces. Also, multiple contexts can be used to portion available bandwidth across topic sub-spaces (in effect allocating more bandwidth to high-priority topics).
Warning Regardless of the number of contexts created by your application, a good practice is to keep them open throughout the life of your application. Do not close them until you close the application.
3.2. Topic Object
A UM topic object is conceptually very simple; it is little more than a string (the topic name). However, UM uses the topic object to hold a variety of state information used by UM for internal processing. It is conceptually contained within a context. Topic objects must be bound to source or receiver objects.
A data source creates a topic by calling
lbm_src_topic_alloc().
A data receiver doesn't explicitly create topic objects;
UM does that as topics are discovered and cached.
Instead, the receiving application calls
lbm_rcv_topic_lookup() to find the topic object.
Unlike other objects, the topic object is not created or deleted by the
application. UM creates, manages and deletes them internally as needed.
However, the application does use them, so the API has functions
that give the application access to them when needed
(lbm_src_topic_alloc() and
lbm_rcv_topic_lookup()).
3.3. Source Object
A UM source object is used to send messages to the topic that it is bound to. It is conceptually contained within a context.
You create a source object by calling
lbm_src_create().
One of its parameters is a topic object that must have been
previously allocated. A source object can be bound to only one topic.
(A topic object, however, can be bound to many sources provided the sources exist
in separate contexts.)
3.3.1. Message Properties Object
The message properties object allows your application to insert named, typed metadata in topic messages, and to implement functionality that depends on the message properties. UM allows eight property types: boolean, byte, short, int, long, float, double, and string.
To use message properties, create a message properties object with
lbm_msg_properties_create().
Then send topic messages with lbm_src_send_ex() (or
LBMSource.send() in the
Java API or
.NET API) passing the message
properties object through lbm_src_send_ex_info_t
object. Set the LBM_SRC_SEND_EX_FLAG_PROPERTIES flag on the
lbm_src_send_ex_info_t object to indicate that it includes properties.
Upon a receipt of a message with properties, your application can access the properties directly through the messages properties field, which is null if no properties are present. You can retrieve individual property values directly by name, or you can iterate over the collection of properties to determine which properties are present at runtime.
The UM message property object supports the standard JMS message properties specification.
Note: The Message Properties Object does not support receivers using the arrival order without reassembly setting (option value = 0) of ordered_delivery.
3.3.1.1. Message Properties Performance Considerations
UM sends property names on the wire with every message. To reduce bandwidth requirements, minimize the length and number of properties.
When coding sources, consider the following sequence of guidelines:
Allocate a data structure to store message properties objects. This can be a thread-local structure if you use a relatively small number of threads, or a thread-safe pool of objects.
Before sending, retrieve a message properties object from the pool. If an object is not available, create a new object.
Set properties for the message.
Send the message using the appropriate API call, passing in the properties object.
After the send completes, clear the message properties object and return it to the pool.
When coding receivers in Java or .NET, call Dispose() on messages before returning from the application callback. This allows UM to internally recycle objects, and limits object allocation.
3.3.2. Source Configuration and Transport Sessions
As with contexts, a source holds configuration information that is of source scope. This includes network options, operational options and reliability options for LBT-RU and LBT-RM. For example, each source can use a different transport and would therefore configure a different network address to which to send topic messages. See the UM Configuration Guide for source configuration options.
As stated in Transports, many topics (and therefore sources) can be mapped to a single transport. Many of the configuration options for sources actually control or influence transport session activity. If many sources are sending topic messages over a single transport session (TCP, LBT-RU or LBT-RM), UM only uses the configuration options for the first source assigned to the transport.
For example, if the first source to use a LBT-RM transport session sets the transport_lbtrm_transmission_window_size to 24 MB and the second source sets the same option to 2 MB, UMS assigns 24 MB to the transport session's transport_lbtrm_transmission_window_size.
The UM Configuration Guide identifies the source configuration options that may be ignored when UM assigns the source to an existing transport session. Log file warnings also appear when UM ignores source configuration options.
3.3.3. Zero Object Delivery (Source)
The Zero Object Delivery (ZOD) feature for Java and .NET lets sources deliver events to an application with no per-event object creation. (ZOD can also be utilized with context source events.) See Zero Object Delivery (ZOD) for information on how to employ ZOD.
3.4. Receiver Object
A UM receiver object is used to receive messages from the topic that it is bound to. It is conceptually contained within a context. Messages are delivered to the application by an application callback function, specified when the receiver object is created.
You create a receiver object by calling
lbm_rcv_create().
One of its parameters is a topic object that must have been
previously looked up. A receiver object can be bound to only one topic.
Multiple receiver objects can be created for the same topic.
3.4.1. Receiver Configuration and Transport Sessions
A receiver holds configuration information that is of receiver scope. This includes network options, operational options and reliability options for LBT-RU and LBT-RM. See the UM Configuration Guide for receiver configuration options.
As stated above in Source Configuration and Transport Sessions, many topics (and therefore receivers) can be mapped to a single transport. As with source configuration options, many receiver configuration options control or influence transport session activity. If many receivers are receiving topic messages over a single transport session (TCP, LBT-RU or LBT-RM), UM only uses the configuration options for the first receiver assigned to the transport.
For example, if the first receiver to use a LBT-RM transport session sets the transport_lbtrm_nak_generation_interval to 10 seconds and the second receiver sets the same option to 2 seconds, UMS assigns 10 seconds to the transport session's transport_lbtrm_nak_generation_interval.
The UM Configuration Guide identifies the receiver configuration options that may be ignored when UM assigns the receiver to an existing transport session. Log file warnings also appear when UM ignores receiver configuration options.
3.4.2. Wildcard Receiver
A wildcard receiver object is created by calling
lbm_wildcard_rcv_create().
Instead of a topic object, the caller supplies a pattern which is used by
UM to match multiple topics.
Since the application doesn't explicitly lookup the topics, the topic
attribute is passed into lbm_wildcard_rcv_create()
so that options can be set.
Also, wildcarding has its own set of options (e.g. pattern type).
The pattern supplied for wildcard matching is normally a general regular
expression.
There are two types of supported regular expressions that differ somewhat
in the syntax of the patterns
(see the wildcard_receiver pattern_type option in
the UM Configuration Guide).
Those types are:
PCRE- (recommended) the same form of regular expressions recognized by Perl; see http://perldoc.perl.org/perlrequick.html for details, orregex- POSIX extended regular expressions; see http://www.freebsd.org/cgi/man.cgi?query=re_format§ion=7 for details. Note thatregexis not supported on all platforms.
A third type of wildcarding is appcb, in
which the application defines its own algorithm to select topic names.
When appcb is configured, the
pattern parameter of
lbm_wildcard_rcv_create() is ignored.
Instead, an application callback function is configured
(see the wildcard_receiver pattern_callback option in
the UM Configuration Guide).
UM then calls that application function with a topic name and
the function can use whatever method is appropriate to decide if the
topic should be included with the receiver.
Be aware that some platforms may not support all of the
regular expression wildcard types.
For example, UM does not support the use of Unicode PCRE characters in
wildcard receiver patterns on any system that communicates with a HP-UX or AIX system.
See the
UM Knowledgebase article,
Platform-Specific Dependencies
for details.
Also note that if UM topic resolution is configured to turn off
source advertisements, then wildcard receivers must
be configured for PCRE.
The other wildcard types do not support receiver queries for topic
resolution.
For an example of wildcard usage, see lbmwrcv.c
Users of TIBCO® SmartSockets™ will want to look at the UM Knowledgebase article, Wildcard Topic Regular Expressions.
3.4.3. Zero Object Delivery (ZOD)
The Zero Object Delivery (ZOD) feature for Java and .NET lets receivers (and sources) deliver messages and events to an application with no per-message or per-event object creation. This facilitates source/receiver applications that would require little to no garbage collection at runtime, producing lower and more consistent message latencies.
To take advantage of this feature, you must call dispose() on a message to mark it as
available for reuse. To access data from the message when using ZOD, you use a specific pair of
LBMMessage-class methods (see below) to extract message data directly from the message, rather than the
standard data() method. Using the latter method creates a byte array, and consequently, an
object. It is the subsequent garbage collecting to recycle those objects that can affect performance.
For using ZOD, the LBMMessage class methods are:
Java:
dispose(),dataBuffer(), anddataLength().NET:
dispose(),dataPointer(), andlength()
On the other hand, you may need to keep the message as an object for further use after callback. In this case,
ZOD is not appropriate and you must call promote() on the message, and also you can use
data() to extract
message data.
For more details see the Java API Overview or the .Net LBMMessage Class description. This feature does not apply to the C API.
3.5. Event Queue Object
A UM event queue object is conceptually a managed data and control buffer. UM delivers events (including received messages) to your application by means of application callback functions. Without event queues, these callback functions are called from the UM context thread, which places the following restrictions on the application function being called:
The application function is not allowed to make certain API calls (mostly having to do with creating or deleting UM objects).
The application function must execute very quickly without blocking.
The application does not have control over when the callback executes. It can't prevent callbacks during critical sections of application code.
Some circumstances require the use of UM event queues. As mentioned above, if the receive callback needs to use UM functions that create or delete objects. Or if the receive callback performs operations that potentially block. You may also want to use an event queue if the receive callback is CPU intensive and can make good use of multiple CPU hardware. Not using an event queue provides the lowest latency, however, high message rates or extensive message processing can negate the low latency benefit if the context thread continually blocks.
Of course, your application can create its own queues, which can be bounded, blocking queues or unbounded, non-blocking queues. For transports that are flow-controlled, a bounded, blocking application queue preserves flow control in your messaging layer because the effect of a filled or blocked queue extends through the message path all the way to source. The speed of the application queue becomes the speed of the source.
UM event queues are unbounded, non-blocking queues and provide the following unique features.
Your application can set a queue size threshold with queue_size_warning and be warned when the queue contains too many messages.
Your application can set a delay threshold with queue_delay_warning and be warned when events have been in the queue for too long.
The application callback function has no UM API restrictions.
Your application can control exactly when UM delivers queued events with
lbm_event_dispatch(). And you can have control return to your application either when specifically asked to do so (by callinglbm_event_dispatch_unblock()), or optionally when there are no events left to deliver.Your application can take advantage of parallel processing on multiple processor hardware since UM processes asynchronously on a separate thread from your application's processing of received messages. By using multiple application threads to dispatch an event queue, or by using multiple event queues, each with its own dispatch thread, your application can further increase parallelism.
You create an UM event queue in
the C API by calling
lbm_event_queue_create().
In the Java API and the
.NET API, use the
LBMEventQueue class.
An event queue object also holds configuration information that is of
event queue scope.
See Event Queue Options.
3.6. Transport Objects
This section discusses the following topics.
3.6.1. Transport TCP
The TCP UMS transport uses normal TCP connections to send messages from sources to receivers. This is the default transport when it's not explicitly set. TCP is a good choice when:
Flow control is desired. I.e. when one or more receivers cannot keep up, it is desired to slow down the source. This is a "better late than never" philosophy.
Equal bandwidth sharing with other TCP traffic is desired. I.e. when it is desired that the source slow down when general network traffic becomes heavy.
There are few receivers listening to each topic. Multiple receivers for a topic requires multiple transmissions of each message, which places a scaling burden on the source machine and the network.
The application is not sensitive to latency. Use of TCP as a messaging transport can result in unbounded latency.
The messages must pass through a restrictive firewall which does not pass multicast traffic.
Note: TCP transports may be distributed to receiving threads. See Multi-Transport Threads for more information.
3.6.2. Transport TCP-LB
The TCP-LB UMS transport is a variation on the TCP transport which adds latency-bounded behavior. The source is not flow-controlled as a result of network congestion or slow receivers. So, for applications that require a "better never than late" philosophy, TCP-LB can be a better choice.
However, latency cannot be controlled as tightly as with UDP-based transports (see below). In particular, latency can still be introduced because TCP-LB shares bandwidth equally with other TCP traffic. It also has the same scaling issues as TCP when multiple receivers are present for each topic.
Note: TCP-LB transports may be distributed to receiving threads. See Multi-Transport Threads for more information.
3.6.3. Transport LBT-RU
The LBT-RU UMS transport adds reliable delivery to unicast UDP to send messages from sources to receivers. This provides greater flexibility in the control of latency. For example, the application can further limit latency by allowing the use of arrival order delivery. See the UM Knowledgebase FAQ, Why can't I have low-latency delivery and in-order delivery?. Also, LBT-RU is less sensitive to overall network load; it uses source rate controls to limit its maximum send rate.
Since it is based on unicast addressing, LBT-RU can pass through most firewalls. However, it has the same scaling issues as TCP when multiple receivers are present for each topic.
Note: LBT-RU can use Datagram Bypass Layer (DBL) acceleration in conjunction with DBL-enabled Myricom® 10-Gigabit Ethernet NICs for Linux and Microsoft® Windows®. DBL is a kernel-bypass technology that accelerates sending and receiving UDP traffic. See Transport Acceleration Options for more information.
Note: LBT-RU transports may be distributed to receiving threads. See Multi-Transport Threads for more information.
3.6.4. Transport LBT-RM
The LBT-RM UMS transport adds reliable multicast to UDP to send messages. This provides the maximum flexibility in the control of latency. In addition, LBT-RM can scale effectively to large numbers of receivers per topic using network hardware to duplicate messages only when necessary at wire speed. One limitation is that multicast is often blocked by firewalls.
LBT-RM is a UDP-based, reliable multicast protocol designed with the use of UM and its target applications specifically in mind. The protocol is very similar to PGM, but with changes to aid low latency messaging applications.
Topic Mapping - Several topics may map onto the same LBT-RM session. Thus a multiplexing mechanism to LBT-RM is used to distinguish topic level concerns from LBT-RM session level concerns (such as retransmissions, etc.). Each message to a topic is given a sequence number in addition to the sequence number used at the LBT-RM session level for packet retransmission.
Negative Acknowledgments (NAKs) - LBT-RM uses NAKs as PGM does. NAKs are unicast to the sender. For simplicity, LBT-RM uses a similar NAK state management approach as PGM specifies.
Time Bounded Recovery - LBT-RM allows receivers to specify a a maximum time to wait for a lost piece of data to be retransmitted. This allows a recovery time bound to be placed on data that has a definite lifetime of usefulness. If this time limit is exceeded and no retransmission has been seen, then the piece of data is marked as an unrecoverable loss and the application is informed. The data stream may continue and the unrecoverable loss will be ordered as a discrete event in the data stream just as a normal piece of data.
Flexible Delivery Ordering - LBT-RM receivers have the option to have the data for an individual topic delivered "in order" or "arrival order". Messages delivered "in order" will arrive in sequence number order to the application. Thus loss may delay messages from being delivered until the loss is recovered or unrecoverable loss is determined. With "arrival-order" delivery, messages will arrive at the application as they are received by the LBT-RM session. Duplicates are ignored and lost messages will have the same recovery methods applied, but the ordering may not be preserved. Delivery order is a topic level concern. Thus loss of messages in one topic will not interfere or delay delivery of messages in another topic.
Session State Advertisements - In PGM, SPM packets are used to advertise session state and to perform PGM router assist in the routers. For LBT-RM, these advertisements are only used when data is not flowing. Once data stops on a session, advertisements are sent with an exponential back-off (to a configurable maximum interval) so that the bandwidth taken up by the session is minimal.
Sender Rate Control - LBT-RM can control a sender's rate of injection of data into the network by use of a rate limiter. This rate is configurable and will back pressure the sender, not allowing the application to exceed the rate limit it has specified. In addition, LBT-RM senders have control over the rate of retransmissions separately from new data. This allows sending application to guarantee a minimum transmission rate even in the face of massive loss at some or all receivers.
Low Latency Retransmissions - LBT-RM senders do not mandate the use of NCF packets as PGM does. Because low latency retransmissions is such an important feature, LBT-RM senders by default send retransmissions immediately upon receiving a NAK. After sending a retransmission, the sender ignores additional NAKs for the same data and does not repeatedly send NCFs. The oldest data being requested in NAKs has priority over newer data so that if retransmissions are rate controlled, then LBT-RM sends the most important retransmissions as fast as possible.
Note: LBT-RM can use Datagram Bypass Layer (DBL) acceleration in conjunction with DBL-enabled Myricom 10-Gigabit Ethernet NICs for Linux and Microsoft Windows. DBL is a kernel-bypass technology that accelerates sending and receiving UDP traffic. See Transport Acceleration Options for more information.
Note: LBT-RM transports may be distributed to receiving threads. See Multi-Transport Threads for more information.
3.6.5. Transport LBT-IPC
The LBT-IPC transport is an Interprocess Communication (IPC) UM transport that allows sources to publish topic messages to a shared memory area managed as a static ring buffer from which receivers can read topic messages. Message exchange takes place at memory access speed which can greatly improve throughput when sources and receivers can reside on the same host. LBT-IPC can be either source-paced or receiver-paced.
The LBT-IPC transport uses a "lock free" design that eliminates calls to the Operating System and allows receivers quicker access to messages. An internal validation method enacted by receivers while reading messages from the Shared Memory Area ensures message data integrity. The validation method compares IPC header information at different times to ensure consistent, and therefore, valid message data. Sources can send individual messages or a batch of messages, each of which possesses an IPC header.
Note: Transport LBT-IPC is not supported on the HP NonStop® platform.
3.6.5.1. LBT-IPC Shared Memory Area
The following diagram illustrates the Shared Memory Area used for LBT-IPC.
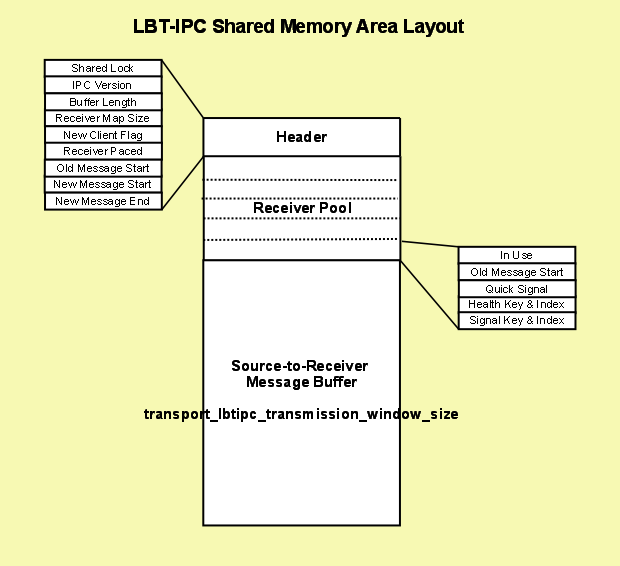
3.6.5.1.1. Header
The Header contains information about the shared memory area resource.
Shared Lock - shared receiver pool semaphore (mutex on Microsoft Windows) to ensure mutually exclusive access to the receiver pool.
Version - LBT-IPC version number which is independent of any UM product version number.
Buffer Length - size of shared memory area.
Receiver Map Size - Number of entries available in the Receiver Pool which you configure with the source option, transport_lbtipc_maximum_receivers_per_transport.
New Client Flag - set by the receiver after setting its Receiver Pool entry and before releasing the Shared Lock. Indicates to the source that a new receiver has joined the transport.
Receiver Paced - Indicates if you've configured the transport for receiver-pacing.
Old Message Start - pointer indicating messages that may be reclaimed.
New Message Start - pointer indicating messages that may be read.
New Message End - pointer indicating the end of messages that may be read, which may not be the same as the Old Message Start pointer.
3.6.5.1.2. Receiver Pool
The receiver pool is a collection of receiver connections maintained in the Shared Memory Area. The source reads this information if you've configured receiver-pacing to determine if a message can be reclaimed or to monitor a receiver. Each receiver is responsible for finding a free entry in the pool and marking it as used.
In Use flag - set by receiver while holding the Shared Lock, which effectively indicates the receiver has joined the transport session. Using the Shared Lock ensures mutually exclusive access to the receiver connection pool.
Oldest Message Start - set by receiver after reading a message. If you enable receiver-pacing the source reads it to determine if message memory can be reclaimed.
Monitor Shared Lock - checked by the source to monitor a receiver. (semaphore on Linux, event on Microsoft Windows) See Receiver Monitoring.
Signal Shared Lock - Set by source to notify receiver that new data has been written. (semaphore on Linux, mutex on Microsoft Windows) If you set transport_lbtipc_receiver_thread_behavior to busy_wait, the receiver sets this semaphore to zero and the source does not notify.
3.6.5.1.3. Source-to-Receiver Message Buffer
This area contains message data. You specify the size of the shared memory area with a source option, transport_lbtipc_transmission_window_size. The size of the shared memory area cannot exceed your platform's shared memory area maximum size. UM stores the memory size in the shared memory area's header. The Old Message Start and New Message Start point to positions in this buffer.
3.6.5.2. Sources and LBT-IPC
When you create a source with lbm_src_create() and you've set the transport option to IPC, UM creates a shared memory area object. UM assigns one of the transport IDs to this area specified with the UM context configuration options, transport_lbtipc_id_high and transport_lbtipc_id_low. You can also specify a shared memory location outside of this range with a source configuration option, transport_lbtipc_id, to prioritize certain topics, if needed.
UM names the shared memory area object according to the format, LBTIPC_%x_%d where %x is the hexadecimal Session ID and %d is the decimal Transport ID. Examples names are LBTIPC_42792ac_20000 or LBTIPC_66e7c8f6_20001. Receivers access a shared memory area with this object name to receive (read) topic messages.
Using the configuration option, transport_lbtipc_behavior, you can choose source-paced or receiver-paced message transport. See Transport LBT-IPC Operation Options.
3.6.5.2.1. Sending over LBT-IPC
To send on a topic (write to the shared memory area) the source writes to the Shared Memory Area starting at the Oldest Message Start position. It then increments each receiver's Signal Lock if the receiver has not set this to zero.
3.6.5.3. Receivers and LBT-IPC
Receivers operate identically to receivers for all other UM transports. A receiver can actually receive topic messages from a source sending on its topic over TCP, LBT-RU or LBT-RM and from a second source sending on LBT-IPC with out any special configuration. The receiver learns what it needs to join the LBT-IPC session through the topic advertisement.
3.6.5.3.1. Topic Resolution and LBT-IPC
Topic resolution operates identically with LBT-IPC as other UM transports albeit with a new advertisement type, LBMIPC. Advertisements for LBT-IPC contain the Transport ID, Session ID and Host ID. Receivers obtain LBT-IPC advertisements in the normal manner (resolver cache, advertisements received on the multicast resolver address:port and responses to queries.) Advertisements for topics from LBT-IPC sources can reach receivers on different machines if they use the same topic resolution configuration, however, those receivers silently ignore those advertisements since they cannot join the IPC transport. See Sending to Both Local and Remote Receivers.
3.6.5.3.2. Receiver Pacing
Although receiver pacing is a source behavior option, some different things must happen on the receiving side to ensure that a source does not reclaim (overwrite) a message until all receivers have read it. When you use the default transport_lbtipc_behavior (source-paced), each receiver's Oldest Message Start position in the Shared Memory Area is private to each receiver. The source writes to the Shared Memory Area independently of receivers' reading. For receiver-pacing, however, all receivers share their Oldest Message Start position with the source. The source will not reclaim a message until all receivers have successfully read that message.
3.6.5.3.3. Receiver Monitoring
To ensure that a source does not wait on a receiver that is not running, the source monitors a receiver via the Monitor Shared Lock allocated to each receiving context. (This lock is in addition to the semaphore already allocated for signaling new data.) A new receiver takes and holds the Monitor Shared Lock and releases the resource when it dies. If the source is able to obtain the resource, it knows the receiver has died. The source then clears the receiver's In Use flag in it's Receiver Pool Connection.
3.6.5.4. Similarities with Other UM Transports
Although no actual network transport occurs, UM functions in much the same way as if you send packets across the network as with other UM transports.
If you use a range of LBT-IPC transport IDs, UM assigns multiple topics sent by multiple sources to all the transport sessions in a round robin manner just like other UM transports.
Transport sessions assume the configuration option values of the first source assigned to the transport session.
Sources are subject to message batching.
3.6.5.5. Differences from Other UM Transports
Unlike LBT-RM which uses a transmission window to specify a buffer size to retain messages in case they must be retransmitted, LBT-IPC uses the transmission window option to establish the size of the shared memory.
LBT-IPC does not retransmit messages. Since LBT-IPC transport is essentially a memory write/read operation, messages should not be be lost in transit. However, if the shared memory area fills up, new messages overwrite old messages and the loss is absolute. No retransmission of old messages that have been overwritten occurs.
Receivers also do not send NAKs when using LBT-IPC.
LBT-IPC does not support Ordered Delivery options. However, if you set ordered_delivery 1 or -1, LBT-IPC reassembles any large messages.
LBT-IPC does not support Rate Control.
LBT-IPC creates a separate receiver thread in the receiving context.
3.6.5.6. Sending to Both Local and Remote Receivers
A source application that wants to support both local and remote receivers should create two UM Contexts with different topic resolution configurations, one for IPC sends and one for sends to remote receivers. Separate contexts allows you to use the same topic for both IPC and network sources. If you simply created two source objects (one IPC, one say LBT-RM) in the same UM Context, you would have to use separate topics and suffer possible higher latency because the sending thread would be blocked for the duration of two send calls.
A UM source will never automatically use IPC when the receivers are local and a network transport for remote receivers because the discovery of a remote receiver would hurt the performance of local receivers. An application that wants transparent switching can implement it in a simple wrapper.
3.6.5.7. LBT-IPC Object Diagram
The following diagram illustrates how sources and receivers interact with the shared memory area used in the LBT-IPC transport.

In the diagram above, 3 sources send (write) to two Shared Memory Areas while four receivers in two different contexts receive (read) from the areas. The diagram also shows the UM configuration options that set up this scenario. The assignment of sources to Shared Memory Areas demonstrate UM's round robin method. UM assigns the source sending on Topic A to Transport 20001, the source sending on Topic B to Transport 20002 and the source sending on Topic C back to the top of the transport ID range, 20001. The memory area size, although the default value, appears for illustration.
3.6.5.8. Required Authorities
LBT-IPC requires no special operating system authorities, except on Microsoft Windows Vista® and Microsoft Windows Server 2008, which require Administrator privileges. In addition, on Microsoft Windows XP, applications must be started by the same user, however, the user is not required to have administrator privileges. In order for applications to communicate with a service, the service must use a user account that has Administrator privileges.
3.6.5.9. Host Resource Usage and Limits
LBT-IPC contexts and sources consume host resources as follows.
Per Source - 1 shared memory segment, 1 shared lock (semaphore on Linux, mutex on Microsoft Windows)
Per Receiving Context - 2 shared locks (semaphores on Linux, one event and one mutex on Microsoft Windows)
Across most operating system platforms, these resources have the following limits.
4096 shared memory segments, though some platforms use different limits
32,000 shared semaphores (128 shared semaphore sets * 250 semaphores per set)
Consult your operating system documentation for specific limits per type of resource. Resources may be displayed and reclaimed using the LBT-IPC Resource Manager. See also Managing LBT-IPC Host Resources.
3.6.5.10. LBT-IPC Resource Manager
Deleting an IPC source with lbm_src_delete() or deleting an IPC receiver with lbm_rcv_delete() reclaims the shared memory area and locks allocated by the IPC source or receiver. However, if a less than graceful exit from a process occurs, global resources remain allocated but unused. To address this possibility, the LBT-IPC Resource Manager maintains a resource allocation database with a record for each global resource (memory or semaphore) allocated or freed. You can use the LBT-IPC Resource Manager to discover and reclaim resources. See the three example outputs below.
3.6.5.10.1. Displaying Resources
$> lbtipc_resource_manager
Displaying Resources (to reclaim you must type '-reclaim' exactly)

--Memory Resources--
 Memory resource: Process ID: 24441 SessionID: ab569cec XportID: 20001

--Semaphore Resources--
 Semaphore key: 0x68871d75
	Semaphore resource Index 0: reserved
	Semaphore resource: Process ID: 24441 Sem Index: 1
	Semaphore resource: Process ID: 24436 Sem Index: 2
3.6.5.10.2. Reclaiming Unused Resources
$> lbtipc_resource_manager -reclaim

Reclaiming Resources
 Process 24441 not found: reclaiming Memory resource (SessionID: ab569cec XPortID: 20001)
 Process 24441 not found: reclaiming Semaphore resource: Key: 0x68871d75 Sem Index: 1
 Process 24436 not found: reclaiming Semaphore resource: Key: 0x68871d75 Sem Index: 2
3.6.5.10.3. Discovering Resources In Use
$> lbtipc_resource_manager -reclaim

Reclaiming Resources
 Process 24441 still active! Memory resource not reclaimed (SessionID: ab569cec XPortID: 20001)
 Process 24441 still active! Semaphore resource not reclaimed (Key: 0x68871d75 Sem Index: 1)
 Process 24436 still active! Semaphore resource not reclaimed (Key: 0x68871d75 Sem Index: 2)
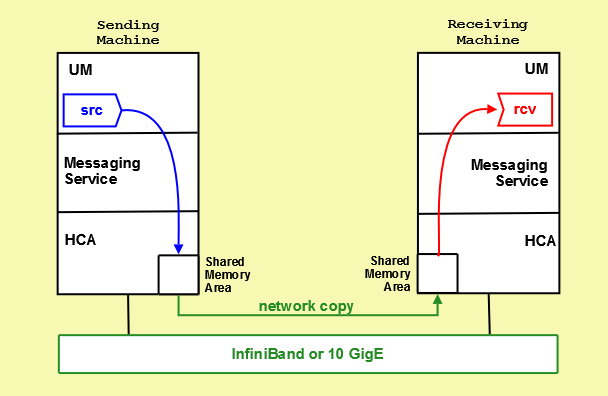
3.6.6. Transport LBT-RDMA
The LBT-RDMA transport is Remote Direct Memory Access (RDMA) UM transport that allows sources to publish topic messages to a shared memory area from which receivers can read topic messages. LBT-RDMA runs across InfiniBand and 10 Gigabit Ethernet hardware.
Note: Use of the LBT-RDMA transport requires the purchase and installation of the Ultra Messaging RDMA Transport Module. See your Ultra Messaging representative for licensing specifics.
Note: Transport LBT-RDMA is not supported on the HP NonStop platform.
When you create a source with lbm_src_create() and you've set the transport option to RDMA, UM creates a shared memory area object on the sending machine's Host Channel Adapter (HCA) card. UM assigns one of the RDMA transport ports to this area specified with the UM context configuration options, transport_lbtrdma_port_high and transport_lbtrdma_port_low. You can also specify a shared memory location outside of this range with a source configuration option, transport_lbtrdma_port, to prioritize certain topics, if needed.
When you create a receiver with lbm_rcv_create() for a topic being sent over LBT-RDMA, UM creates a shared memory area on the receiving machine's HCA card. The network hardware immediately copies any new data from the sending HCA to the receiving HCA. UM receivers monitor the receiving shared memory area for new topic messages. You configure receiver monitoring with transport_lbtrdma_receiver_thread_behavior.
3.6.6.1. LBT-RDMA Object Diagram
The following diagram illustrates how sources and receivers interact with the shared memory area used in the LBT-RDMA transport.
3.6.6.2. Similarities with Other UMS Transports
UM functions in much the same way as if you send packets across a traditional Ethernet network as with other UM transports.
If you use a range of ports, UM assigns multiple topics that have been sent by multiple sources in a round robin manner to all the transport sessions configured my the port range.
Transport sessions assume the configuration option values of the first source assigned to the transport session.
Sources are subject to message batching.
Topic resolution operates identically with LBT-RDMA as other UM transports albeit with a new advertisement type, LBMRDMA.
3.6.6.3. Differences from Other UMS Transports
Unlike LBT-RM which uses a transmission window to specify a buffer size to retain messages in case they must be retransmitted, LBT-RDMA uses the transmission window option to establish the size of the shared memory.
LBT-RDMA does not retransmit messages. Since LBT-RDMA transport is essentially a memory write/read operation, messages should not be be lost in transit. However, if the shared memory area fills up, new messages overwrite old messages and the loss is absolute. No retransmission of old messages that have been overwritten occurs.
Receivers also do not send NAKs when using LBT-RDMA.
LBT-RDMA does not support Ordered Delivery. However, if you set ordered_delivery 1 or -1, LBT-RDMA reassembles any large messages.
LBT-RDMA does not support Rate Control.
LBT-RDMA creates a separate receiver thread in the receiving context.
4. Architecture
UM is designed to be a flexible architecture. Unlike many messaging systems, UM does not require an intermediate daemon to handle routing issues or protocol processing. This increases the performance of UM and returns valuable computation time and memory back to applications that would normally be consumed by messaging daemons.
This section discusses the following topics.
4.1. Embedded Mode
When you create a context (lbm_context_create()) with the operational_mode set to embedded (the default), UM creates an independent thread, called the context thread, which handles timer and socket events, and does protocol-level processing, like retransmission of dropped packets.
4.2. Sequential Mode
When you create a context (lbm_context_create()) with the
operational_mode set to sequential,
the context thread is NOT created. It becomes the application's responsibility to
donate a thread to UM by calling lbm_context_process_events()
regularly, typically in a tight loop. Use Sequential mode for
circumstances where your application wants control over the attributes of the context
thread. For example, some applications raise the priority of the context thread so
as to obtain more consistent latencies.
In sequential mode, no separate thread is spawned when a context is created.
You enable Sequential mode with the following configuration option.
context operational_mode sequential
4.3. Topic Resolution
Topic resolution is the discovery of a topic's transport session information by a receiver to enable the receipt of topic messages. By default, UM relies on multicast requests and responses to resolve topics to transport sessions. (You can also use Unicast requests and responses, if needed.) UM receivers multicast their topic requests, or queries, to an IP multicast address and UDP port ( resolver_multicast_address and resolver_multicast_port). UM sources also multicast their advertisements and responses to receiver queries to the same multicast address and UDP port.
Topic Resolution offers 3 distinct phases that can be implemented.
Initial Phase - Period that allows you to resolve a topic aggressively. Can be used to resolve all known topics before message sending begins. This phase can be configured to run differently from the defaults or completely disabled.
Sustaining Phase - Period that allows new receivers to resolve a topic after the Initial Phase. Can also be the primary period of topic resolution if you disable the Initial Phase. This phase can also be configured to run differently from the defaults or completely disabled.
Quiescent Phase - The "steady state" period during which a topic is resolved and UM uses no system resources for topic resolution.
This section discusses the following topics.
4.3.1. Multicast Topic Resolution
The following diagram depicts the UM topic resolution using multicast.

UM performs topic resolution automatically. Your application does not need to call any API functions to initiate topic resolution, however, you can influence topic resolution with Topic Resolution Configuration Options. Moreover, you can set configuration options for individual topics by using the lbm_*_attr_setopt() functions in your application. See Assigning Different Configuration Options to Individual Topics
Note: Multicast topic resolution traffic can use Datagram Bypass Layer (DBL) acceleration in conjunction with DBL-enabled Myricom 10-Gigabit Ethernet NICs for Linux and Microsoft Windows. DBL is a kernel-bypass technology that accelerates sending and receiving UDP traffic. See Transport Acceleration Options for more information.
Note: Multicast Topic Resolution is not supported directly on the HP NonStop platform, but can be run a different host within your network supplying topic resolution services to sources and receivers running on HP NonStop platform.
4.3.1.1. Sources Advertise
UM sources help UM receivers discover transport information in the following ways.
Advertise Active Topics - Each source advertises its active topic first upon its creation and subsequently according to the resolver_advertisement_*_interval configuration options for the Initial and Sustaining Phases. Sources advertise by sending a Topic Information Record (TIR). (You can prevent a source from sending an advertisement upon creation with resolver_send_initial_advertisement.)
Respond to Topic Queries - Each source responds immediately to queries from receivers about its topic.
Both a topic advertisement and a query response contain the topic's transport session information. Based on the transport type, a receiver can join the appropriate multicast group (for LBT-RM), send a connection request (for LBT-RU), connect to the source (for TCP) or access a shared memory area (for LBT-IPC). The address and port information potentially contained within a TIR includes:
For a TCP transport, the source address and TCP port.
For an LBT-RM transport, the unicast UDP port (to which NAKs are sent) and the UDP destination port.
For an LBT-RU transport, the source address and UDP port.
For an LBT-IPC transport, the Host ID, LBT-IPC Session ID and Transport ID.
For the UM Gateway, the context instance and Domain ID of the original source plus the Hop Count and Portal Cost. See Forwarding Costs
For various UMP options, the store address and TCP port, and the source address and TCP port (to which receivers send delivery confirmations).
For UMQ, the Queue Name, which allows the receiver to then resolve the Queue in order to receive queued messages.
4.3.1.2. Receivers Query
Receivers can discover transport information in the following ways.
Search advertisements collected in the resolver cache maintained by the UM context.
Listen for source advertisements on the resolver_multicast_address:port.
Send a topic query (TQR).
A new receiver queries for its topic according to the resolver_query_*_interval configuration options for the Initial and Sustaining Phases.
Note: The resolver_query_minimum_initial_interval actually begins after you call lbm_rcv_topic_lookup() prior to creating the receiver. If you have disabled the Initial Phase for the topic's resolution, the resolver_query_sustaining_interval begins after you call lbm_rcv_topic_lookup().
A Topic Query Record (TQR) consists primarily of the topic string. Receivers continue querying on a topic until they discover the number of sources configured by resolution_number_of_sources_query_threshold. However the large default of this configuration option (10,000,000) allows a receiver to continue to query until both the initial and sustaining phase of topic resolution complete.
4.3.1.3. Wildcard Receivers
Wildcard receivers can discover transport information in the following ways.
Search advertisements collected in the resolver cache maintained by the UM context.
Listen for source advertisements on the resolver_multicast_address:port.
Send a wildcard receiver topic query (WC-TQR).
UM implements only one phase of wildcard receiver queries, sending wildcard receiver queries according to wildcard receiver resolver_query_*_interval configuration options until the topic pattern has been queried for the resolver_query_minimum_duration. The wildcard receiver topic query (WC-TQR) contains the topic pattern and the pattern_type.
4.3.2. Topic Resolution Phases
The phases of topic resolution pertain to individual topics. Therefore if your system has 100 topics, 100 different topic resolution advertisement and query phases may be running concurrently. This describes the three phases of Ultra Messaging topic resolution.
4.3.2.1. Initial Phase
The initial topic resolution phase for a topic is an aggressive phase that can be used to resolve all topics before sending any messages. During the initial phase, network traffic and CPU utilization might actually be higher. You can completely disable this phase, if desired. See Disabling Aspects of Topic Resolution.
4.3.2.1.1. Advertising in the Initial Phase
For the initial phase default settings, the resolver issues the first advertisement as soon as the scheduler can process it. The resolver issues the second advertisement 10 ms later, or at the resolver_advertisement_minimum_initial_interval. For each subsequent advertisement, UM doubles the interval between advertisements. The source sends an advertisement at 20 ms, 40 ms, 80 ms, 160 ms, 320 ms and finally at 500 ms, or the resolver_advertisement_maximum_initial_interval. These 8 advertisements require a total of 1130 ms. The interval between advertisements remains at the maximum 500 ms, resulting in 7 more advertisements before the total duration of the initial phase reaches 5000 ms, or the resolver_advertisement_minimum_initial_duration. This concludes the initial advertisement phase for the topic.
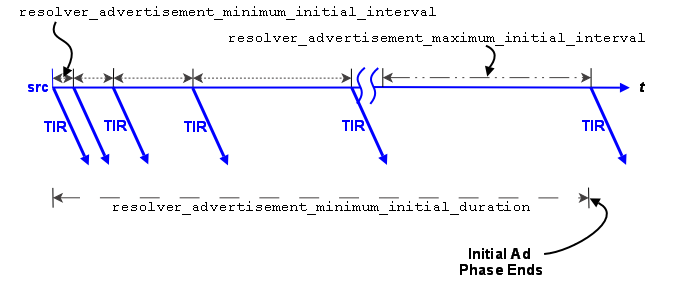
The initial phase for a topic can take longer than the resolver_advertisement_minimum_initial_duration if many topics are in resolution at the same time. The configuration options, resolver_initial_advertisements_per_second and resolver_initial_advertisement_bps enforce a rate limit on topic advertisements for the entire UM context. A large number of topics in resolution - in any phase - or long topic names may exceed these limits.
If a source advertising in the initial phase receives a topic query, it responds with a topic advertisement. UM recalculates the next advertisement interval from that point forward as if the advertisement was sent at the nearest interval.
4.3.2.1.2. Querying in the Initial Phase
Querying activity by receivers in the initial phase operates in similar fashion to advertising activity, although with different interval defaults. The resolver_query_minimum_initial_interval default is 20 ms. Subsequent intervals double in length until the interval reaches 200 ms, or the resolver_query_maximum_initial_interval. The query interval remains at 200 ms until the initial querying phase reaches 5000 ms, or the resolver_query_minimum_initial_duration.
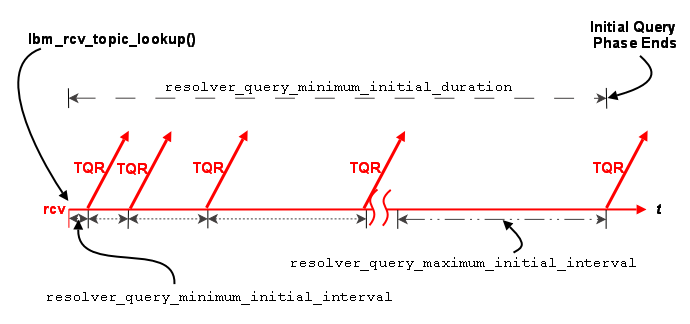
The initial query phase completes when it reaches the resolver_query_minimum_initial_duration. The initial query phase also has UM context-wide rate limit controls ( resolver_initial_queries_per_second and resolver_initial_query_bps) that can result in the extension of a phase's duration in the case of a large number of topics or long topic names.
4.3.2.2. Sustaining Phase
The sustaining topic resolution phase follows the initial phase and can be a less active phase in which a new receiver resolves its topic. It can also act as the sole topic resolution phase if you disable the initial phase. The sustaining phase defaults use less network resources than the initial phase and can also be modified or disabled completely. See Disabling Aspects of Topic Resolution.
4.3.2.2.1. Advertising in the Sustaining Phase
For the sustaining phase defaults, a source sends an advertisement every second ( resolver_advertisement_sustain_interval) for 1 minute ( resolver_advertisement_minimum_sustain_duration). When this duration expires, the sustaining phase of advertisement for a topic ends. If a source receives a topic query, the sustaining phase resumes for the topic and the source completes another duration of advertisements.
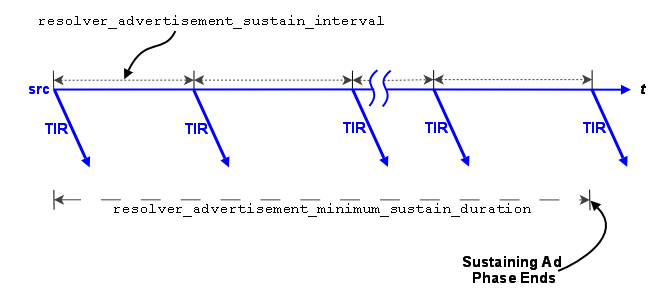
The sustaining advertisement phase has UM context-wide rate limit controls ( resolver_sustain_advertisements_per_second and resolver_sustain_advertisement_bps) that can result in the extension of a phase's duration in the case of a large number of topics or long topic names.
4.3.2.2.2. Querying in the Sustaining Phase
Default sustaining phase querying operates the same as advertising. Unresolved receivers query every second ( resolver_query_sustain_interval) for 1 minute ( resolver_query_minimum_sustain_duration). When this duration expires, the sustaining phase of querying for a topic ends.
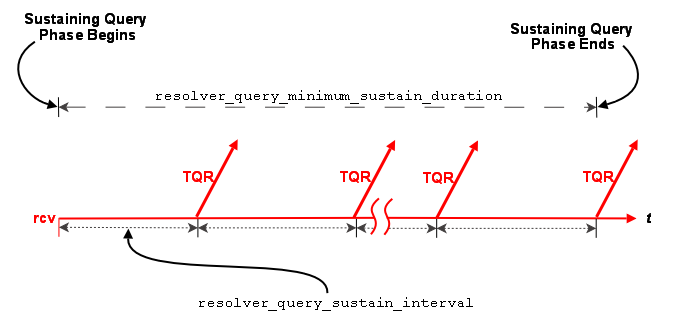
Sustaining phase queries stop when one of the following events occurs.
The receiver discovers multiple sources that equal resolution_number_of_sources_query_threshold.
The sustaining query phase reaches the resolver_query_minimum_sustain_duration.
The sustaining query phase also has UM context-wide rate limit controls ( resolver_sustain_queries_per_second and resolver_sustain_query_bps) that can result in the extension of a phase's duration in the case of a large number of topics or long topic names.
4.3.2.3. Quiescent Phase
This phase is the absence of topic resolution activity for a given topic. It is possible that some topics may be in the quiescent phase at the same time other topics are in initial or sustaining phases of topic resolution. This phase ends if either of the following occurs.
A new receiver sends a query.
Your application calls lbm_context_topic_resolution_request() that provokes the sending of topic queries for any receiver or wildcard receiver in this state.
4.3.3. Topic Resolution Configuration Options
Refer to the UM Configuration Guide for specific information about Topic Resolution Configuration Options.
4.3.3.1. Assigning Different Configuration Options to Individual Topics
You can assign different configuration option values to individual topics by accessing the topic attribute table (lbm_*_topic_attr_t_stct) before creating the source, receiver or wildcard receiver.
4.3.3.1.1. Creating a Source with Different Topic Resolution Options
Call lbm_src_topic_attr_setopt() to set new option value
Call lbm_src_topic_alloc()
Call lbm_src_create()
4.3.3.1.2. Creating a Receiver with Different Topic Resolution Options
Call lbm_rcv_topic_attr_setopt() to set new option value
Call lbm_rcv_topic_lookup()
Call lbm_rcv_create()
4.3.3.1.3. Creating a Wildcard Receiver with Different Topic Resolution Options
Call lbm_wildcard_rcv_attr_setopt() to set new wildcard receiver option value
Call lbm_wildcard_rcv_create()
4.3.3.2. Multicast Network Options
Essentially, the _incoming and _outgoing versions of resolver_multicast_address/port provide more fine-grained control of topic resolution. By default, the resolver_multicast_address and resolver_multicast_port and the _incoming and _outgoing address and port are set to the same value. If you want your context to listen to a particular multicast address/port and send on another address/port, then you can set the _incoming and _outgoing configuration options to different values.
4.3.4. Unicast Topic Resolution
This section also discusses the following topics.
By default UM expects multicast connectivity between all sources and receivers. When only unicast connectivity is available, you may configure all sources and receivers to use unicast topic resolution. This requires that you run one or more UM unicast topic resolution daemon(s) (Manpage for lbmrd), which perform the same topic resolution activities as multicast topic resolution. You configure each instance of the unicast topic resolution daemon with resolver_unicast_daemon.
Note: The Unicast Topic Resolver lbmrd is not supported on the HP NonStop platform.
The lbmrd can run on any machine, including the source or receiver (enter lbmrd -h for instructions). Of course, sources will also have to select a transport protocol that uses unicast addressing (e.g. TCP, TCP-LB, or LBT-RU). The lbmrd maintains a table of clients (address and port pairs) from which it has received a topic resolution message, which can be any of the following.
Topic Information Records (TIR) - also known as topic advertisements
Topic Query Records (TQR)
keepalive messages, which are only used in unicast topic resolution
After lbmrd receives a TQR or TIR, it forwards it to all known clients. If a client (i.e. source or receiver) is not sending either TIRs or TQRs, it sends a keepalive message to lbmrd according to the resolver_unicast_keepalive_interval. This registration with the lbmrd allows the client to receive advertisements or queries from lbmrd. lbmrd maintains no state about topics, only about clients.
4.3.4.1. Topic Information Records
Of all topic resolution messages, only the TIR contains address and port information. This tells a receiver how it can get the data being published. Based on the transport type, a receiver can join the appropriate multicast group (for LBT-RM), send a connection request (for LBT-RU), or connect to the source (for TCP).
The TIR contains additional blocks of information to define UMP capabilities, indicating the address and port of the source and store.
The address and port information potentially contained within a TIR includes:
For a TCP transport, the source address and TCP port.
For an LBT-RM transport, the unicast UDP port (to which NAKs are sent) and the UDP destination port.
For an LBT-RU transport, the source address and UDP port.
For various UMP options, the store address and TCP port, and the source address and TCP port (to which delivery confirmations are sent).
For UMQ, the Queue Name and TCP port.
For unicast-based transports (TCP and LBT-RU), the TIR source address is 0.0.0.0, not the actual source address. This allows some minimal functionality within a Network Address Translation (NAT) environment.
Topic resolution messages (whether received by the application via multicast, or by the unicast topic resolution daemon via unicast) are always UDP datagrams. They are received via a recvfrom() call, which also obtains the address and port from which the datagrams were received. If the address 0.0.0.0 (INADDR_ANY) appears for one of the addresses, lbmrd replaces it with the address from which the datagram is received. The net effect is as if the actual source address had originally been put into the TIR.
4.3.4.2. Unicast Topic Resolution Resilience
Running multiple instances of lbmrd allows your applications to continue operation in the face of a lbmrd failure. Your applications' sources and receivers send topic resolution messages as usual, however, rather than sending every message to each lbmrd instance, UM directs messages to lbmrd instances in a round-robin fashion. Since the lbmrd does not maintain any resolver state, as long as one lbmrd instance is running, UM continues to forward LBMR packets to all connected clients. UM switches to the next active lbmrd instance every 250-750 ms.
4.3.4.3. Unicast Topic Resolution Across Administrative Domains
If your network architecture includes remote or local LANs that use Network Address Translation (NAT), you can implement an lbmrd configuration file to translate IP addresses/ports across administrative domains. Without translation, lbmrd clients (sources and receivers) across NAT boundaries cannot connect to each other in response to topic advertisements due to NAT restrictions.
By default, topic advertisements forwarded by lbmrd contain the private (or inside) address/port of the source. Routers implementing NAT prevent connection to these private addresses from receivers outside the LAN.
The lbmrd configuration file allows lbmrd to insert a translation or outside address/port for the private address/port of the source in the topic advertisement. This outside or translation address must already be configured in the router's static NAT table. When the receiver attempts to connect to the source by using the source address/port in the topic advertisement, the NAT router automatically translates the outside address/port to the private address/port, thereby allowing the connection.
Note: The Request/Response model and the Late Join feature only work with (lbmrd) across local LANs that use Network Address Translation (NAT) if you use the default value (0.0.0.0) for request_tcp_interface.
4.3.4.3.1. lbmrd Configuration File
This section presents the syntax of the lbmrd configuration file, which is an XML file. Descriptions of elements also appear below. See Unicast Resolver Example Configuration for an example lbmrd configuration file.
<?xml version="1.0" encoding="UTF-8" ?>
<lbmrd version="1.0">
	<domains>
	 <domain name="domain-name-1">
		 <network>network-specification</network>
	 </domain>
	 <domain name="domain-name-2">
		 <network>network-specification</network>
	 </domain>
	</domains>
	<transformations>
	 <transform source="source-domain-name"
		 destination="destination-domain-name">
		 <rule>
		  <match address="original-address" port="original-port"/>
		  <replace address="replacement-address" port="replacement-port"/>
		 </rule>
	 </transform>
	</transformations>
</lbmrd>
The <lbmrd> element is the root element. It requires a single attribute, version, which defines the version of the DTD to be used. Currently, only version 1.0 is supported. The <lbmrd> element must contain a single <domains> element and a single <transformations> element.
The <domains> element defines the set of network domains. The <domains> element may contain one or more <domain> elements. Each defines a separate domain.
The <domain> element defines a single network domain. Each domain must be named via the name attribute. This name is referenced in <map> elements, which are discussed below. Each domain name must be unique. The <domain> element may contain one or more <network> elements.
The <network> element defines a single network specification which is to be considered part of the enclosing <domain>. The network specification must contain either an IP address, or a network specification in CIDR form.
The <transformations> element defines and contains the set of transformations to be applied to the TIRs. The <transformations> element contains one or more <transform> elements, described below.
The <transform> element defines a set of transformation tuples. Each tuple applies to a TIR sent from a specific network domain (specified using the source attribute), and destined for a specific network domain (specified using the destination attribute). The source and destination attributes must specify a network domain name as defined by the <domain> elements. The <transform> element contains one or more <rule> elements, described below.
Each <rule> element is associated with the enclosing <transform> element, and completes the transformation tuple. The <rule> element must contain one <match> element, and one <replace> element, described below.
The <match> element defines the address and port to match within the TIR. The attributes address and port specify the address and port. address must specify a full IP address (a network specification is not permitted). port specifies the port in the TIR. To match any port, specify port="*" (which is the default).
The <replace> element defines the address and port which are to replace those matched in the TIR. The attributes address and port specify the address and port. address must specify a full IP address (a network specification is not permitted). To leave the TIR port unchanged, specify port="*" (which is the default).
It is valid to specify port="*" for both <match> and <replace>. This effectively matches all ports for the given address and changes only the address. It is important to note that TIR addresses and ports are considered together. For example, the Ultra Messaging R for the Enterprise option in the TIR contains the source address and port, and the store address and port. When processing a transformation tuple, the source address and source port are considered (and transformed) together, and the store address and store port are considered (and transformed) together.
4.4. Message Batching
Batching many small messages into fewer network packets decreases the per-message CPU load, thereby increasing throughput. Let's say it costs 2 microseconds of CPU to fully process a message. If you process 10 messages per second, you won't notice the load. If you process half a million messages per second, you saturate the CPU. So to achieve high message rates, you have to reduce the per-message CPU cost with some form of message batching. These per-message costs apply to both the sender and the receiver. However, the implementation of batching is almost exclusively the realm of the sender.
Many people are under the impression that while batching improves CPU load, it increases message latency. While it is true that there are circumstances where this can happen, it is also true that careful use of batching can result in small latency increases or none at all. In fact, there are circumstances where batching can actually reduce latency.
UM allows the following methods for batching messages.
Implicit Batching - the default behavior, batching messages for individual transport sessions.
Adaptive Batching - a convenience feature of UM that monitors sending activity and automatically determines the optimum time to flush the Implicit Batch buffer.
Intelligent Batching - a method that makes use of your application's knowledge of the messages it must send, clearing the Implicit Batching buffer when sending the only remaining message.
Explicit Batching - provides greater control to your application through lbm_src_send() message flags and also operates in conjunction with the Implicit Batching mechanism.
Application Batching - your application groups messages and sends them in a single batch.
4.4.1. Implicit Batching
UM automatically batches smaller messages into transport session datagrams. The implicit batching options, implicit_batching_interval (default = 200 milliseconds) and implicit_batching_minimum_length (default = 2048 bytes) govern UM implicit message batching. Although these are source options, they actually apply to the transport session to which the source was assigned. See also Source Configuration and Transport Sessions.
UM establishes the implicit batching parameters when it creates the transport session. Any sources assigned to that transport session use the implicit batching limits set for that transport session, and the limits apply to any and all sources subsequently assigned to that transport session. This means that batched transport datagrams can contain messages on multiple topics. See Explicit Batching for information about topic-level message batching.
4.4.1.1. Implicit Batching Operation
Implicit Batching buffers messages until:
the buffer size exceeds the configured implicit_batching_minimum_length or
the oldest message in the buffer has been in the buffer for implicit_batching_interval milliseconds.
When either condition is met, UM flushes the buffer, pushing the messages onto the network.
It may appear this design introduces significant latencies for low-rate topics. However, remember that Implicit Batching operates on a transport session basis. Typically many low-rate topics map to the same transport session, providing a high aggregate rate. The implicit_batching_interval option is a last resort to prevent messages from becoming stuck in the Implicit Batching buffer. If your UM deployment frequently uses the implicit_batching_interval to push out the data (i.e. if the entire transport session has periods of inactivity longer than the value of implicit_batching_interval (defaults to 200 ms), then either the implicit batching options need to be fine-tuned (reducing one or both), or you should consider an alternate form of batching. See Intelligent Batching.
The minimum value for the implicit_batching_interval is 3 milliseconds. The actual minimum amount of time that data stays in the buffer depends on your Operating System and its scheduling clock interval. For example, on a Solaris 8 machine, the actual time is approximately 20 milliseconds. On Microsoft Windows machines, the time is probably 16 milliseconds. On a Linux 2.6 kernel, the actual time is 3 milliseconds. Using a implicit_batching_interval value of 3 guarantees the minimum possible wait for whichever operating system you are using.
4.4.1.2. Implicit Batching Example
The following example demonstrates how the implicit_batching_minimum_length is actually a trigger or floor, for sending batched messages. It is sometimes misconstrued as a ceiling or upper limit.
implicit_batching_minimum_length = 2000
The first send by your application puts 1900 bytes into the batching buffer, which is below the minimum, so UM holds it.
The second send fills the batching buffer to 3800 bytes, well over the minimum. UM sends it down to the transport layer, which builds a 3800-byte (plus overhead) datagram and sends it.
The Operating System fragments the datagram into packets independently of UM and reassembles them on the receiving end.
UM reads the datagram from the socket at the receiver.
UM parses out the two messages and delivers them to the appropriate topic levels, which deliver the data.
The proper setting of the implicit batching parameters often represents a tradeoff between latency and efficiency, where efficiency affects the highest throughput attainable. In general, a large minimum length setting increases efficiency and allows a higher peak message rate, but at low message rates a large minimum length can increase latency. A small minimum length can lower latency at low message rates, but does not allow the message rate to reach the same peak levels due to inefficiency. An intelligent use of implicit batching and application-level flushing can be used to implement an adaptive form of batching known as Intelligent Batching which can provide low latency and high throughput with a single setting.
4.4.2. Adaptive Batching
Adaptive Batching is a convenience batching feature that attempts to send
messages immediately during periods of low volume and automatically batch
messages during periods of higher volume. The goal of Adaptive Batching is
to automatically optimize throughput and latency by monitoring such things
as the time between calls to lbm_src_send(), the time
messages spend in the Implicit Batching queue, the Rate Controller queue,
and other sending activities. With this information, Adaptive Batching
determines if sending batched messages now or later produces the least
latency.
Adaptive Batching will not satisfy everyone's requirements of throughput and latency. You only need to turn it on and determine if it produces satisfactory performance. If it does, you need do nothing more. If you are not satisfied with the results, simply turn it off.
You enable Adaptive Batching by setting implicit_batching_type to adaptive. When using Adaptive Batching, it is advisable to increase the implicit_batching_minimum_length option to a higher value.
4.4.3. Intelligent Batching
Intelligent Batching uses Implicit Batching along with your application's knowledge of the messages it must send. It is a form of dynamic adaptive batching that automatically adjusts for different message rates. Intelligent Batching can provide significant savings of CPU resources without adding any noticeable latency.
For example, your application might receive input events in a batch, and therefore know that it must produce a corresponding batch of output messages. Or the message producer works off of an input queue, and it can detect messages in the queue.
In any case, if the application knows that it has more messages to send without going to sleep, it simply does normal sends to UM, letting Implicit Batching send only when the buffer meets the implicit_batching_minimum_length threshold. However, when the application detects that it has no more messages to send after it sends the current message, it sets the FLUSH flag (LBM_MSG_FLUSH) when sending the message which instructs UM to flush the implicit batching buffer immediately by sending all messages to the transport layer. Refer to lbm_src_send() in the UMS API documentation (UM C API, UM Java API or UM .NET API) for all the available send flags.
When using Intelligent Batching, it is usually advisable to increase the implicit_batching_minimum_length option to 10 times the size of the average message, to a maximum value of 8196. This tends to strike a good balance between batching length and flushing frequency, giving you low latencies across a wide variation of message rates.
4.4.4. Explicit Batching
UM allows you to batch messages for a particular topic with explicit batching. When your application sends a message (lbm_src_send()) it may flag the message as being the start of a batch (LBM_MSG_START_BATCH) or the end of a batch (LBM_MSG_END_BATCH). All messages sent between the start and end are grouped together. The flag used to indicate the end of a batch also signals UM to send the message immediately to the implicit batching buffer. At this point, Implicit Batching completes the batching operation. UM includes the start and end flags in the message so receivers can process the batched messages effectively.
Unlike Intelligent Batching which allows intermediate messages to trigger flushing according to the implicit_batching_minimum_length option, explicit batching holds all messages until the batch is completed. This feature is useful if you configure a relatively small implicit_batching_minimum_length and your application has a batch of messages to send that exceeds the implicit_batching_minimum_length. By releasing all the messages at once, Implicit Batching maximizes the size of the network datagrams.
4.4.4.1. Explicit Batching Example
The following example demonstrates explicit batching.
implicit_batching_minimum_length = 8000
Your application performs 10 sends of 100 bytes each as a single explicit batch.
At the 10th send (which completes the batch), UM delivers the 1000 bytes of messages to the implicit batch buffer.
Let's assume that the buffer already has 7899 bytes of data in it from other topics on the same transport session
UM adds the first 100-byte message to the buffer, bringing it to 7999.
UM adds the second 100-byte message, bringing it up to 8099 bytes, which exceeds implicit_batching_minimum_length but is below the 8192 maximum datagram size.
UM sends the 8099 bytes (plus overhead) datagram.
UM adds the third through tenth messages to the implicit batch buffer. These messages will be sent when either implicit_batching_minimum_length is again exceeded, or the implicit_batching_interval is met, or a message arrives in the buffer with the flush flag (LBM_MSG_FLUSH) set.
4.4.5. Application Batching
In all of the above situations, your application sends individual messages to UM and lets UM decide when to push the data onto the wire (often with application help). With application batching, your application buffers messages itself and sends a group of messages to UM with a single send. Thus, UM treats the send as a single message. On the receiving side, your application needs to know how to dissect the UM message into individual application messages.
This approach is most useful for Java or .NET applications where there is a higher per-message cost in delivering an UM message to the application. It can also be helpful when using an event queue to deliver received messages. This imposes a thread switch cost for each UM message. At low message rates, this extra overhead is not noticeable. However, at high message rates, application batching can significantly reduce CPU overhead.
4.5. Ordered Delivery
With the Ordered Delivery feature, a receiver's delivery controller can deliver messages to your application in sequence number order or arrival order. This feature can also reassemble fragmented messages or leave reassembly to the application. Ordered Delivery can be set via UM configuration option to one of three modes:
Sequence Number Order, Fragments Reassembled
Arrival Order, Fragments Not Reassembled
Arrival Order, Fragments Reassembled
4.5.1. Sequence Number Order, Fragments Reassembled (Default Mode)
In this mode, a receiver's delivery controller delivers messages in sequence number order (the same order in which they are sent). This feature also guarantees reassembly of fragmented large messages. To enable sequence number ordered delivery, set the ordered_delivery configuration option as shown:
receiver ordered_delivery 1
Please note that ordered delivery can introduce latency when packets are lost.
4.5.2. Arrival Order, Fragments Not Reassembled
This mode allows messages to be delivered to the application in the order they are received. If a message is lost, UM will retransmit the message. In the meantime, any subsequent messages received are delivered immediately to the application, followed by the dropped packet when its retransmission is received. This mode guarantees the lowest latency.
With this mode, the receiver delivers messages larger than the transport's maximum datagram size
as individual fragments. (See transport_*_datagram_max_size in the Ultra Messaging Configuration
Guide.) The C API function, lbm_msg_retrieve_fragment_info() returns fragmentation information
for the message you pass to it, and can be used to reassemble large messages. (In Java and .NET,
LBMMessage provides methods to return the same fragment information.) Note that reassembly is
not required for small messages.
To enable this no-reassemble arrival-order mode, set the following configuration option as shown:
receiver ordered_delivery 0
When developing message reassembly code, consider the following:
Message fragments don't necessarily arrive in sequence number order.
Some message fragments may never arrive (unrecoverable loss), so you must time out partial messages.
4.5.3. Arrival Order, Fragments Reassembled
This mode delivers messages in the order they are received, except for fragmented messages, which UM reassembles before delivering to your application. Your application can then use the sequence_number field of lbm_msg_t objects to order or discard messages.
To enable this arrival-order-with-reassembly mode, set the following configuration option as shown:
receiver ordered_delivery -1
4.6. Loss Detection Using TSNIs
When a source enters a period during which it has no data traffic to send, that source issues timed Topic Sequence Number Info (TSNI) messages. The TSNI lets receivers know that the source is still active and also reminds receivers of the sequence number of the last message. This helps receivers become aware of any lost messages between TSNIs.
Sources send TSNIs over the same transport and on the same topic as normal data messages. You can set a time value of the TSNI interval with configuration option transport_topic_sequence_number_info_interval. You can also set a time value for the duration that the source sends contiguous TSNIs with configuration option transport_topic_sequence_number_info_active_threshold, after which time the source stops issuing TSNIs.
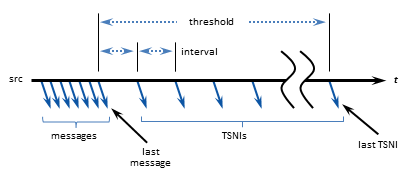
4.7. Receiver Keepalive Using Sesssion Messages
When an LBT-RM, LBT-RU, or LBT-IPC transport session enters a period during which it has no data traffic to send, UM issues timed Session Messages (SMs). For example, suppose all topics in a session stop sending data. One by one, they then send TSNIs, and if there is still no data to send, their TSNI periods eventually expire. After the last quiescent topic's TSNIs stop, UM begins transmitting SMs.
You can set time values for SM interval and duration with configuration options specific to their transport type.
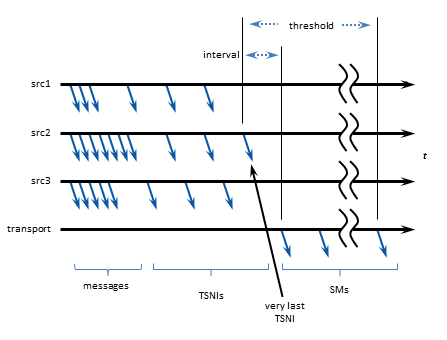
5. UMS Features
5.1. Using Late Join
This section introduces the use of UM Late Join in default and specialized configurations. Specifically, this section on UM Late Join includes:
See the UM Configuration Guide for specific information about Late Join configuration options.
Note: If your application is running within a UM context with configuration option request_tcp_bind_request_port set to zero, then request port binding has been turned off, which also disables the Late Join feature.
Note: The Late Join feature only works with the unicast topic resolution daemon (lbmrd) across local LANs that use Network Address Translation (NAT) if you use the default value (0.0.0.0) for request_tcp_interface.
5.1.1. Late Join Overview
The Late Join feature enables newly created receivers to receive previously transmitted messages. Sources configured for Late Join maintain a retention buffer (not to be confused with a transport retransmission window), which holds transmitted messages for late-joining receivers.
A Late Join operation follows the following sequence:
A new receiver configured for Late Join with use_late_join completes topic resolution. Topic advertisements from the source indicate that the source is configured for Late Join with late_join.
The new receiver sends a Late Join Initiation Request (LJIR) to request previously transmitted messages. The receiver configuration option, retransmit_request_outstanding_maximum, determines the number of messages the receiver requests.
The source responds with a Late Join Information (LJI) message containing the sequence numbers for the retained messages that are available for retransmission.
The source unicasts the messages.
When Configuring Late Join for Large Numbers of Messages, the receiver issues additional requests, and the source retransmits these additional groups of older messages, oldest first.
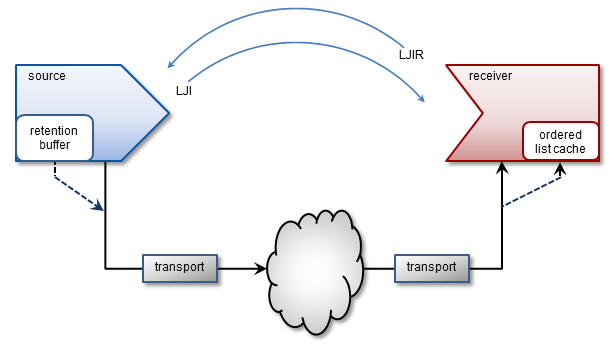
The source's retention buffer's is not pre-allocated and occupies an increasing amount of memory as the source sends messages and adds them to the buffer. If a retention buffer grows to a size equal to the value of the source configuration option, retransmit_retention_size_threshold, the source deletes older messages as it adds new ones. The source configuration option, retransmit_retention_age_threshold, controls message deletion based on message age.
Note: UM uses control-structure overhead memory on a per-message basis for messages held in the retention buffer, in addition to the retention buffer's memory. Such memory usage can become significantly higher when retained messages are smaller in size, since more of them can then fit in the retention buffer.
Caution If you set the receiver configuration option ordered_delivery to 1, the receiver must deliver messages to your application in sequence number order. The receiver holds out-of-order messages in an ordered list cache until messages arrive to fill the sequence number gaps. If an out-of-order message arrives with a sequence number that creates a message gap greater than the value of retransmit_message_caching_proximity, the receiver creates a burst loss event and terminates the Late Join recovery operation. You can increase the value of the proximity option and restart the receiver, but a burst loss is a significant event and you should investigate your network and message system components for failures.
5.1.2. Late Join With UMP
Late Join can be implemented in conjunction with UMP's persistent store feature, however in this configuration, it functions somewhat differently. After a Late-Join-enabled receiver has been created, resolved a topic, and become registered with a store, it may then request older messages. This request is handled by the store, which unicasts the retransmission messages. If the store does not have these messages, it requests them of the source (assuming option retransmission-request-forwarding is enabled), thus initiating Late Join.
Unlike with a persistent store, a source/topic using UMQ's queue feature will service Late Join requests in the same manner used by UMS.
5.1.3. Late Join Options Summary
Following is a summary of Late join configuration options. Please refer to UM Configuration Guide for full descriptions of these options.
| scope (object) | option |
|---|---|
| source | late_join |
| source | retransmit_retention_age_threshold |
| source | retransmit_retention_size_limit |
| source | retransmit_retention_size_threshold |
| receiver | use_late_join |
| receiver | retransmit_initial_sequence_number_request |
| receiver | retransmit_message_caching_proximity |
| receiver | retransmit_request_generation_interval |
| receiver | retransmit_request_interval |
| receiver | retransmit_request_maximum |
| receiver | retransmit_request_outstanding_maximum |
5.1.4. Using Default Late Join Options
To implement Late Join with default options, set the Late Join configuration options to activate the feature on both a source and receiver in the following manner.
Create a configuration file with source and receiver Late Join activation options set to 1. For example, file cfg1.cfg containing the two lines:
	 source late_join 1
	 receiver use_late_join 1
Run an application that starts a Late-Join-enabled source. For example:
lbmsrc -c cfg1.cfg -P 1000 topicName
Wait a few seconds, then run an application that starts a Late-Join-enabled receiver. For example:
lbmrcv -c cfg1.cfg -v topicName
The output for each should closely resemble the following.
LBMSRC
	 $ lbmsrc -c cfg1.cfg -P 1000 topicName
	 LOG Level 5: NOTICE: Source "topicName" has no retention settings (1 message retained max)
	 Sending 10000000 messages of size 25 bytes to topic [topicName]
	 Receiver connect [TCP:10.29.3.77:34200]
LBMRCV
	 $ lbmrcv -c cfg1.cfg -v topicName
	 Immediate messaging target: TCP:10.29.3.77:4391
	 [topicName][TCP:10.29.3.76:4371][2]-RX-, 25 bytes
	 1.001 secs. 0.0009988 Kmsgs/sec. 0.1998 Kbps
	 [topicName][TCP:10.29.3.76:4371][3], 25 bytes
	 1.002 secs. 0.0009982 Kmsgs/sec. 0.1996 Kbps
	 [topicName][TCP:10.29.3.76:4371][4], 25 bytes
	 1.003 secs. 0.0009972 Kmsgs/sec. 0.1994 Kbps
	 [topicName][TCP:10.29.3.76:4371][5], 25 bytes
	 1.003 secs. 0.0009972 Kmsgs/sec. 0.1994 Kbps
Note that the source only retained 1 Late Join message (due to default retention settings) and that this message appears as a retransmit (-RX-). Also note that it is possible to sometimes receive 2 RX messages in this scenario (see Retransmitting Only Recent Messages.)
5.1.5. Specifying a Range of Messages to Retransmit
To receive more than one or two Late Join messages, increase the source's retransmit_retention_size_threshold from its default value of 0. Once this threshold is exceeded, the source now allows the next new message entering the retention buffer to bump out the oldest one. Note that this threshold's units are bytes (which includes a small overhead per message).
While the retention threshold endeavors to keep the buffer size close to its value, it does not set hard upper limit for retention buffer size. For this, the retransmit_retention_size_limit configuration option (also in bytes) sets this boundary.
Follow the steps below to demonstrate how a source can retain about 50MB of messages, but no more than 60MB:
Create a second configuration file (cfg2.cfg) with the following options:
	 source late_join 1
	 source retransmit_retention_size_threshold 50000000
	 source retransmit_retention_size_limit 60000000
	 receiver use_late_join 1
Run lbmsrc -c cfg2.cfg -P 1000 topicName.
Wait a few seconds and run lbmrcv -c cfg2.cfg -v topicName.
The output for each should closely resemble the following.
LBMSRC
	 $ lbmsrc -c cfg2.cfg -P 1000 topicName
	 Sending 10000000 messages of size 25 bytes to topic [topicName]
	 Receiver connect [TCP:10.29.3.76:34444]
LBMRCV
	 $ lbmrcv -c cfg2.cfg -v topicName
	 Immediate messaging target: TCP:10.29.3.76:4391
	 [topicName][TCP:10.29.3.77:4371][0]-RX-, 25 bytes
	 [topicName][TCP:10.29.3.77:4371][1]-RX-, 25 bytes
	 [topicName][TCP:10.29.3.77:4371][2]-RX-, 25 bytes
	 [topicName][TCP:10.29.3.77:4371][3]-RX-, 25 bytes
	 [topicName][TCP:10.29.3.77:4371][4]-RX-, 25 bytes
	 1.002 secs. 0.004991 Kmsgs/sec. 0.9981 Kbps
	 [topicName][TCP:10.29.3.77:4371][5], 25 bytes
	 1.002 secs. 0.0009984 Kmsgs/sec. 0.1997 Kbps
	 [topicName][TCP:10.29.3.77:4371][6], 25 bytes
	 1.002 secs. 0.0009983 Kmsgs/sec. 0.1997 Kbps
	 [topicName][TCP:10.29.3.77:4371][7], 25 bytes
Note that lbmrcv received live messages with sequence numbers 7, 6, and 5, and RX messages going from 4 all the way back to Sequence Number 0.
5.1.6. Retransmitting Only Recent Messages
Thus far we have worked with only source late join settings, but suppose that you want to receive only the last 10 messages. To do this, configure the receiver option retransmit_request_maximum option to set how many messages to request backwards from the latest message.
Follow the steps below to demonstrate setting this option to 10.
Add the following line to cfg2.cfg and rename it cfg3.cfg.
receiver retransmit_request_maximum 10
Run lbmsrc -c cfg3.cfg -P 1000 topicName.
Wait a few seconds and run lbmrcv -c cfg3.cfg -v topicName.
The output for each should closely resemble the following.
LBMSRC
	 $ lbmsrc -c cfg3.cfg -P 1000 topicName
	 Sending 10000000 messages of size 25 bytes to topic [topicName]
	 Receiver connect [TCP:10.29.3.76:34448]
LBMRCV
	 $ lbmrcv -c cfg3.cfg -v topicName
	 Immediate messaging target: TCP:10.29.3.76:4391
	 [topicName][TCP:10.29.3.77:4371][13]-RX-, 25 bytes
	 [topicName][TCP:10.29.3.77:4371][14]-RX-, 25 bytes
	 [topicName][TCP:10.29.3.77:4371][15]-RX-, 25 bytes
	 [topicName][TCP:10.29.3.77:4371][16]-RX-, 25 bytes
	 [topicName][TCP:10.29.3.77:4371][17]-RX-, 25 bytes
	 [topicName][TCP:10.29.3.77:4371][18]-RX-, 25 bytes
	 [topicName][TCP:10.29.3.77:4371][19]-RX-, 25 bytes
	 [topicName][TCP:10.29.3.77:4371][20]-RX-, 25 bytes
	 [topicName][TCP:10.29.3.77:4371][21]-RX-, 25 bytes
	 [topicName][TCP:10.29.3.77:4371][22]-RX-, 25 bytes
	 [topicName][TCP:10.29.3.77:4371][23]-RX-, 25 bytes
	 1.002 secs. 0.01097 Kmsgs/sec. 2.195 Kbps
	 [topicName][TCP:10.29.3.77:4371][24], 25 bytes
	 1.002 secs. 0.0009984 Kmsgs/sec. 0.1997 Kbps
	 [topicName][TCP:10.29.3.77:4371][25], 25 bytes
	 1.002 secs. 0.0009984 Kmsgs/sec. 0.1997 Kbps
	 [topicName][TCP:10.29.3.77:4371][26], 25 bytes
Note that 11, not 10, retransmits were actually received. This can happen because network and timing circumstances may have one RX already in transit while the specific RX amount is being processed. (Hence, please note that it is not possible to guarantee one and only one RX message for every possible Late Join recovery.)
5.1.7. Configuring Late Join for Large Numbers of Messages
Suppose you have a receiver that comes up at midday and must gracefully catch up on the large number of messages it has missed. The following discussion explains the relevant Late Join options and how to use them.
5.1.7.1. retransmit_request_generation_interval (receiver)
This option sets the maximum interval (default 10,000ms) between when a receiver first sends a retransmission request and when the receiver gives up on receiving any more RXs (if any at all were received). The receiver then delivers received RXs, and commences delivering live messages.
For requested messages not received, the receiver generates either an individual message loss report, or, if receiver option delivery_control_maximum_burst_loss is exceeded, a burst loss report.
Set this option high enough so that all requested Late Join messages can be retransmitted to the receiver. Although the default 10-second value works in many situations, extremely high volumes of Late Join messages may require more time.
As an alternative, you can set this option to the longest expected Late Join recovery time. To estimate Late Join recovery time, see Estimating Recovery Time in the Configuration Guide.
5.1.7.2. retransmit_request_outstanding_maximum (receiver)
When a receiver comes up and begins requesting Late Join messages, it does not simply request messages starting at Sequence Number 0 through 1000000. Rather, it requests the messages a little at a time, depending upon retransmit_request_outstanding_maximum. For example, when set to the default of 200, the receiver requests the first 200 messages (Sequence Number 0 - 199). Upon receiving Sequence Number 0, it then requests the next grouping, starting at Sequence Number 200, and so on.
Note that in some environments, the default of 200 messages may be too high and overwhelm receivers with RXs, which can cause loss in a live LBT-RM stream. However, higher values can also increase the rate of RXs received.
5.1.7.3. retransmit_message_caching_proximity (receiver)
Long recoveries of active sources can create memory cache problems due to the processing of both new and retransmitted messages. This option provides a method to control caching and cache size during recovery.
It does this by comparing the option value (default 2147483647) to the difference between the newest (live) received sequence number and the latest received RX sequence number. If the difference is less than the option's value incoming live new messages are cached. Otherwise, new messages are dropped and not cached (they can be requested later as retransmissions).
The default value of retransmit_message_caching_proximity encourages caching and should be optimal for most receivers.
If your source sends faster than it retransmits, caching is beneficial, as it ensures new data is received only once, thus reducing recovery time. If the source retransmits faster than it sends, which is the optimal condition, you can lower the value of this option to use less memory during recovery, with little performance impact.
5.1.7.4. retransmit_message_map_tablesz (source)
This option has been deprecated.
This option specifies the size of the hash table the source uses to store Late Join messages.
A larger table can store more messages more efficiently, but takes up more memory.
A smaller table uses less memory, but costs more CPU time as more messages are retained.
For example, if the table size is left at its default of 131, bringing up a receiver requesting 1 million Late Join messages can take over 5 minutes. If you increase the table size to 131113, the receiver will need only 8 seconds to become fully caught up.
5.2. Off-Transport Recovery (OTR)
Off-Transport Recovery (OTR) is a lost-message-recovery feature that provides a level of hedging against the possibility of brief and incidental unrecoverable loss at the transport level or from a gateway. This section describes the OTR feature.
5.2.1. OTR Overview
When a transport cannot recover lost messages, OTR engages and looks to the source for message recovery. It does this by accessing the source's retention buffer (used also by the Late Join feature) to re-request messages that no longer exist in a transport's transmission window or other places such as a UMP store or redundant source.
OTR functions in a manner very similar to that of Late Join, but differs mainly in that it activates in message loss situations rather than following the creation of a receiver, and shares only the source late_join option setting.
Upon detecting loss, a receiver using TCP, TCP-LB, LBT-IPC or LBT-RDMA initiates OTR by sending repeated, spaced, OTR requests to the source, until it recovers lost messages or a timeout period elapses.
OTR operates independently from transport-level recovery mechanisms such as NAKs for LBT-RU or LBT-RM. When you enable OTR for a receiver with use_otr, the otr_request_initial_delay starts as soon as the delivery controller detects a sequence gap. OTR recovery initiates if the gap is not resolved by the end of the delay interval. OTR recovery can occur before, during or after transport-level recovery attempts.
When a receiver initiates OTR, the intervals between OTR requests increases twofold after each request, until the maximum interval is reached (assuming the receiver is still waiting to receive the retransmission). You use configuration options otr_request_minimum_interval and otr_request_maximum_intervalto set the initial (minimum) and maximum intervals, respectively.
The source retransmits lost messages to the recovered receiver via unicast.
5.2.2. OTR With UMP
You can implement OTR in conjunction with UMP's persistent store feature, however in this configuration, it functions somewhat differently. If an OTR-enabled receiver registered with a store detects a sequence gap in the live stream and that gap is not resolved by other means within the next otr_request_initial_delay, the receiver requests those messages from the store(s). If the store does not have some of the requested messages, they will be requested from the source. Regardless of whether the messages are recovered from a store or from the source, OTR delivers all recovered messages the LBM_MSG_OTR flag, unlike Late Join, which uses the LBM_MSG_RETRANSMIT flag.
Unlike with a persistent store, a source/topic using UMQ's queue feature services OTR requests in the same manner used by UMS.
5.2.3. OTR Options Summary
The following set of configuration options govern OTR functionality. Please refer to the Ultra Messaging Configuration Guide for full descriptions of these options. You can click the individual links below for each option's description.
| scope (object) | option |
|---|---|
| source | late_join |
| source | retransmit_retention_age_threshold |
| source | retransmit_retention_size_limit |
| source | retransmit_retention_size_threshold |
| receiver | use_otr |
| receiver | otr_request_duration |
| receiver | otr_request_initial_delay |
| receiver | otr_request_log_alert_cooldown |
| receiver | otr_request_maximum_interval |
| receiver | otr_request_minimum_interval |
| receiver | otr_request_outstanding_maximum |
5.3. Request/Response Model
This section discusses the following topics.
5.3.1. Request Message
UM provides three ways to send a request message.
lbm_send_request() to send a request to a topic via a source object. Uses the standard source-based transports (TCP, LBT-RM, LBT-RU).
lbm_multicast_immediate_request() to send a request to a topic as a multicast immediate message. See Multicast Immediate Messaging.
lbm_unicast_immediate_request() to send a request to a topic as a unicast immediate message. See Multicast Immediate Messaging.
The request function returns a request object and defines an application callback for responses that allows the receiving application to send a response directly to the requesting application via a special TCP connection instead of a normal data transport. The requesting application -- not UM -- determines how many responses it needs. Therefore, it must delete the request object when it no longer wants to receive responses by calling lbm_request_delete(). It discards any responses that arrive after the request object has been deleted.
5.3.2. Response Message
An application responds to an UM request message by calling lbm_send_response(). Contained within that request message's header is a response object, which serves as a return address to the requester. UM passes the response object to lbm_send_response(). Since the response object is part of the message header, it is deleted at the same time that the message is deleted. Therefore, if the sending of the response cannot be done within the responder's receive callback, the message must be retained and subsequently deleted.
5.3.3. TCP Management
UM creates and manages the special TCP connections for responses, maintaining a list of active response connections . When an application sends a response, UM scans that list for an active connection to the destination. If it doesn't find a connection for the response, it creates a new connection and adds it to the list. After the lbm_send_response() function returns, UM schedules the response_tcp_deletion_timeout, which defaults to 2 seconds. If a second request comes in from the same application before the timer expires, the responding application simply uses the existing connection and restarts the deletion timer.
It is conceivable that a very large response could take more than the response_tcp_deletion_timeout default (2 seconds) to send to a slow-running receiver. In this case, UM automatically increases the deletion timer as needed to ensure the last message completes.
5.3.4. Configuration
See the UM Configuration Guide for the descriptions of the Request/Response configuration options.
Note: If your application is running within an UM context where the configuration option, request_tcp_bind_request_port has been set to zero, request port binding has been turned off, which also disables the Request/Response feature.
Note: The Request/Response model only works with the unicast topic resolution daemon (lbmrd) across local LANs that use Network Address Translation (NAT) if you use the default value (0.0.0.0) for request_tcp_interface.
5.3.5. Example Applications
UM includes two example applications that illustrate Request/Response.
lbmreq.c - application that sends requests on a given topic (single source) and waits for responses. See also the Java example, lbmreq.java, and the .NET example, lbmreq.cs.
lbmresp.c - application that waits for requests and sends responses back on a given topic (single receiver). See also the Java example, lbmresp.java, and the .NET example, lbmresp.cs.
We can demonstrate a series of 5 requests and responses with the following procedure.
Run lbmresp -v topicname
Run lbmreq -R 5 -v topicname
LBMREQ
Output for lbmreq should resemble the following.
$ lbmreq -R 5 -q topicname
Event queue in use
Using TCP port 4392 for responses
Delaying requests for 1000 milliseconds
Sending request 0
Starting event pump for 5 seconds.
Receiver connect [TCP:10.29.1.78:4958]
Done waiting for responses. 1 responses (25 bytes) received. Deleting request. Sending request 1
Starting event pump for 5 seconds.
Done waiting for responses. 1 responses (25 bytes) received. Deleting request. Sending request 2
Starting event pump for 5 seconds.
Done waiting for responses. 1 responses (25 bytes) received. Deleting request. Sending request 3
Starting event pump for 5 seconds.
Done waiting for responses. 1 responses (25 bytes) received. Deleting request. Sending request 4
Starting event pump for 5 seconds.
Done waiting for responses. 1 responses (25 bytes) received. Deleting request.
Quitting...
LBMRESP
Output for lbmresp should resemble the following.
$ lbmresp -v topicname
Request [topicname][TCP:10.29.1.78:14371][0], 25 bytes
Sending response. 1 responses of 25 bytes each (25 total bytes).
Done sending responses. Deleting response.
Request [topicname][TCP:10.29.1.78:14371][1], 25 bytes
Sending response. 1 responses of 25 bytes each (25 total bytes).
Done sending responses. Deleting response.
Request [topicname][TCP:10.29.1.78:14371][2], 25 bytes
Sending response. 1 responses of 25 bytes each (25 total bytes).
Done sending responses. Deleting response.
Request [topicname][TCP:10.29.1.78:14371][3], 25 bytes
Sending response. 1 responses of 25 bytes each (25 total bytes).
Done sending responses. Deleting response.
Request [topicname][TCP:10.29.1.78:14371][4], 25 bytes
Sending response. 1 responses of 25 bytes each (25 total bytes).
Done sending responses. Deleting response.
[topicname][TCP:10.29.1.78:14371], End of Transport Session
5.4. Self Describing Messaging
The UM Self-Describing Messaging (SDM) feature provides an API that simplifies the creation and use of messages by your applications. An SDM message contains one or more fields and each field consists of the following.
A name
A type
A value
Each named field may appear only once in a message. If multiple fields of the same name and type are needed, array fields are available. A field in a nested message may have the same name as a field in the outer message.
SDM is particularly helpful for creating messages sent across platforms by simplifying the creation of data formats. SDM automatically performs platform-specific data translations, eliminating Endianess conflicts.
Using SDM also simplifies message maintenance because the message format or structure can be independent of the source and receiver applications. For example, if your receivers query SDM messages for particular fields and ignore the order of the fields within the message, a source can change the field order if necessary with no modification of the receivers needed.
Use the following links to access a complete reference of SDM functions, field types and message field operations.
C Application Programmer's Interface -- click on the Files tab at the top and select lbmsdm.h.
Java Application Programmer's Interface -- select com.latencybusters.lbm.sdm under Packages.
.NET Application Programmer's Interface -- select the com.latencybusters.lbm.sdm Namespace.
5.5. Pre-Defined Messaging
The UM Pre-Defined Messaging (PDM) feature provides an API similar to the SDM API, but allows you to define messages once and then use the definition to create messages that may contain self-describing data. Eliminating the need to repeatedly send a message definition increases the speed of PDM over SDM. The ability to use arrays created in a different programming language also improves performance.
The PDM library lets you create, serialize, and deserialize messages using pre-defined knowledge about the possible fields that may be used. You can create a definition that a) describes the fields to be sent and received in a message, b) creates the corresponding message, and c) adds field values to the message. This approach offers several performance advantages over SDM, as the definition is known in advance. However, the usage pattern is slightly different than the SDM library, where fields are added directly to a message without any type of definition.
A PDM message contains one or more fields and each field consists of the following.
A name
A type
A value
Each named field may appear only once in a message. If multiple fields of the same name and type are needed, array fields are available. A field in a nested message may have the same name as a field in the outer message.
See the C, Java, and .NET Application Programmer's Interfaces for complete references of PDM functions, field types and message field operations. The C API also has information and code samples about how to create definitions and messages, set field values in a message, set the value of array fields in a message, serialize, deserialize and dispose of messages, and fetch values from a message. See the following API documentation:
C Application Programmer's Interface -- click on the Files tab at the top and select lbmpdm.h.
Java Application Programmer's Interface -- select com.latencybusters.lbm.pdm under Packages.
.NET Application Programmer's Interface -- select the com.latencybusters.lbm.pdm Namespace.
5.5.1. Typical PDM Usage Patterns
The typical PDM usage patterns can usually be broken down into two categories: sources (which need to serialize a message for sending) and receivers (which need to deserialize a message to extract field values). However, for optimum performance for both sources and receivers, first set up the definition and a single instance of the message only once during a setup or initialization phase, as in the following example workflow:
Create a definition and set its id and version.
Add field information to the definition to describe the types of fields to be in the message.
Create a single instance of a message based on the definition.
Set up a source to do the following:
Add field values to the message instance.
Serialize the message so that it can be sent.
Likewise, set up a receiver to do the following:
Deserialize the received bytes into the message instance.
Extract the field values from the message.
5.5.2. Getting Started
PDM APIs are provided in C, Java, and C#, however, the examples in this section are Java based.
5.5.2.1. PDM Code Example, Source
Translating the Typical PDM Usage Patterns to Java for a source produces the following:
private PDMDefinition defn;
private PDMMessage msg;
private PDMFieldInfo fldInfo100;
private PDMFieldInfo fldInfo101;
private PDMFieldInfo fldInfo102;

public void setupPDM() {
	//Create the definition with 3 fields and using int field names
	defn = new PDMDefinition(3, true);

	//Set the definition id and version
	defn.setId(1001);
	defn.setMsgVersMajor((byte)1);
	defn.setMsgVersMinor((byte)0);

	//Create information for a boolean, int32, and float fields (all required)
	fldInfo100 = defn.addFieldInfo(100, PDMFieldType.BOOLEAN, true);
	fldInfo101 = defn.addFieldInfo(101, PDMFieldType.INT32, true);
	fldInfo102 = defn.addFieldInfo(102, PDMFieldType.FLOAT, true);

	//Finalize the definition and create the message
	defn.finalizeDef();
	msg = new PDMMessage(defn);
}

public void sourceUsePDM() {
	//Call the function to setup the definition and message
	setupPDM();

	//Example values for the message
	boolean fld100Val = true;
	int fld101Val = 7;
	float fld102Val = 3.14F;

	//Set each field value in the message
	msg.setFieldValue(fldInfo100, fld100Val);
	msg.setFieldValue(fldInfo101, fld101Val);
	msg.setFieldValue(fldInfo102, fld102Val);

	//Serialize the message to bytes
	byte[] buffer = msg.toBytes();
}
5.5.2.2. PDM Code Example, Receiver
Translating the Typical PDM Usage Patterns to Java for a receiver produces the following:
private PDMDefinition defn;
private PDMMessage msg;
private PDMFieldInfo fldInfo100;
private PDMFieldInfo fldInfo101;
private PDMFieldInfo fldInfo102;

public void setupPDM() {
	//Create the definition with 3 fields and using int field names
	defn = new PDMDefinition(3, true);

	//Set the definition id and version
	defn.setId(1001);
	defn.setMsgVersMajor((byte)1);
	defn.setMsgVersMinor((byte)0);

	//Create information for a boolean, int32, and float field (all required)
	fldInfo100 = defn.addFieldInfo(100, PDMFieldType.BOOLEAN, true);
	fldInfo101 = defn.addFieldInfo(101, PDMFieldType.INT32, true);
	fldInfo102 = defn.addFieldInfo(102, PDMFieldType.FLOAT, true);

	//Finalize the definition and create the message
	defn.finalizeDef();
	msg = new PDMMessage(defn);
}

public void receiverUsePDM(byte[] buffer) {
	//Call the function to setup the definition and message
	setupPDM();

	//Values to be retrieved from the message
	boolean fld100Val;
	int fld101Val;
	float fld102Val;

	//Deserialize the bytes into a message
	msg.parse(buffer);

	//Get each field value from the message
	fld100Val = msg.getFieldValueAsBoolean(fldInfo100);
	fld101Val = msg.getFieldValueAsInt32(fldInfo101);
	fld102Val = msg.getFieldValueAsFloat(fldInfo102);
}
5.5.2.3. PDM Code Example Notes
In the examples above, the setupPDM() function is called once to set up the PDM definition and message. It is identical in both the source and receiver cases and simply sets up a definition that contains three required fields with integer names (100, 101, 102). Once finalized, it can create a message that leverages its pre-defined knowledge about these three required fields. The source example adds the three sample field values (a boolean, int32, and float) to the message, which is then serialized to a byte array. In the receiver example, the message parses a byte array into the message and then extracts the three field values.
5.5.3. Using the PDM API
The following code snippets expand upon the previous examples to demonstrate the usage of additional PDM functionality (but use "..." to eliminate redundant code).
5.5.3.1. Reusing the Message Object
Although the examples use a single message object (which provides performance benefits due to reduced message creation and garbage collection), it is not explicitly required to reuse a single instance. However, multiple threads should not access a single message instance.
5.5.3.2. Number of Fields
Although the number of fields above is initially set to 3 in the PDMDefinition constructor, if you add more fields to the definition with the addFieldInfo method, the definition grows to accommodate each field. Once the definition is finalized, you cannot add additional field information because the definition is now locked and ready for use in a message.
5.5.3.3. String Field Names
The examples above use integer field names in the setupPDM() function when creating the definition. You can also use string field names when setting up the definition. However, you still must use a FieldInfo object to set or get a field value from a message, regardless of field name type. Notice that false is passed to the PDMDefinition constructor to indicate string field names should be used. Also, the overloaded addFieldInfo function uses string field names (.Field100.) instead of the integer field names.
...
public void setupPDM() {
	//Create the definition with 3 fields and using string field names
	defn = new PDMDefinition(3, false);
	...
	//Create information for a boolean, int32, and float field (all required)
fldInfo100 = defn.addFieldInfo("Field100", PDMFieldType.BOOLEAN, true);
	fldInfo101 = defn.addFieldInfo("Field101", PDMFieldType.INT32, true);
	fldInfo102 = defn.addFieldInfo("Field102", PDMFieldType.FLOAT, true);
	...
}
...
5.5.3.4. Retrieving FieldInfo from the Definition
At times, it may be easier to lookup the FieldInfo from the definition using the integer name (or string name if used). This eliminates the need to store the reference to the FieldInfo when getting or setting a field value in a message, but it does incur a performance penalty due to the lookup in the definition to retrieve the FieldInfo. Notice that there are no longer FieldInfo objects being used when calling addFieldInfo and a lookup is being done for each call to msg.getFieldValueAs* to retrieve the FieldInfo by integer name.
private PDMDefinition defn;
private PDMMessage msg;

public void setupPDM() {
	...
	//Create information for a boolean, int32, and float field (all required)
	defn.addFieldInfo(100, PDMFieldType.BOOLEAN, true);
	defn.addFieldInfo(101, PDMFieldType.INT32, true);
	defn.addFieldInfo(102, PDMFieldType.FLOAT, true);
	...
}

public void receiverUsePDM(byte[] buffer) {
	...
	//Get each field value from the message
	fld100Val = msg.getFieldValueAsBoolean(defn.getFieldInfo(100));
	fld101Val = msg.getFieldValueAsInt32(defn.getFieldInfo(101));
	fld102Val = msg.getFieldValueAsFloat(defn.getFieldInfo(102));
}
5.5.3.5. Required and Optional Fields
When adding field information to a definition, you can indicate that the field is optional and may not be set for every message that uses the definition. Do this by passing false as the third parameter to the addFieldInfo function. Using required fields (fixed-required fields specifically) produces the best performance when serializing and deserializing messages, but causes an exception if all required fields are not set before serializing the message. Optional fields allow the concept of sending "null" as a value for a field by simply not setting that field value on the source side before serializing the message. However, after parsing a message, a receiver should check the isFieldValueSet function for an optional field before attempting to read the value from the field to avoid the exception mentioned above.
...
private PDMFieldInfo fldInfo103;
...
public void setupPDM() {
	...
//Create information for a boolean, int32, and float field (all required)
	// as well as an optional int8 field
fldInfo100 = defn.addFieldInfo(100, PDMFieldType.BOOLEAN, true);
	fldInfo101 = defn.addFieldInfo(101, PDMFieldType.INT32, true);
	fldInfo102 = defn.addFieldInfo(102, PDMFieldType.FLOAT, true);
	fldInfo103 = defn.addFieldInfo(103, PDMFieldType.INT8, false);
	...
}

public void sourceUsePDM() {
	...
	//Set each field value in the message
	// except do not set the optional field
	msg.setFieldValue(fldInfo100, fld100Val);
	msg.setFieldValue(fldInfo101, fld101Val);
	msg.setFieldValue(fldInfo102, fld102Val);
...
}
...
private PDMFieldInfo fldInfo103;
...
public void setupPDM() {
	...
//Create information for a boolean, int32, and float field (all required)
	// as well as an optional int8 field
	fldInfo103 = defn.addFieldInfo(103, PDMFieldType.INT8, false);
	...
}
public void receiverUsePDM(byte[] buffer) {
	...
	byte fld103Val;
	...

	if(msg.isFieldValueSet(fldInfo103)) {
		fld103Val = msg.getFieldValueAsInt8(fldInfo103);
	}
}
5.5.3.6. Fixed String and Fixed Unicode Field Types
A variable length string typically does not have the performance optimizations of fixed-required fields. However, by indicating "required", as well as the field type FIX_STRING or FIX_UNICODE and specifying an integer number of fixed characters, PDM sets aside an appropriate fixed amount of space in the message for that field and treats it as an optimized fixed-required field. Strings of a smaller length can still be set as the value for the field, but the message allocates the specified fixed number of bytes for the string. Specify unicode strings in the same manner (with FIX_UNICODE as the type) and in "UTF-8" format.
...
private PDMFieldInfo fldInfo104;
...
public void setupPDM() {
	...
	fldInfo104 = defn.addFieldInfo(104, PDMFieldType.FIX_STRING, 12, true);
	...
}

public void sourceUsePDM() {
	...
	String fld104Val = "Hello World!";

	//Set each field value in the message
	// except do not set the optional field
	msg.setFieldValue(fldInfo100, fld100Val);
	msg.setFieldValue(fldInfo101, fld101Val);
	msg.setFieldValue(fldInfo102, fld102Val);
	msg.setFieldValue(fldInfo104, fld104Val);
...
}
...
private PDMFieldInfo fldInfo104;
...
public void setupPDM() {
	...
	fldInfo104 = defn.addFieldInfo(104, PDMFieldType.FIX_STRING, 12, true);
	...
}
public void receiverUsePDM(byte[] buffer) {
	...
	String fld104Val;
	...

	fld104Val = msg.getFieldValueAsString(fldInfo104);
}
5.5.3.7. Variable Field Types
The field types of STRING, UNICODE, BLOB, and MESSAGE are all variable length field types. They do not require a length to be specified when adding field info to the definition. You can use a BLOB field to store an arbitrary binary objects (in Java as an array of bytes) and a MESSAGE field to store a PDMMessage object, which enables "nesting" PDMMessages inside other PDMMessages. Creating and using a variable length string field is nearly identical to the previous fixed string example.
...
private PDMFieldInfo fldInfo105;
...
public void setupPDM() {
	...
	fldInfo105 = defn.addFieldInfo(105, PDMFieldType.STRING, true);
	...
}

public void sourceUsePDM() {
	...
	String fld105Val = "variable length value";
	...
	msg.setFieldValue(fldInfo105, fld105Val);
...
}
...
private PDMFieldInfo fldInfo105;
...
public void setupPDM() {
	...
	fldInfo105 = defn.addFieldInfo(105, PDMFieldType.STRING, true);
	...
}
public void receiverUsePDM(byte[] buffer) {
	...
	String fld105Val;
	...

	fld105Val = msg.getFieldValueAsString(fldInfo105);
}
Retrieve the BLOB field values with the getFieldValueAsBlob function, and the MESSAGE field values with the getFieldValueAsMessage function.
5.5.3.8. Array Field Types
For each of the scalar field types (fixed and variable length), a corresponding array field type uses the convention *_ARR for the type name (ex: BOOLEAN_ARR, INT32_ARR, STRING_ARR, etc). This lets you set and get Java values such as an int[] or string[] directly into a single field. In addition, all of the array field types can specify a fixed number of elements for the size of the array when they are defined, or if not specified, behave as variable size arrays. Do this by passing an extra parameter to the addFieldInfo function of the definition.
To be treated as a fixed-required field, an array type field must be required as well as be specified as a fixed size array of fixed length elements. For instance, a required BOOLEAN_ARR field defined with a size of 3 would be treated as a fixed-required field. Also, a required FIX_STRING_ARR field defined with a size of 5 and fixed string length of 7 would be treated as a fixed-required field. However, neither a STRING_ARR field nor a BLOB_ARR field are treated as a fixed length field even if the size of the array is specified, since each element of the array can be variable in length. In the example below, field 106 and field 108 are both treated as fixed-required fields, but field 107 is not because it is a variable size array field type.
...
private PDMFieldInfo fldInfo106;
private PDMFieldInfo fldInfo107;
private PDMFieldInfo fldInfo108;
...
public void setupPDM() {
	...
	//Create information for a boolean, int32, and float field (all required)
	// as well as an optional int8 field
	...
	//A required, fixed size array of 3 boolean elements
	fldInfo106 = defn.addFieldInfo(106, PDMFieldType.BOOLEAN_ARR, true, 3);
	//An optional, variable size array of int32 elements
	fldInfo107 = defn.addFieldInfo(107, PDMFieldType.INT32_ARR, false);
	//A required, fixed size array of 2 element which are each 5 character strings
	fldInfo108 = defn.addFieldInfo(108, PDMFieldType.FIX_STRING_ARR, 5, true, 2);
	...
}

public void sourceUsePDM() {
...

	//Example values for the message
	...
	boolean fld106Val[] = {true, false, true};
	int fld107Val[] = {1, 2, 3, 4, 5};
	String fld108Val[] = {"aaaaa", "bbbbb"};

	//Set each field value in the message
	...
	msg.setFieldValue(fldInfo106, fld106Val);
	msg.setFieldValue(fldInfo107, fld107Val);
	msg.setFieldValue(fldInfo108, fld108Val);

	...
}
...
private PDMFieldInfo fldInfo106;
private PDMFieldInfo fldInfo107;
private PDMFieldInfo fldInfo108;
...
public void setupPDM() {
	...
	//Create information for a boolean, int32, and float field (all required)
	// as well as an optional int8 field
	...
	//A required, fixed size array of 3 boolean elements
	fldInfo106 = defn.addFieldInfo(106, PDMFieldType.BOOLEAN_ARR, true, 3);
	//An optional, variable size array of int32 elements
	fldInfo107 = defn.addFieldInfo(107, PDMFieldType.INT32_ARR, false);
	//A required, fixed size array of 2 element which are each 5 character strings
	fldInfo108 = defn.addFieldInfo(108, PDMFieldType.FIX_STRING_ARR, 5, true, 2);
	...
}

public void receiverUsePDM(byte[] buffer) {
	...

	//Values to be retrieved from the message
	...
	boolean fld106Val[];
	int fld107Val[];
	String fld108Val[];

	//Deserialize the bytes into a message
	msg.parse(buffer);

	//Get each field value from the message
	...
	fld106Val = msg.getFieldValueAsBooleanArray(fldInfo106);
	if(msg.isFieldValueSet(fldInfo107)) {
		fld107Val = msg.getFieldValueAsInt32Array(fldInfo107);
	}
	fld108Val = msg.getFieldValueAsStringArray(fldInfo108);

}
5.5.3.9. Definition Included In Message
Optionally, a PDM message can also include the definition when it is serialized to bytes. This enables receivers to parse a PDM message without having pre-defined knowledge of the message, although including the definition with the message affects message size and performance of message deserialization. Notice that the setIncludeDefinition function is called with an argument of true for a source that serializes the definition as part of the message.
private PDMDefinition defn;
private PDMMessage msg;

public void setupPDM() {
	//Create the definition with 3 fields and using int field names
	defn = new PDMDefinition(3, true);

	...

	//Finalize the definition and create the message
	defn.finalizeDef();
	msg = new PDMMessage(defn);

//Set the flag to indicate that the definition should also be serialized
	msg.setIncludeDefinition(true);
}

...
For a receiver, the setupPDM function does not need to set any flags for the message but rather should define a message without a definition, since we assume the source provides the definition. If a definition is set for a message, it will attempt to use that definition instead of the definition on the incoming message (unless the ids are different).
private PDMDefinition defn;
private PDMMessage msg;

public void setupPDM() {
	//Don.t define a definition

	//Create a message without a definition since the incoming message will have it

	msg = new PDMMessage();
}

...
5.5.3.10. The PDM Field Iterator
You can use the PDM Field Iterator to check all defined message fields to see if set, or to extract their values. You can extract a field value as an Object using this method, but due to the casting involved, we recommend you use the type specific get method to extract the exact value. Notice the use of field.isValueSet to check to see if the field value is set and the type specific get methods such as getBooleanValue and getFloatValue.
...

public void setupPDM() {
	//Create the definition with 3 fields and using int field names
	defn = new PDMDefinition(3, true);

	//Set the definition id and version
	defn.setId(1001);
	defn.setMsgVersMajor((byte)1);
	defn.setMsgVersMinor((byte)0);

	//Create information for a boolean, int32, and float field (all required)
	// as well as an optional int8 field
	fldInfo100 = defn.addFieldInfo(100, PDMFieldType.BOOLEAN, true);
	fldInfo101 = defn.addFieldInfo(101, PDMFieldType.INT32, true);
	fldInfo102 = defn.addFieldInfo(102, PDMFieldType.FLOAT, true);
	fldInfo103 = defn.addFieldInfo(103, PDMFieldType.INT8, false);
	fldInfo104 = defn.addFieldInfo(104, PDMFieldType.FIX_STRING, 12, true);
	fldInfo105 = defn.addFieldInfo(105, PDMFieldType.STRING, true);
	//A required, fixed size array of 3 boolean elements
	fldInfo106 = defn.addFieldInfo(106, PDMFieldType.BOOLEAN_ARR, true, 3);
	//An optional, variable size array of int32 elements
	fldInfo107 = defn.addFieldInfo(107, PDMFieldType.INT32_ARR, false);
	//A required, fixed size array of 2 element which are each 5 character strings
	fldInfo108 = defn.addFieldInfo(108, PDMFieldType.FIX_STRING_ARR, 5, true, 2);

	//Finalize the definition and create the message
	defn.finalizeDef();
	msg = new PDMMessage(defn);
}

public void receiveAndIterateMessage(byte[] buffer) {
	msg.parse(buffer);
	PDMFieldIterator iterator = msg.createFieldIterator();
	PDMField field = null;
	while(iterator.hasNext()) {
		field = iterator.next();
		System.out.println("Field set? " +field.isValueSet());
		switch(field.getIntName()) {
			case 100:
				boolean val100 = field.getBooleanValue();
				System.out.println(
						"Field 100's value is: " + val100);
				break;
			case 101:
				int val101 = field.getInt32Value();
				System.out.println(
						"Field 101's value is: " + val101);
				break;
			case 102:
				float val102 = field.getFloatValue();
				System.out.println(
						"Field 102's value is: " + val102);
				break;
			default:
				//Casting to object is possible but not recommended
				Object value = field.getValue();
				int name = field.getIntName();
				System.out.println(
						"Field " + name + "'s value is: " + value);
		}
	}
}
Sample Output (106, 107, 108 are array objects as expected):
Field set? true
Field 100's value is: true
Field set? true
Field 101's value is: 7
Field set? true
Field 102's value is: 3.14
Field set? false
Field 103's value is: null
Field set? true
Field 104's value is: Hello World!
Field set? true
Field 105's value is: Variable
Field set? true
Field 106's value is: [Z@527736bd
Field set? true
Field 107's value is: [I@10aadc97
Field set? true
Field 108's value is: [Ljava.lang.String;@4178460d
5.5.3.11. Using the Definition Cache
The PDM Definition Cache assists with storing and looking up definitions by their id and version. In some scenarios, it may not be desirable to maintain the references to the message and the definition from a setup phase by the application. A source could optionally create the definition during the setup phase and store it in the definition cache. At a later point in time, it could retrieve the definition from the cache and use it to create the message without needing to maintain any references to the objects.
public void createAndStoreDefinition() {
	PDMDefinition myDefn = new PDMDefinition(3, true);
	//Set the definition id and version
	myDefn.setId(2001);
	myDefn.setMsgVersMajor((byte)1);
	myDefn.setMsgVersMinor((byte)0);

	//Create information for a boolean, int32, and float field (all required)
	myDefn.addFieldInfo(100, PDMFieldType.BOOLEAN, true);
	myDefn.addFieldInfo(101, PDMFieldType.INT32, true);
	myDefn.addFieldInfo(102, PDMFieldType.FLOAT, true);

	myDefn.finalizeDef();

	PDMDefinitionCache.getInstance().put(myDefn);
}

public void createMessageUsingCache() {
	PDMDefinition myFoundDefn = PDMDefinitionCache.getInstance().get(2001, 1, 0);
	if(myFoundDefn != null) {
		PDMMessage myMsg = new PDMMessage(myFoundDefn);
		//Get FieldInfo from defn and then set field values in myMsg
		//...
	}
}
A more advanced use of the PDM Definition Cache is by a receiver which may need to receive messages with different definitions and the definitions are not being included with the messages. The receiver can create the definitions in advance and then set a flag that allows automatic lookup into the definition cache when parsing a message (which is not on by default). Before receiving messages, the receiver should do something similar to createAndStoreDefinition (shown below) to set up definitions and put them in the definition cache. Then the flag to allow automatic lookup should be set as shown below in the call to setTryToLoadDefFromCache(true). This allows the PDMMessage to be created without a definition and still successfully parse a message by leveraging the definition cache.
public void createAndStoreDefinition() {
	PDMDefinition myDefn = new PDMDefinition(3, true);
	//Set the definition id and version
	myDefn.setId(2001);
	myDefn.setMsgVersMajor((byte)1);
	myDefn.setMsgVersMinor((byte)0);

	//Create information for a boolean, int32, and float field (all required)
	myDefn.addFieldInfo(100, PDMFieldType.BOOLEAN, true);
	myDefn.addFieldInfo(101, PDMFieldType.INT32, true);
	myDefn.addFieldInfo(102, PDMFieldType.FLOAT, true);

	myDefn.finalizeDef();

	PDMDefinitionCache.getInstance().put(myDefn);

	//Create and store other definitions
	//...
}

public void receiveKnownMessages(byte[] buffer) {
	PDMMessage myMsg = new PDMMessage();
	//Set the flag that enables messages to try
	// looking up the definition in the cache automatically
	// when parsing a byte buffer
	myMsg.setTryToLoadDefFromCache(true);
	myMsg.parse(buffer);

	if(myMsg.getDefinition().getId() == 2001
			&& myMsg.getDefinition().getMsgVersMajor() == 1
			&& myMsg.getDefinition().getMsgVersMinor() == 0) {

		PDMDefinition myDefn = PDMDefinitionCache.getInstance().get(2001, 1, 0);
		PDMFieldInfo fldInfo100 = myDefn.getFieldInfo(100);
		PDMFieldInfo fldInfo101 = myDefn.getFieldInfo(101);
		PDMFieldInfo fldInfo102 = myDefn.getFieldInfo(102);

		boolean fld100Val;
		int fld101Val;
		float fld102Val;

		//Get each field value from the message
		fld100Val = myMsg.getFieldValueAsBoolean(fldInfo100);
		fld101Val = myMsg.getFieldValueAsInt32(fldInfo101);
		fld102Val = myMsg.getFieldValueAsFloat(fldInfo102);

		System.out.println(fld100Val + " " + fld101Val + " " + fld102Val);
	}
}
5.5.4. Migrating from SDM
Applications using SDM with a known set of message fields are good candidates for migrating from SDM to PDM. With SDM, the source typically adds fields to an SDM message without a definition. But, as shown above in the PDM examples, creating/adding a PDM definition before adding field values is fairly straightforward.
However, certain applications may be incapable of building a definition in advance due to the ad-hoc nature of their messaging needs, in which case a self-describing format like SDM may be preferred.
5.5.4.1. Simple Migration Example
The following source code shows a basic application that serializes and deserializes three fields using SDM and PDM. The setup method in both cases initializes the object instances so they can be reused by the source and receiver methods.
The goal of the sourceCreateMessageWith functions is to produce a byte array by setting field values in a message object. With SDM, actual Field classes are created, values are set, the Field classes are added to a Fields class, and then the Fields class is added to the SDMessage. With PDM, FieldInfo objects are created during the setup phase and then used to set specific values in the PDMMessage.
The goal of the receiverParseMessageWith functions is to produce a message object by parsing the byte array and then extract the field values from the message. With SDM, the specific field is located and casted to the correct field class before getting the field value. With PDM, the appropriate getFieldValueAs function is called with the corresponding FieldInfo object created during the setup phase to extract the field value.
public class Migration {

	//SDM Variables
	private LBMSDMessage srcSDMMsg;
	private LBMSDMessage rcvSDMMsg;

	//PDM Variables
	private PDMDefinition defn;
	private PDMFieldInfo fldInfo100;
	private PDMFieldInfo fldInfo101;
	private PDMFieldInfo fldInfo102;
	private PDMMessage srcPDMMsg;
	private PDMMessage rcvPDMMsg;


public static void main(String[] args) {
		Migration app = new Migration();
		System.out.println("Setting up PDM Definition and Message");
		app.setupPDM();
		System.out.println("Setting up SDM Messages");
		app.setupSDM();

		byte[] sdmBuffer;
		sdmBuffer = app.sourceCreateMessageWithSDM();
		app.receiverParseMessageWithSDM(sdmBuffer);

		byte[] pdmBuffer;
		pdmBuffer = app.sourceCreateMessageWithPDM();
		app.receiverParseMessageWithPDM(pdmBuffer);

	}

	public void setupSDM() {
		rcvSDMMsg = new LBMSDMessage();
		srcSDMMsg = new LBMSDMessage();
	}

	public void setupPDM() {
		//Create the definition with 3 fields and using int field names
		defn = new PDMDefinition(3, false);

		//Set the definition id and version
		defn.setId(1001);
		defn.setMsgVersMajor((byte)1);
		defn.setMsgVersMinor((byte)0);

		//Create information for a boolean, int32, and float field (all required)
		// as well as an optional int8 field
		fldInfo100 = defn.addFieldInfo("Field100", PDMFieldType.INT8, true);
		fldInfo101 = defn.addFieldInfo("Field101", PDMFieldType.INT16, true);
		fldInfo102 = defn.addFieldInfo("Field102", PDMFieldType.INT32, true);

		//Finalize the definition and create the message
		defn.finalizeDef();
		srcPDMMsg = new PDMMessage(defn);
		rcvPDMMsg = new PDMMessage(defn);
	}

	public byte[] sourceCreateMessageWithSDM() {
		byte[] buffer = null;

		LBMSDMField fld100 = new LBMSDMFieldInt8("Field100", (byte)0x42);
		LBMSDMField fld101 = new LBMSDMFieldInt16("Field101", (short)0x1ead);
		LBMSDMField fld102 = new LBMSDMFieldInt32("Field102", 12345);
		LBMSDMFields fset = new LBMSDMFields();

		try {
			fset.add(fld100);
			fset.add(fld101);
			fset.add(fld102);
		} catch (LBMSDMException e) {
			System.out.println ( e );
		}


		srcSDMMsg.set(fset);
		try {
			buffer = srcSDMMsg.data();
		} catch (IndexOutOfBoundsException e) {
			System.out.println ( "SDM Exception occurred during build of message:" );
			System.out.println ( e.toString() );
		} catch (LBMSDMException e) {
			System.out.println ( e.toString() );
		}
		return buffer;

	}

	public byte[] sourceCreateMessageWithPDM() {
		//Set each field value in the message
		srcPDMMsg.setFieldValue(fldInfo100, (byte)0x42);
		srcPDMMsg.setFieldValue(fldInfo101, (short)0x1ead);
		srcPDMMsg.setFieldValue(fldInfo102, 12345);

		//Serialize the message to bytes
		byte[] buffer = srcPDMMsg.toBytes();
		return buffer;
	}

	public void receiverParseMessageWithSDM(byte[] buffer) {
		//Values to be retrieved from the message
		byte fld100Val;
		short fld101Val;
		int fld102Val;

		//Deserialize the bytes into a message
		try {
			rcvSDMMsg.parse(buffer);
		} catch (LBMSDMException e) {
			System.out.println(e.toString());
		}

		LBMSDMField fld100 = rcvSDMMsg.locate("Field100");
		LBMSDMField fld101 = rcvSDMMsg.locate("Field101");
		LBMSDMField fld102 = rcvSDMMsg.locate("Field102");

		//Get each field value from the message
		fld100Val = ((LBMSDMFieldInt8)fld100).get();
		fld101Val = ((LBMSDMFieldInt16)fld101).get();;
		fld102Val = ((LBMSDMFieldInt32)fld102).get();;


		System.out.println("SDM Results: Field100=" + fld100Val +
				", Field101=" + fld101Val +
				", Field102=" + fld102Val);

	}

	public void receiverParseMessageWithPDM(byte[] buffer) {
		//Values to be retrieved from the message
		byte fld100Val;
		short fld101Val;
		int fld102Val;

		//Deserialize the bytes into a message
		rcvPDMMsg.parse(buffer);

		//Get each field value from the message
		fld100Val = rcvPDMMsg.getFieldValueAsInt8(fldInfo100);
		fld101Val = rcvPDMMsg.getFieldValueAsInt16(fldInfo101);
		fld102Val = rcvPDMMsg.getFieldValueAsInt32(fldInfo102);


		System.out.println("PDM Results: Field100=" + fld100Val +
				", Field101=" + fld101Val +
				", Field102=" + fld102Val);

	}

}
Notice that with sourceCreateMessageWithSDM function, the three fields (name and value) are created and added to the fset variable, which is then added to the SDM message. On the other hand, the sourceCreateMessageWithPDM function uses the FieldInfo object references to add the field values to the message for each of the three fields.
Also notice that the receiverParseMessageWithSDM requires a cast to the specific field class (like LBMSDMFieldInt8) once the field has been located. After the cast, calling the get method returns the expected value. On the other hand the receiverParseMessageWithPDM uses the FieldInfo object reference to directly retrieve the field value using the appropriate getFieldValueAs* method.
5.5.4.2. SDM Raw Classes
Several SDM classes with Raw in their name could be used as the value when creating an LBMSDMField. For example, an LBMSDMRawBlob instance could be created from a byte array and then that the LBMSDMRawBlob could be used as the value to a LBMSDMFieldBlob as shown in the following example.
		byte[] blob = new byte[25];
		LBMSDMRawBlob rawSDMBlob = new LBMSDMRawBlob(blob);
		try {
			LBMSDMField fld103 = new LBMSDMFieldBlob("Field103",rawSDMBlob);
		} catch (LBMSDMException e1) {
			System.out.println(e1);
		}
The actual field named "Field103" is created in the try block using the rawSDMBlob variable which has been created to wrap the blob byte array. This field can be added to a LBMSDMFields object, which then uses it in a LBMSDMessage.
In PDM, there are no "Raw" classes that can be created. When setting the value for a field for a message, the appropriate variable type should be passed in as the value. For example, setting the field value for a BLOB field would mean simply passing the byte array directly in the setValue method as shown in the following code snippet since the field is defined as type BLOB.
private PDMFieldInfo fldInfo103;

public void setupPDM() {
		...
		fldInfo103 = defn.addFieldInfo("Field103", PDMFieldType.BLOB, true);
		...
	}
...
		byte[] blob = new byte[25];
		srcPDMMsg.setFieldValue(fldInfo103, blob);
The PDM types of DECIMAL, TIMESTAMP, and MESSAGE expect a corresponding instance of PDMDecimal, PDMTimestamp, and PDMMessage as the field value when being set in the message so those types do require an instantiation instead of using a native Java type. For example, if "Field103" had been of type PDMFieldType.DECIMAL, the following code would be used to set the value.
PDMDecimal decimal = new PDMDecimal((long)2, (byte)32);
srcPDMMsg.setFieldValue(fldInfo103, decimal);
5.6. Multicast Immediate Messaging
As an alternative to the normal, source-based UM messaging model, Multicast Immediate Messaging (MIM) offers advantages to short-lived topics and applications that cannot tolerate a delay between source creation and the sending of the first message. See the UM Knowledgebase article, Delay Before Sending for background on this delay and other head-loss mitigation techniques.
Multicast Immediate Messaging avoids delay by eliminating the topic resolution process. MIM accomplishes this by:
Configuring transport information into sending and receiving applications.
Including topic strings within each message.
MIM is well-suited to applications where a small number of messages are sent to a topic. By eliminating topic resolution, MIM also reduces one of the causes of head-loss, defined as the loss of initial messages sent over a new transport session. Messages sent before topic resolution is complete will be lost.
MIM is typically not used for normal streaming data because messages are somewhat less efficiently handled than source-based messages. Inefficiencies derive from larger message sizes due to the inclusion of the topic name, and on the receiving side, the MIM delivery controller hashing of topic names to find receivers, which consumes some extra CPU. If you have a high-message-rate stream, you should use a source-based method and not MIM. If head-loss is a concern and delay before sending is not feasible, then consider using late join (although this replaces head-loss with some head latency).
Note: Multicast Immediate Messaging can use Datagram Bypass Layer (DBL) acceleration in conjunction with DBL-enabled Myricom 10-Gigabit Ethernet NICs for Linux and Microsoft Windows. DBL is a kernel-bypass technology that accelerates sending and receiving UDP traffic. See Transport Acceleration Options for more information.
This section discusses the following topics.
5.6.1. Temporary Transport Session
MIM uses the same reliable multicast algorithms as LBT-RM. When a sending application sends a message with lbm_multicast_immediate_message(), MIM creates a temporary transport session. Note that no topic-level source object is created.
MIM automatically deletes the temporary transport session after a period of inactivity defined by mim_src_deletion_timeout which defaults to 30 seconds. A subsequent send creates a new transport session. Due to the possibility of head-loss in the switch, it is recommended that sending applications use a long deletion timeout if they continue to use MIM after significant periods of inactivity.
MIM forces all topics across all sending applications to be concentrated onto a single multicast address to which ALL applications listen, even if they aren't interested in any of the topics. Thus, all topic filtering must happen in UM.
MIM can also be used to send an UM request message with lbm_multicast_immediate_request(). For example, an application can use MIM to request initialization information right when it starts up. MIM sends the response directly to the initializing application, avoiding the topic resolution delay inherent in the normal source-based lbm_send_request() function.
5.6.1.1. MIM Notifications
MIM notifications differ in the following ways from normal UM source-based sending.
When a sending application's MIM transport session times out and is deleted, the receiving applications do not receive an EOS notification.
Applications with a source notification callback are not informed of a MIM sender. Since source notification is basically a hook into the topic resolution system, this should not come as a surprise.
MIM sending supports the non-blocking flag. However, it does not provide an LBM_SRC_EVENT_WAKEUP notification when the MIM session becomes writable again.
MIM sends unrecoverable loss notifications to a context callback, not to a receiver callback. See Loss Handling.
5.6.2. Receiving Immediate Messages
MIM does not require any special type of receiver. It uses the topic-based publish/subscribe model so an application must still create a receiver for a topic to receive MIM messages.
Note: If needed, an application can send topic-less messages using MIM. A MIM sender passes in a NULL string instead of a topic name. The message goes out on the MIM multicast address and is received by all other receivers. A receiving application can use lbm_context_rcv_immediate_msgs() to set the callback procedure and delivery method for non-topic immediate messages.
5.6.2.1. Wildcard Receivers
When an application receives an immediate message, it's topic is hashed to see if there is at least one regular (non-wildcard) receiver object listening to the topic. If so, then MIM delivers the message data to the list of receivers.
However, if there are no regular receivers for that topic in the receive hash, MIM runs the message topic through all existing wildcard patterns and delivers matches to the appropriate wildcard receiver objects without creating sub-receivers. The next MIM message received for the same topic will again be run through all existing wildcard patterns. This can consume significant CPU resources since it is done on a per-message basis.
5.6.2.2. Loss Handling
The receiving application can set up a context callback to be notified of MIM unrecoverable loss (lbm_mim_unrecloss_function_cb). It is not possible to do this notification on a topic basis because the receiving UM has no way of knowing which topics were affected by the loss.
Note: The UM API's statistics functions and the UM Monitoring API do not provide access to MIM transport session statistics.
5.6.3. MIM Configuration
As of UM 3.1, MIM supports ordered delivery. As of UM 3.3.2, the MIM configuration option, mim_ordered_delivery defaults to ordered delivery. A byproduct of MIM ordered delivery is cross-topic ordering, which normal source-based UM senders cannot guarantee.
See the UM Configuration Guide for the descriptions of the MIM configuration options.
Note: Setting mim_incoming_address to 0.0.0.0 turns off MIM.
5.6.4. MIM Example Applications
UM includes two example applications that illustrate MIM.
lbmimsg.c - application that sends immediate messages as fast as it can to a given topic (single source). See also the Java example, lbmimsg.java and the .NET example, lbmimsg.cs.
lbmireq.c - application that sends immediate requests to a given topic (single source) and waits for responses.
5.6.4.1. lbmimsg.c
We can demonstrate the default operation of Immediate Messaging with lbmimsg and lbmrcv.
Run lbmrcv -v topicName
Run lbmimsg topicName
The lbmrcv output should resemble the following.
Immediate messaging target: TCP:10.29.1.78:14391
1     secs.  0     Kmsgs/sec.  0     Kbps
1     secs.  0     Kmsgs/sec.  0     Kbps
1     secs.  0     Kmsgs/sec.  0     Kbps
[topicName][LBTRM:10.29.1.78:14390:644c8862:224.10.10.21:14401][0], 25 bytes
[topicName][LBTRM:10.29.1.78:14390:644c8862:224.10.10.21:14401][1], 25 bytes
[topicName][LBTRM:10.29.1.78:14390:644c8862:224.10.10.21:14401][2], 25 bytes
[topicName][LBTRM:10.29.1.78:14390:644c8862:224.10.10.21:14401][3], 25 bytes
[topicName][LBTRM:10.29.1.78:14390:644c8862:224.10.10.21:14401][4], 25 bytes
[topicName][LBTRM:10.29.1.78:14390:644c8862:224.10.10.21:14401][5], 25 bytes
[topicName][LBTRM:10.29.1.78:14390:644c8862:224.10.10.21:14401][6], 25 bytes
Each line in the lbmrcv output is a message received, showing the topic name, transport type, receiver IP:Port, multicast address and message number.
5.6.4.2. lbmireq.c
Sending an UM request by MIM can be demonstrated with lbmireq and lbmrcv, which shows a single request being sent by lbmireq and received by lbmrcv. (lbmrcv sends no response.)
Run lbmrcv -v topicName
Run lbmireq topicName
lbmrcv
The lbmrcv output should resemble the following.
$ lbmrcv -v topicName
Immediate messaging target: TCP:10.29.1.78:14391
1     secs.  0     Kmsgs/sec.  0     Kbps
1     secs.  0     Kmsgs/sec.  0     Kbps
1     secs.  0     Kmsgs/sec.  0     Kbps
[topicName][LBTRM:10.29.1.78:14390:92100885:224.10.10.21:14401][0], Request
1     secs.  0     Kmsgs/sec.  0     Kbps
1     secs.  0     Kmsgs/sec.  0     Kbps
1     secs.  0     Kmsgs/sec.  0     Kbps
1     secs.  0     Kmsgs/sec.  0     Kbps
1     secs.  0     Kmsgs/sec.  0     Kbps
1     secs.  0     Kmsgs/sec.  0     Kbps
lbmireq
The lbmireq output should resemble the following.
$ lbmireq topicName
Using TCP port 4392 for responses
Sending 1 requests of size 25 bytes to target <> topic <topicName>
Sending request 0
Sent request 0. Pausing 5 seconds.
Done waiting for responses. 0 responses (0 bytes) received. Deleting request
Quitting...
Lingering for 5 seconds...
5.7. Spectrum
UM Spectrum, which refers to a "spectrum of channels", allows a source application to allocate any number of channels using lbm_src_channel_create() on which to send (lbm_src_send_ex())different messages of the same topic. A receiving application can subscribe receivers to one or more channels with either lbm_rcv_subscribe_channel or lbm_wrcv_subscribe_channel. Since each channel requires a different receiver callback, the receiver application can achieve more granular filtering of messages. Moreover, messages are received in-order across channels since all messages are part of the same topic stream.
The same level of filtering can be accomplished with a topic space design that creates separate topics for each channel, however, UM cannot guarantee the delivery of messages from multiple sources/topics in any particular order. Not only can UM Spectrum deliver the messages over many channels in the order they were sent by the source, but it also reduces topic resolution traffic since UM advertises only topics, not channels.
See also the C API documentation.
5.7.1. Performance Pluses
The use of separate callbacks for different channels improves filtering and also relieves the source application of the task of including filtering information in the message data.
Java and .NET performance also receives a boost because messages not of interest can be discarded before they transition to the Java or .NET level.
5.7.2. Configuration Options
Spectrum's default behavior delivers messages on any channels the receiver has subscribed to on the callbacks specified when subscribing, and all other messages on the receiver's default callback. This behavior can be changed with the following configuration options.
null_channel_behavior - behavior for messages delivered with no channel information.
unrecognized_channel_behavior - behavior for messages delivered with channel information but are on a channel for which the receiver has not registered interest.
channel_map_tablesz - controls the size of the table used by a receiver to store channel subscriptions.
5.8. Hot Failover
UM Hot Failover (HF) lets you implement sender redundancy in your applications. You can create multiple HF senders in different UM contexts, or, for even greater resiliency, on separate machines. There is no hard limit to the number of HF sources, and different HF sources can use different transport types.
Hot Failover receivers filter out the duplicate messages and deliver one message to your application. Thus, sources can drop a few messages or even fail completely without causing message loss, as long as the HF receiver receives each message from at least one source.
The following diagram displays Hot Failover operation.
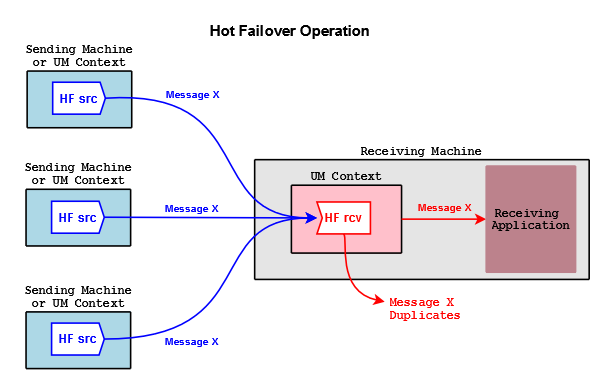
In the figure above, HF sources send copies of Message X. An HF receiver delivers the first copy of Message X it receives to the application, and discards subsequent copies coming from the other sources.
5.8.1. Implementing Hot Failover Sources
You create Hot Failover sources with lbm_hf_src_create(). This returns a source
object with internal state information that lets it send HF messages. You delete HF sources
with the lbm_src_delete() function.
HF sources send HF messages via lbm_hf_src_send_ex() or
lbm_hf_src_sendv_ex(). These functions take a sequence number, supplied via the
exinfo object, that HF receivers use to identify the same message sent from different
HF sources. The exinfo has an hf_sequence_number, with a flag
(LBM_SRC_SEND_EX_FLAG_HF_32 or LBM_SRC_SEND_EX_FLAG_HF_64) that
identifies whether it's a 32- or 64-bit number. Each HF source sends the same message content for a
given sequence number, which must be coordinated by your application.
If the source needs to restart its sequence number to an earlier value (e.g. start of day; not needed
for normal wraparound), delete and re-create the source and receiver objects. Without re-creating the
objects, the receiver sees the smaller sequence number, assumes the data is duplicate, and discards it.
In (and only in) cases where this cannot be done, use lbm_hf_src_send_rcv_reset().
Note: Your application must synchronize calling
lbm_hf_src_send_ex()orlbm_hf_src_sendv_ex()with all threads sending on the same source. (One symptom of not doing so is messages appearing at the receiver as inside intentional gaps and being erroneously discarded.)
Please be aware that non-HF receivers created for an HF topic receive multiple copies of each message. We recommend you establish local conventions regarding the use of HF sources, such as including "HF" in the topic name.
For an example source application, see lbmhfsrc in the UM Examples Page.
5.8.2. Implementing Hot Failover Receivers
You create HF receivers with lbm_hf_rcv_create(), and delete them using
lbm_hf_rcv_delete() and lbm_hf_rcv_delete_ex().
Incoming messages have an hf_sequence_number field containing the sequence number, and a message flag (LBM_MSG_FLAG_HF_32 or LBM_MSG_FLAG_HF_64) noting the bit size.
Note: Previous UM versions used sequence_number for HF message identification. This field holds a 32-bit value and is still set for backwards compatibility, but if the HF sequence numbers are 64-bit lengths, this non-HF sequence number is set to 0. Also, you can retrieve the original (non-HF) topic sequence number via
lbm_msg_retrieve_original_sequence_number()or, in Java and .NET, viaLBMMessage.osqn().
For the maximum time period to recover lost messages, the HF receiver uses the minimum of the LBT-RM and LBT-RU NAK generation intervals (transport_lbtrm_nak_generation_interval, transport_lbtru_nak_generation_interval). Each transport protocol is configured as normal, but the lost message recovery timer is the minimum of the two settings.
Some lbm_msg_t objects coming from HF receivers may be flagged as having "passed through" the HF receiver. This means that the message has not been ordered with other HF messages. These messages have the LBM_MSG_FLAG_HF_PASS_THROUGH flag set. UM flags messages sent from HF sources using lbm_src_send() in this manner, as do all non-HF sources. Also, UM flags EOS, no source notification, and requests in this manner as well.
For an example receiver application, see lbmhfrcv in the UM Examples Page.
5.8.3. Implementing Hot Failover Wildcard Receivers
To create an HF wildcard receiver, set option hf_receiver to 1, then create a wildcard receiver with
lbm_wildcard_rcv_create(). This actually creates individual HF receivers on a per-topic basis, so that
each topic can have its own set of HF sequence numbers. Once the HF wildcard receiver detects that all
sources for a particular topic are gone it closes the individual topic HF receivers and discards the HF
sequence information (unlike a standard HF receiver). You can extend or control the delete timeout
period of individual HF receivers with option resolver_no_source_linger_timeout.
5.8.4. Java and .NET
For information on implement the HF feature in a Java application, go to UM Java API and see the documentation for classes LBMHotFailoverReceiver and LBMHotFailoverSource.
For information on implement the HF feature in a .NET application, go to UM .NET API and navigate to Namespaces -> com.latencybusters.lbm -> LBMHotFailoverReceiver and LBMHotFailoverSource.
5.8.5. Using Hot Failover with UMP
When implementing Hot Failover with UMP, you must consider the following impact on hardware resources:
Additional storage space required for a UMP disk store
Higher disk activity
Higher network activity
Increased application complexity regarding message filtering
Also note that you must enable UME explicit ACKs and Hot Failover duplicate delivery in each Hot Failover receiving application.
For detailed information on using Hot Failover with UMP, see the Knowledge Base article UMP Hot Failover.
5.8.6. Hot Failover Intentional Gap Support
UM supports intentional gaps in HF message streams. Your HF sources can supply message sequence numbers with number gaps up to 1073741824. HF receivers automatically detect the gaps and consider any missing message sequence numbers as not sent and do not attempt recovery for these missing sequence numbers. See the following example.
HF source 1 sends message sequence numbers: 10, 11, 12, 13, 25, 26, 38
HF source 2 sends message sequence numbers: 10, 11, 12, 13, 25, 26, 38

HF receiver 1 receives message sequence numbers in order with no pause between any messages:
                                            10, 11, 12, 13, 25, 26, 38
5.8.7. Hot Failover Optional Messages
Hot Failover sources can send optional messages that HF receivers can be configured to
receive or not receive ( hf_optional_messages). HF receivers detect an optional message by checking
lbm_msg_t.flags for LBM_MSG_FLAG_HF_OPTIONAL.
HF sources indicate an optional message by passing
LBM_SRC_SEND_EX_FLAG_HF_OPTIONAL in the
lbm_src_send_ex_info_t.flags field to
lbm_hf_src_send_ex() or lbm_hf_src_sendv_ex().
In the examples below, optional messages appear with an "o" after the sequence number.
HF source 1 sends message sequence numbers: 10, 11, 12, 13o, 14o, 15, 16o, 17o, 18o, 19o, 20
HF source 2 sends message sequence numbers: 10, 11, 12, 13o, 14o, 15, 16o, 17o, 18o, 19o, 20

HF receiver 1 receives:                     10, 11, 12, 13o, 14o, 15, 16o, 17o, 18o, 19o, 20
HF receiver 2, configured to ignore optional messages, receives:
                                            10, 11, 12,           15,                     20
5.8.8. Using Hot Failover with Ordered Delivery
An HF receiver takes some of its operating parameters directly from the receive topic attributes. The ordered_delivery setting indicates the ordering for the HF receiver. Please see Ordered Delivery for information on the different modes of delivery order.
Note: UM supports Arrival Order with HF only when all sources use the same transport type.
5.8.9. Hot Failover Across Multiple Contexts
If you have a receiving application on a multi-homed machine receiving HF messages from HF sources, you can set up the Hot Failover Across Contexts (HFX) feature. This involves setting up a separate UM context to receive HF messages over each NIC and then creating an HFX Object, which drops duplicate HF messages arriving over all contexts. Your receiving application then receives only one copy of each HF message. The HFX feature achieves the same effect across multiple contexts as the normal Hot Failover feature does within a single context.
The following diagram displays Hot Failover operation across UM contexts.
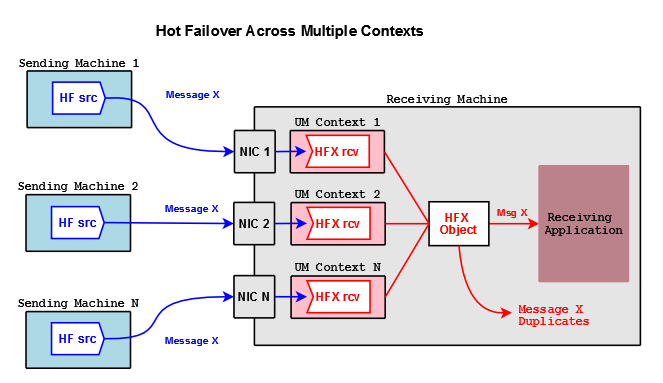
For each context that receives HF messages, create one HFX Receiver per topic. Each HFX Receiver can be configured independently by passing in a UM Receiver attributes object during creation. A unique client data pointer can also be associated with each HFX Receiver. The HFX Object is a special Ultra Messaging object and does not live in any UM context.
Note: You never have to call
lbm_topic_lookup()for a HFX Receiver. If you are creating HFX Receivers along with normal UM receivers for the same topic, do not interleave the calls. For example, calllbm_hfx_create()andlbm_hfx_rcv_create()for the topic. Then calllbm_topic_lookup()andlbm_rcv_create()for the topic to create the normal UM receivers.
The following outlines the general procedure for HFX.
Create an HFX Object for every HF topic of interest with
lbm_hfx_create(), passing in an attributes object created withlbm_hfx_attr_create()to specify any attributes desired.Create a context for the first NIC receiving HF messages with
lbm_context_create().Create a HFX Receiver for every HF topic with
lbm_hfx_rcv_create(), passing in UM Receive Topic Attributes.Repeat steps 2 and 3 for all NICs receiving HF message
Receive messages. The HFX Object identifies and drops all duplicates, delivering messages through a single callback (and optional event queue) specified when you created the HFX Object.
Delete each HFX Receiver with lbm_hfx_rcv_delete() or
lbm_hfx_rcv_delete_ex(). Delete the HFX Object with
lbm_hfx_delete().
Note: When writing source-side HF applications for HFX, be aware that HFX receivers do not support hf_sequence, 64-bit sequence numbers, the
lbm_hf_src_send_rcv_reset()function, or HF wildcard receivers.
Hot Failover Operation Options for HFX Configuration Options.
LBMHFX*.java in UM Java API.
LBMHFX*.cs in UM .NET API.
6. Monitoring UMS
6.1. Introduction
Messaging systems often employ real-time monitoring and rapid human intervention to prevent the system from becoming unstable. The design of UM encourages stable operation by allowing you to pre-configure how UM will use resources under all traffic and network conditions. Hence manual intervention is not required when those conditions occur.
Monitoring UM still fills important roles other than maintaining stable operation. Chiefly among these are capacity planning and a better understanding of the latency added by UM as it recovers from loss. Collecting accumulated statistics from all sources and all receivers once per day is generally adequate for these purposes.
6.1.1. Why Monitor?
Monitoring can aid different groups within an organization.
Developers can spot bugs that impact system performance.
Performance tuning groups can pinpoint under-performing receivers.
Testing groups can understand the reaction of a system to stresses like random packet loss during pre-production testing.
Network or middleware management groups can use monitoring to ensure a production system continues to operate within its design criteria.
6.1.2. What to Monitor
Before discussing the monitoring statistics that are built into UM, we mention two things that are probably more important to monitor: connectivity and latency. UM provides some assistance for monitoring these, but the final responsibility rests with your applications.
6.1.2.1. Connectivity
If you monitor only one thing, monitor connectivity, defined as the ability of your system components to talk to each other when needed Connectivity failures generally indicate a software, hardware, or network failure and generally require prompt attention. UM features like End Of Source (EOS) events, new source notifications, and receiver connect/disconnect events may help in application connectivity monitoring. See the lbmprice.c example to see techniques for using these to build an awareness of when components of the system come and go.
6.1.2.2. Message Latency
If you monitor only two things, monitor connectivity and the latency of every message. Connectivity monitoring will catch the hard failures and latency monitoring will catch the soft failures. Many impending hard failures in hardware, software, and networks show up first as rises in average latency or as latency spikes. See our white paper Pragmatic Advice for Handling Market Data Rate Increases for additional comments on the importance of measuring latency.
6.1.2.3. Monitoring Methods
UM provides the following four methods to monitor your UM activities.
Use UM API function calls within your applications to retrieve statistics and deliver them to your monitoring application.
Use the UM Monitoring API to more easily retrieve and send statistics to your monitoring application.
Use Automatic Monitoring to easily employ the UM Monitoring API to monitor UM activity at an UM context level.
Use the Ultra Messaging SNMP Agent and MIB to monitor statistics through a Network Management System. The Ultra Messaging SNMP Agent is purchased separately.
6.2. UMS API Functions and Data Structures
The UM API contains functions that retrieve various statistics for a context, event queue, source or receiver. This section lists the functions and constructors you can use to retrieve statistics, along with the data structures UM uses to deliver the statistics. Refer to the UMS API documentation ( UM C API, UM Java API or UM .NET API) for specific information about the functions and constructors. Links to the data structures appear in the tables to provide quick access to the specific statistics available.
6.2.1. Context Statistics
Context statistics help you monitor topic resolution activity, along with the number of unknown messages received and the number of sends and responses that were blocked or returned EWOULDBLOCK. Context statistics also contain transport statistics for Multicast Immediate Messaging (MIM) activity and transport statistics for all the sources or receivers in a context.
| C API Function | Java or .NET API Constructor | Data Structure |
|---|---|---|
| lbm_context_retrieve_stats() | LBMContextStatistics(LBMContext ctx) | lbm_context_stats_t |
| lbm_context_retrieve_rcv_transport_stats() | LBMReceiverStatistics(LBMContext int maxStats) | lbm_rcv_transport_stats_t |
| lbm_context_retrieve_src_transport_stats() | LBMSourceStatistics(LBMContext int maxStats) | lbm_src_transport_stats_t |
| lbm_context_retrieve_mim_rcv_stats() | LBMMIMReceiverStatistics(LBMContext ctx) | lbm_rcv_transport_stats_lbtrm_t |
| lbm_context_retrieve_mim_src_stats() | LBMMIMSourceStatistics(LBMContext ctx) | lbm_src_transport_stats_lbtrm_t |
6.2.2. Event Queue Statistics
Event Queue statistics help you monitor the number of events currently on the queue, how long it takes to service them (maximum, minimum and mean service times) and the total number of events for the monitoring period. These statistics are available for the following types of events.
Data messages
Request messages
Immediate messages
Wildcard receiver messages
I/O events
Timer events
Source events
Unblock events
Cancel events
Callback events
Context source events
Total events
Age of events
When monitoring Event Queue statistics you must enable the Event Queue UM Configuration Options, queue_age_enabled, queue_count_enabled and queue_service_time_enabled . UM disables these options by default, which produces no event queue statistics.
| C API Function | Java or .NET API Constructor | Data Structure |
|---|---|---|
| lbm_event_queue_retrieve_stats() | LBMEventQueueStatistics(LBMEventQueue evq) | lbm_event_queue_stats_t |
6.2.3. Transport Statistics
You can retrieve transport statistics for different types of transports (TCP, LBT-RU, LBT-RM, LBT-IPC, LBT-RDMA). In addition, you can limit these transport statistics to a specifc source sending on the particular transport or a specifc receiver receiving messages over the transport. Source statistics for LBT-RM, for example, include the number of messages (datagrams) sent and the number of retransmissions sent. For receiver LBT-RM, statistics include, for example, the number of messages (datagrams) received and number of UM messages received.
Note: None of the three types of transport statistics (all, source, or receiver) are topic level statistics. Currently UM does not provide topic-specific transport statistics.
| C API Function | Java or .NET API Constructor | Data Structure |
|---|---|---|
| lbm_rcv_retrieve_transport_stats() | LBMReceiverStatistics(LBMReceiver lbmrcv source) | lbm_rcv_transport_stats_t |
| lbm_rcv_retrieve_all_transport_stats() | LBMReceiverStatistics(LBMReceiver lbmrcv int maxStats) | lbm_rcv_transport_stats_t |
| lbm_src_retrieve_transport_stats() | LBMSourceStatistics(LBMSource lbmsrc) | lbm_src_transport_stats_t |
6.3. UMS Monitoring API
This section discusses the following topics.
The UM Monitoring API (see lbmmon.h or the LBMMonitor classes in the Java API and the .NET API) provides a framework to easily gather UMS transport statistics and send them to a monitoring or reporting application. Transport sessions for sources and receivers, along with all transport sessions for a given context can be monitored. This API can be implemented in one of two ways.
Build monitoring into your application with the UM Monitoring API functions.
Turn on Automatic Monitoring with UMS configuration options. See Automatic Monitoring.
An application requesting transport monitoring is called a monitor source, and an application accepting statistics is a monitor receiver. These monitoring objects deal only with transport session statistics and should not be confused with UM sources and UM receivers, which deal with UM messages. Statistics for both UM sources and UM receivers can be forwarded by a monitor source application.
Both a monitor source and monitor receiver comprise three modules:
A format module, responsible for serializing and de-serializing the statistics. The proper transmission between monitor source and monitor receiver requires this serialization.
A transport module that is responsible for sending and receiving statistics data.
A control module, responsible for gathering the statistics, and calling the appropriate functions from the format and transport modules.
You can substitute format and transport modules of your own choosing or creation. UM Monitoring provides the following sample modules:
LBMMON CSV format module
LBMMON UMS transport module
LBMMON UDP transport module
LBMMON SNMP transport module
To view the source code for all LBMMON transport modules, see LBMMON Example Source Code found on the Related Pages tab in the C Application Programmer's Interface.
Note: The LBMMON SNMP transport module can be used for non-SNMP based monitoring. The Ultra Messaging SNMP Agent is not required for its use.
6.3.1. UMS Monitoring Process Flow
The overall process flow appears in the diagram below.
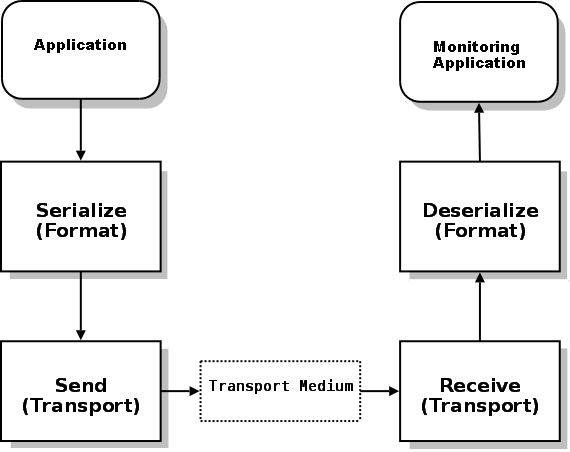
Your application creates the monitor source controller, specifying the format and transport modules to use. It also calls lbmmon functions to start monitoring an UM context, UM source or UM receiver.
The monitor source controller passes those statistics to the format module serialization function.
The monitor source controller passes the resulting serialized data to the transport module send function.
The transport module transmits the data over some transport medium (such as a network).
The monitor receiver controller transport module receives the serialized data. (Your monitoring application has already created the monitor receiver controller specifying the format and transport modules to use, along with the application callback functions to use upon the receipt of UM source or UM receiver statistics data.)
The monitor receiver controller calls the format module's de-serialization function.
Finally, the monitor receiver controller passes the statistics to your monitoring application via the specified application callback functions.
Your applications only calls functions in the controller modules, which calls the appropriate functions in the transport and format modules.
6.3.2. API Framework Flexibility
The segregation of UM Monitoring into control, format, and transport modules provides flexibility for monitor receivers in two ways.
Allows you to use languages for which no UM API or binding exists.
Allows you to use monitoring products which do not integrate with UM.
As an example, assume you have a Perl application which currently gathers statistics from other network applications (or, you are simply most comfortable working in Perl for such tasks). There is no Perl binding for UM. However, Perl can handle UDP packets very nicely, and can pick apart CSV data easily. By implementing a UDP transport module to be used by the monitor sources, your Perl application can read the UDP packets and process the statistics.
6.3.3. Initial Monitoring Questions
If you can answer the following questions, you're already on your way.
What format module will you use? LBMMON CSV Format module or a different one.
What transport module will you use? One of the 3 LBMMON modules or a different one.
Do you want to monitor individual sources/receivers, or an entire context? The difference is in how the statistics are aggregated.
Monitoring a context aggregates transport statistics for all sources and receivers associated with a context, by transport. Note that this is not by transport type. The default configuration for TCP, for example, allocates up to 10 ports, forming up to 10 separate transport sessions. Absent any specific instructions, UM allocates sources and receivers to these 10 transports in a round-robin fashion. So the statistics for a specific transport on a context will aggregate all sources and receivers which use that specific transport.
Ultra Messaging recommends that you monitor either a context or source/receiver, but not both. For example if Topic1 and Topic2 are mapped to the same transport session (which is the only transport session for the context) and you monitor both the receivers and the context, you will get 3 identical sets of statistics: one for Topic1 reporting the stats for it's transport session, one for Topic2 reporting the stats for the same transport session, and one for the transport session via the context.
In the case of wildcard receivers, only the context may be monitored. UM creates wildcard receivers dynamically as it detects topics which match the wildcard pattern. The application does not have access to these dynamically-created receivers. So the only way to monitor a wildcard receiver is to monitor the context on which it was created.
Should statistics be sent automatically, or on demand?
Automatic sending of statistics is by far the simplest approach. You simply indicate how often the statistics should be gathered and sent. The rest is taken care of.
On-demand is somewhat more involved. Your application decides when statistics should be gathered and sent. If you intend to use the arrival of statistics as a type of heartbeat, this is the method you should use.
The following sections present more discussion and sample source code about starting monitor sources, monitor receivers and the LBMMON format and transport modules.
6.3.4. Creating a Monitoring Source
The following examples demonstrate how to use the UM Monitoring API to enable monitoring in your application.
First, create a monitoring source controller:
lbm_context_t * ctx;
lbm_src_t * src;
lbm_rcv_t * rcv;
lbmmon_sctl_t * monctl;

if (lbmmon_sctl_create(&monctl, lbmmon_format_csv_module(), NULL, lbmmon_transport_lbm_module(), NULL) == -1)
{
		fprintf(stderr, "lbmmon_sctl_create() failed\n");
		exit(1);
}
The above code tacitly assumes that the ctx, src, and rcv variables have been previously assigned via the appropriate UM API calls.
The monitoring source controller object must be passed to subsequent calls to reference a specific source controller. One implication of this is that it is possible to have multiple monitoring source controllers within a single application, each perhaps monitoring a different set of objects.
In the above example, the default CSV format module and default UM transport module are specified via the provided module functions lbmmon_format_csv_module() and lbmmon_transport_lbm_module().
6.3.5. Specifying the Object to Monitor
Once a monitoring source controller is created, the application can monitor a specific context using:
if (lbmmon_context_monitor(monctl, ctx, NULL, 10) == -1)
{
		fprintf(stderr, "lbmmon_context_monitor() failed\n");
		exit(1);
}
The above example indicates that statistics for all transports on the specified context will be gathered and sent every 10 seconds.
A UM source can be monitored using:
if (lbmmon_src_monitor(monctl, src, NULL, 10) == -1)
{
		fprintf(stderr, "lbmmon_src_monitor() failed\n");
		exit(1);
}
Finally, an UM receiver can be monitored using:
if (lbmmon_rcv_monitor(monctl, rcv, NULL, 10) == -1)
{
		fprintf(stderr, "lbmmon_rcv_monitor() failed\n");
		exit(1);
}
The two above examples also request that statistics for all transports on the specified source or receiver be gathered and sent every 10 seconds.
Statistics can also be gathered and sent in an on-demand manner. Passing 0 for the Seconds parameter to lbmmon_context_monitor(), lbmmon_src_monitor(), or lbmmon_rcv_monitor() prevents the automatic gathering and sending of statistics. To trigger the gather/send process, use:
lbmmon_sctl_sample(monctl);
Such a call will perform a single gather/send action on all monitored objects (contexts, sources, and receivers) which were registered as on-demand.
As part of application cleanup, the created monitoring objects should be destroyed. Each individual object can be de-registered using lbmmon_context_unmonitor(), lbmmon_src_unmonitor(), or lbmmon_rcv_unmonitor(). Finally, the monitoring source controller can be destroyed using:
lbmmon_sctl_destroy(monctl);
Any objects which are still registered will be automatically de-registered by lbmmon_sctl_destroy().
6.3.6. Receiving Monitoring Data
To make use of the statistics, an application must be running which receives the monitor data. This application creates a monitoring receive controller, and specifies callback functions which are called upon the receipt of source or receiver statistics data.
Use the following to create a monitoring receive controller:
lbmmon_rctl_t * monctl;
lbmmon_rctl_attr_t * attr;
lbmmon_rcv_statistics_func_t rcvcb = { rcv_statistics_cb };
lbmmon_src_statistics_func_t srccb = { src_statistics_cb };
lbmmon_evq_statistics_func_t evqcb = { evq_statistics_cb };
lbmmon_ctx_statistics_func_t ctxcb = { ctx_statistics_cb };

if (lbmmon_rctl_attr_create(&attr) != 0)
{
	fprintf(stderr, "call to lbmmon_rctl_attr_create() failed, %s\n", lbmmon_errmsg());
	exit(1);
}
if (lbmmon_rctl_attr_setopt(attr, LBMMON_RCTL_RECEIVER_CALLBACK, (void *) &rcvcb, sizeof(rcvcb)) != 0)
{
	fprintf(stderr, "call to lbmmon_rctl_attr_setopt() failed, %s\n", lbmmon_errmsg());
	exit(1);
}
if (lbmmon_rctl_attr_setopt(attr, LBMMON_RCTL_SOURCE_CALLBACK, (void *) &srccb, sizeof(srccb)) != 0)
{
	fprintf(stderr, "call to lbmmon_rctl_attr_setopt() failed, %s\n", lbmmon_errmsg());
	exit(1);
}
if (lbmmon_rctl_attr_setopt(attr, LBMMON_RCTL_EVENT_QUEUE_CALLBACK, (void *) &evqcb, sizeof(evqcb)) != 0)
{
	fprintf(stderr, "call to lbmmon_rctl_attr_setopt() failed, %s\n", lbmmon_errmsg());
	exit(1);
}
if (lbmmon_rctl_attr_setopt(attr, LBMMON_RCTL_CONTEXT_CALLBACK, (void *) &sctxcb, sizeof(ctxcb)) != 0)
{
	fprintf(stderr, "call to lbmmon_rctl_attr_setopt() failed, %s\n", lbmmon_errmsg());
	exit(1);
}
if (lbmmon_rctl_create(&monctl, lbmmon_format_csv_module(), NULL, lbmmon_transport_lbm_module(), (void *)
transport_options, attr) != 0)
{
	fprintf(stderr, "call to lbmmon_rctl_create() failed, %s\n", lbmmon_errmsg());
	exit(1);
}
if (lbmmon_rctl_attr_delete(attr) != 0)
{
	fprintf(stderr, "call to lbmmon_rctl_attr_delete() failed, %s\n", lbmmon_errmsg());
	exit(1);
}
As in the earlier example, the default CSV format module and default UM transport module are specified via the provided module functions lbmmon_format_csv_module() and lbmmon_transport_lbm_module().
As an example of minimal callback functions, consider the following example:
void rcv_statistics_cb(const void * AttributeBlock, const lbm_rcv_transport_stats_t * Statistics)
{
	lbm_ulong_t source = LBMMON_ATTR_SOURCE_NORMAL;
	if (lbmmon_attr_get_source(AttributeBlock, &source) != 0)
	{
		source = LBMMON_ATTR_SOURCE_NORMAL;
	}
	switch (Statistics->type)
	{
		case LBM_TRANSPORT_STAT_TCP:
			handle_rcv_tcp_statistics();
			break;
		case LBM_TRANSPORT_STAT_LBTRM:
			switch (source)
			{
				case LBMMON_ATTR_SOURCE_IM:
					handle_rcv_im_lbtrm_statistics();
					break;
				default:
					handle_rcv_lbtrm_statistics();
					break;
			}
			break;
		case LBM_TRANSPORT_STAT_LBTRU:
			handle_rcv_lbtru_statistics();
			break;
	}
}

void src_statistics_cb(const void * AttributeBlock, const lbm_src_transport_stats_t * Statistics)
{
	lbm_ulong_t source = LBMMON_ATTR_SOURCE_NORMAL;
	if (lbmmon_attr_get_source(AttributeBlock, &source) != 0)
	{
		source = LBMMON_ATTR_SOURCE_NORMAL;
	}
	switch (Statistics->type)
	{
		case LBM_TRANSPORT_STAT_TCP:
			handle_src_tcp_statistics();
			break;
		case LBM_TRANSPORT_STAT_LBTRM:
			switch (source)
			{
				case LBMMON_ATTR_SOURCE_IM:
					handle_src_im_lbtrm_statistics();
					break;
				default:
					handle_src_lbtrm_statistics();
					break;
			}
			break;
		case LBM_TRANSPORT_STAT_LBTRU:
			handle_src_lbtru_statistics();
			break;
	}
}

void ctx_statistics_cb(const void * AttributeBlock, const lbm_context_stats_t * Statistics)
{
	/* Handle context stats */
}

void evq_statistics_cb(const void * AttributeBlock, const lbm_event_queue_stats_t * Statistics)
{
	/* Handle event queue stats */
}
Upon receipt of a statistics message, the appropriate callback function is called. The application can then do whatever is desired with the statistics data, which might include writing it to a file or database, performing calculations, or whatever is appropriate.
Beyond the actual statistics, several additional pieces of data are sent with each statistics packet. These data are stored in an attribute block, and are accessible via the lbmmon_attr_get_*() functions. Currently, these data include the IPV4 address of machine which sent the statistics data, the timestamp (as a time_t) at which the statistics were generated, and the application ID string supplied by the sending application at the time the object was registered for monitoring. See lbmmon_attr_get_ipv4sender(), lbmmon_attr_get_timestamp(), and lbmmon_attr_get_appsourceid() for more information.
6.3.7. The UMS Transport Module
The UM transport module understands several options which may be used to customize your use of the module. The options are passed via the TransportOptions parameter to the lbmmon_sctl_create() and lbmmon_rctl_create() functions, as a null-terminated string containing semicolon-separated name/value pairs.
The following options are available:
config specifies a configuration file. This file is processed in a manner similar to lbm_config(). However, unlike lbm_config(), the current default attributes are not changed. Instead, the options parsed from the configuration file are applied only to the UM objects created by the module.
topic specifies the topic name to use for sending and receiving statistics. By default, the topic /29west/statistics is used.
wctopic specifies (for monitor receivers only) a wildcard pattern to be used to receive statistics.
As an example, assume your application needs to use a special configuration file for statistics. The following call allows your application to customize the UM transport module using the configuration file stats.cfg.
lbmmon_sctl_t * monctl;
const char * tropt = "config=stats.cfg";
if (lbmmon_sctl_create(&smp;monctl, lbmmon_format_csv_module(), NULL,
lbmmon_transport_lbm_module(), tropt) == -1)
{
		fprintf(stderr, "lbmmon_sctl_create() failed\n");
		exit(1);
}
If your application also needs to use a specific topic for statistics, the following code specifies that, in addition to the configuration file, the topic StatisticsTopic be used for statistics.
lbmmon_sctl_t * monctl;
const char * tropt = "config=stats.cfg;topic=StatisticsTopic";
if (lbmmon_sctl_create(&monctl, lbmmon_format_csv_module(), NULL, lbmmon_transport_lbm_module(),
tropt) == -1)
{
		fprintf(stderr, "lbmmon_sctl_create() failed\n");
		exit(1);
}
It is important to use the same topic and configuration for both monitor sources and receivers. Otherwise your applications may send the statistics, but the monitor receiver won't be able to receive them.
To view the source code for all LBMMON transport modules, see LBMMON Example Source Code found on the Related Pages tab in the C Application Programmer's Interface.
6.3.8. The UDP Transport Module
The UDP transport module understands several options which may be used to
customize your use of the module. The options are passed via the
TransportOptions parameter to the
lbmmon_sctl_create() and
lbmmon_rctl_create() functions, as a null-terminated
string containing semicolon-separated name/value pairs.
The UDP module supports sending and receiving via UDP unicast, UDP broadcast, and UDP multicast. The following options are available.
address specifies the unicast IP address to which statistics are sent via UDP. Applicable to sender only.
port is the IP port packets are sent to. Defaults to 2933.
interface specifies the network interface over which multicast UDP is sent or received.
mcgroup is the multicast group on which to send and receive UDP packets.
bcaddress specified the broadcast address to which UDP packets are sent. Applicable to sender only.
ttl specifies the TTL for each multicast UDP packet. Applicable to sender only.
To view the source code for all LBMMON transport modules, see LBMMON Example Source Code found on the Related Pages tab in the C Application Programmer's Interface.
6.3.9. The SNMP Transport Module
The SNMP transport modules operates in identical fashion to the UMS Transport Module. See The UMS Transport Module
To view the source code for all LBMMON transport modules, see LBMMON Example Source Code found on the Related Pages tab in the C Application Programmer's Interface.
6.4. Automatic Monitoring
Instead of building a monitoring capability into your application using the UM Monitoring API, automatic monitoring allows you to easily produce monitoring statistics with the UM Monitoring API by setting a few simple UM configuration options. Automatic monitoring does not require any changes to your application. You control Automatic Monitoring with eight Automatic Monitoring Options.
You can enable Automatic Monitoring for either or both of the following.
Transport Statistics - Automatic monitoring of transport statistics reflect data for all the transport sessions within the UM context. You cannot, however, receive statistics for an individual transport session. Essentially, you turn on automatic monitoring of a context's transport sessions by specifying a context monitor_interval. The use of the Ultra Messaging SNMP Agent requires the lbmsnmp monitor_transport.
Event Queue Statistics - Automatic Monitoring of Event Queues provides statistics for all the Event Queues within the UM context. You turn on automatic monitoring of a context's Event Queues by specifying a event_queue monitor_interval.
You can also set environment variables to turn on automatic monitoring for all UM contexts (transports and event queues). See Automatic Monitoring Options for more information.
6.5. Monitoring Examples
This section demonstrates the use of the two UM monitoring example applications described in /doc/example/index.html. We present advice based on what we have seen productively monitored by customers and our own knowledge of transport statistics that might be of interest. Of course, what you choose to monitor depends on your needs so merge these thoughts with your own needs to determine what is best for you.
6.5.1. lbmmon.c
The example application lbmmon.c acts as a Monitor Receiver and is provided in both executable and source form. It writes monitoring statistics to the screen and can be used in conjunction with other example applications (which act as the Monitor Sources). The following procedure uses lbmrcv and lbmsrc to create messaging traffic and adds a configuration file in order to specify the LBT-RM transport instead of the TCP default. (The LBT-RM transport displays more statistics than TCP.)
Since UM does not generate monitoring statistics by default, you must activate monitoring in your application. For the example application, use the --monitor-ctx=n option where n is the number of seconds between reports. The following procedure activates monitoring on the receiver, specifying the context (ctx) to create a complete set of receiver statistics. You could activate monitoring in a similar fashion on the source and create source statistics.
To use lbmmon to view statistics from sample application output:
Create configuration file with the single option of source transport lbtrm and name it LBTRM.cfg.
Run lbmmon --transport-opts="config=LBTRM.cfg"
Run lbmrcv -c LBTRM.cfg --monitor-ctx=5 Arizona
Run lbmsrc -c LBTRM.cfg Arizona
After lbmsrc completes, the final output for lbmmon should closely resemble the following.
Receiver statistics received from C:\Program Files\29West\UME_1.2.1\Win2k-i386\bin\lbmrcv.exe
at 10.29.1.78, sent Wed Jan 09 14:25:49 2008
Source: LBTRM:10.29.1.78:4391:323382d8:224.10.10.10:4400
Transport: LBT-RM
LBT-RM messages received                                 : 45455
Bytes received                                           : 370000000
LBT-RM NAK packets sent                                  : 0
LBT-RM NAKs sent                                         : 0
Lost LBT-RM messages detected                            : 0
NCFs received (ignored)                                  : 0
NCFs received (shed)                                     : 0
NCFs received (retransmit delay)                         : 0
NCFs received (unknown)                                  : 0
Loss recovery minimum time                               : 4294967295ms
Loss recovery mean time                                  : 0ms
Loss recovery maximum time                               : 0ms
Minimum transmissions per individual NAK                 : 4294967295
Mean transmissions per individual NAK                    : 0
Maximum transmissions per individual NAK                 : 0
Duplicate LBT-RM data messages received                  : 0
LBT-RM messages unrecoverable (window advance)           : 0
LBT-RM messages unrecoverable (NAK generation expiration): 0
LBT-RM LBM messages received                             : 10000000
LBT-RM LBM messages received with no topic               : 0
LBT-RM LBM requests received                             : 0
Notes:
Since this procedure was done on a single machine. No packets were lost and therefore lbmrcv did not generate any NAKs and lbmsrc did not send any NCFs. If you run this procedure across a network, packets may be lost and you would see statistics for NAKs, NCFs and loss recovery.
This procedure activates monitoring on the receiver, specifying the context (--monitor-ctx) to create a complete set of receiver transport statistics. You could activate monitoring in a similar fashion on the source and create source statistics. Each set of statistics shows one side of the transmission. For example, source statistics contain information about NAKs received by the source (ignored, shed, retransmit delay, etc.) where receiver statistics contain data about NCFs received. Each view can be helpful.
Moreover, as explained earlier in Specifying the Object to Monitor, individual receivers or sources can be monitored instead of all transport activity for a context. For this procedure, use --monitor-rcv or --monitor-src.
You could run this procedure again specifying a different transport (LBT-RU or TCP) in the configuration file and receive a different set of statistics. For descriptions of all the transport statistics, refer to the transport statistics data structures in the C Application Programmer's Interface. Click on the Data Structures tab at the top and click on lbm_rcv_transport_stats_t or lbm_src_transport_stats_t.
6.5.2. lbmmonudp.c and lbmmondiag.pl
The example application, lbmmonudp.c receives UM statistics and forwards them as CSV data over a UDP transport. The Perl script, lbmmondiag.pl, can read UDP packets and process the statistics, reporting Severity 1 and Severity 2 events. This script only reports on LBT-RM transports.
To run lbmmonudp.c with lbmmondiag.pl, use the following procedure.
Create configuration file with the single option of source transport lbtrm and name it LBTRM.cfg.
Run lbmmonudp -a 127.0.0.1 --transport-opts="config=LBTRM.cfg"
Run lbmrcv -c LBTRM.cfg --monitor-ctx=5 Arizona
Run lbmsrc -c LBTRM.cfg Arizona
Run lbmmondiag.pl
The following sections discuss some of the possible results of this procedure. Your results will vary depending upon conditions in your network or if you run the procedure on a single machine.
6.5.2.1. Severity 1 -- Monitoring Unrecoverable Loss
The most severe system problems are often due to unrecoverable datagram loss at the reliable transport level. These are reported as severity 1 events by the lbmmondiag.pl example script. Many of the scalability and latency benefits of UM come from the use of reliable transport protocols like LBT-RM and LBT-RU. These protocols provide loss detection, retransmission, and recovery up to the limits specified by an application. Unrecoverable loss is reported by the transport when loss repair is impossible within the specified limits.
Unrecoverable transport loss often (but not always) leads to unrecoverable message loss so it is very significant to applications that benefit from lossless message delivery.
Unrecoverable loss can be declared by receivers when the
transport_lbtrm_nak_generation_interval has ended without
receipt of repair. Each such loss event is recorded by incrementing the
unrecovered_tmo field in
lbm_rcv_transport_stats_t.
Output from lbmmondiag.pl might look like this:
Sev1: 34 datagrams unrecovered due to NAK generation interval ending
Unrecoverable loss can also be triggered at receivers by notice from a source that the lost datagram has passed out of the source's transmission window. Each such loss event is recorded by incrementing the unrecovered_txw field in lbm_rcv_transport_stats_t. Output from lbmmondiag.pl might look like this:
Sev1: 249 datagrams unrecovered due to transmission window advancement
6.5.2.2. Severity 2 -- Monitoring Rate Controller Activity
The data and retransmission rate controllers built into LBT-RM provide for stable operation under all traffic conditions. These rate controllers introduce some latency at the source since that is generally preferable to the alternative of NAK storms or other unstable states. The lbmmondiag.pl example script reports this activity as a severity 2 event since latency is normally the only effect of their operation.
Activity of the rate controller indicates that a source tried to send faster than
the configured transport_lbtrm_data_rate_limit. Normally, this
limit is set to the speed of the fastest receivers. Sending faster than this rate
would induce loss in all receivers so it is generally best to add latency at the
source or avoid sending in such situations.
The current number of datagrams queued by the rate controller is given in the rctlr_data_msgs field in lbm_src_transport_stats_t. No more than 10 datagrams are ever queued. Output from lbmmondiag.pl might look like this:
Sev2: 10 datagrams queued by data rate controller
Activity of the retransmission rate controller indicates that receivers have
requested retransmissions in excess of the configured transport_lbtrm_retransmit_rate_limit. Latency is added to
retransmission requests in excess of the limit to control the amount of latency
they may add to messages being sent the first time. This behavior avoids NAK storms.
The current number of datagrams queued by the retransmission rate controller is given in the rctlr_rx_msgs field in lbm_src_transport_stats_t. No more than 101 datagrams are ever queued. Output from lbmmondiag.pl might look like this:
Sev2: 101 datagrams queued by retransmission rate controller
6.5.2.3. Severity 2 -- Monitoring Loss Recovery Activity for a Receiver
It is important to monitor loss recovery activity because it always adds latency if the loss is successfully repaired. UM defaults generally provide for quite a bit of loss recovery activity before loss would become unrecoverable. Statistics on such activity are maintained at both the source and receiver. Unrecoverable loss will normally be preceded by a burst of such activity.
UM receivers measure the amount of time required to repair each loss detected. For each transport session, an exponentially weighted moving average is computed from repair times and the maximum and minimum times are tracked.
The total number of losses detected appears in the lost field in lbm_rcv_transport_stats_t. It may be multiplied by the average repair time given in the nak_stm_mean field in lbm_rcv_transport_stats_t to estimate of the amount of latency that was added to repair loss. This is probably the single most important metric to track for those interested in minimizing repair latency. The lbmmondiag.pl script reports this whenever the lost field changes and the average repair time is nonzero. Output might look like this:
	 Sev2: 310 datagrams lost
	 Sev2: 112.236 seconds estimated total latency due to repair of 564 losses
Note: This estimate only includes latency added in the recovery of lost messages. Requiring ordered delivery also adds latency for all messages that arrive after the time of loss and before the time that repair arrives. See the
ordered_deliveryoption to control this.
In addition to counting losses detected, UM reliable receivers also count the number of NAKs generated in the naks_sent field in lbm_rcv_transport_stats_t. Output from lbmmondiag.pl might look like this:
Sev2: 58 NAKs sent
Those who are new to reliable multicast protocols are sometimes surprised to learn that losses detected do not always lead to NAK generation. If a datagram is lost in the network close to the source, it is common for many receivers to detect loss simultaneously when a datagram following the loss arrives. Scalability would suffer if all receivers that detected loss reported it by generating a NAK at the same time. To improve scalability, a random delay is added to NAK generation at each receiver. Since retransmissions are multicast, often only one NAK is generated to repair the loss for all receivers. Thus it is common for the number of losses detected to be much larger than the number of NAKs sent, especially when there are many receivers with similar loss patterns.
6.5.2.4. Severity 2 -- Monitoring Loss Recovery Activity for a Source
For sources, the principal concern is often understanding how much the retransmission of messages already sent at least once slowed down the source. Obviously, bandwidth and CPU time spent servicing retransmission requests cannot be used to send new messages. This is the way that lossy receivers add latency for lossless receivers.
UM sources track the number of NAKs received in the naks_rcved field in lbm_src_transport_stats_t. The number of datagrams that they retransmit to repair loss is recorded in the rxs_sent field in lbm_src_transport_stats_t.
The number of retransmitted datagrams may be multiplied by the average datagram size and divided by the wire speed to estimate the amount of latency added to new messages by retransmission. Output from the example lbmmondiag.pl script might look like this:
	 Sev2: 7478 NAKs received
	 Sev2: 50 retransmissions sent
	 Sev2: 0.015056 seconds estimated total latency due to retransmissions
6.6. Interpreting LBT-RM Source Statistics
LBT-RM sources maintain many statistics that can be useful
in diagnosing reliable multicast problems.
See the UM API documentation
lbm_src_transport_stats_lbtrm_t
Structure Reference for a description of the fields.
The remainder of this section gives advice on interpreting
the statistics.
Divide naks_rcved by
msgs_sent to find the likelihood that
sending a message resulted in a NAK being received.
Expect no more than a few percent on a network with reasonable
loss levels.
Divide rxs_sent by
msgs_sent to find the ratio of retransmissions
to new data.
Many NAKs arriving at a source will cause many retransmissions.
Divide naks_shed by
naks_rcved to find the likelihood that excessive
NAKs were ignored.
Consider reducing loss to avoid NAK generation.
Divide naks_rcved by
nak_pckts_rcved to find the likelihood that
NAKs arrived individually (~1 -> individual NAKs likely;
~0 -> NAKs likely to have arrived grouped in a single packet).
Individual NAKs often indicate sporadic loss while grouped NAKs
often indicate burst loss.
Divide naks_rx_delay_ignored by
naks_ignored to find the likelihood that
NAKs arrived during the ignore interval following a retransmission.
The configuration option
transport_lbtrm_ignore_interval
controls the length of this interval.
7. Manpage for lbmrd
- Table of Contents
- lbmrd -- UMS Resolver Daemon, for unicast topic resolution
lbmrd
Synopsis
lbmrd [-a] [--activity] [-d] [--dump-dtd] [-h] [--help] [-i] [--interface] [-L] [--logfile] [-p] [--port] [-t] [--ttl] [-v] [--validate] config-file
Description
Resolver services for UM messaging products are provided by lbmrd.
The -i and -p (or --interface
and --port) options identify the network interface IP address and
port that lbmrd opens to listen for unicast topic resolution traffic.
The defaults are INADDR_ANY and 15380, respectively.
The -a and -t (or --activity and
--ttl) options interact to detect and remove "dead" clients, i.e., UMS/UME
client applications that are in the lbmrd active client list, but have
stopped sending topic resolution queries, advertisements, or keepalives, usually due to
early termination or looping. These are described in detail below.
Option -t describes the length of time (in seconds),
during which no messages have been received from a given client, that will cause that
client to be marked "dead" and removed from the active client list. Ultra Messaging recommends a
value at least 5 seconds longer than the longest network outage you wish to tolerate.
Option -a describes a repeating time interval (in
milliseconds) after which lbmrd checks for these "dead" clients.
Ultra Messaging recommends a value not larger than -t * 1000.
NOTE: Even clients that send no topic resolution advertisements or queries will still send keepalive messages to lbmrd every 5 seconds. This value is hard-coded and not configurable.
The output will be written to a log file if either -L or --logfile is supplied.
The DTD used to validate a configuration file will be dumped to standard output with
the -d or --dump-dtd option. After dumping the DTD,
lbmrd exits immediately.
The configuration file will be validated against the DTD if either the -v or
--validate options are given. After attempting validation,
lbmrd exits immediately. The exit status will be 0 for a configuration
file validated by the DTD and non-zero otherwise.
Command line help is available with -h or --help.