5. UMS Features
5.1. Using Late Join
This section introduces the use of UM Late Join in default and specialized configurations. Specifically, this section on UM Late Join includes:
See the UM Configuration Guide for specific information about Late Join configuration options.
Note: If your application is running within a UM context with configuration option request_tcp_bind_request_port set to zero, then request port binding has been turned off, which also disables the Late Join feature.
Note: The Late Join feature only works with the unicast topic resolution daemon (lbmrd) across local LANs that use Network Address Translation (NAT) if you use the default value (0.0.0.0) for request_tcp_interface.
5.1.1. Late Join Overview
The Late Join feature enables newly created receivers to receive previously transmitted messages. Sources configured for Late Join maintain a retention buffer (not to be confused with a transport retransmission window), which holds transmitted messages for late-joining receivers.
A Late Join operation follows the following sequence:
-
A new receiver configured for Late Join with use_late_join completes topic resolution. Topic advertisements from the source indicate that the source is configured for Late Join with late_join.
-
The new receiver sends a Late Join Initiation Request (LJIR) to request previously transmitted messages. The receiver configuration option, retransmit_request_outstanding_maximum, determines the number of messages the receiver requests.
-
The source responds with a Late Join Information (LJI) message containing the sequence numbers for the retained messages that are available for retransmission.
-
The source unicasts the messages.
-
When Configuring Late Join for Large Numbers of Messages, the receiver issues additional requests, and the source retransmits these additional groups of older messages, oldest first.
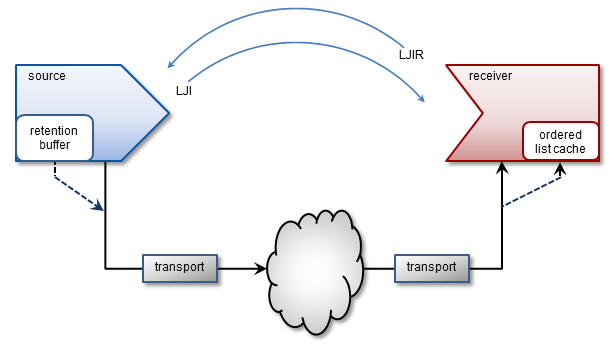
The source's retention buffer's is not pre-allocated and occupies an increasing amount of memory as the source sends messages and adds them to the buffer. If a retention buffer grows to a size equal to the value of the source configuration option, retransmit_retention_size_threshold, the source deletes older messages as it adds new ones. The source configuration option, retransmit_retention_age_threshold, controls message deletion based on message age.
Note: UM uses control-structure overhead memory on a per-message basis for messages held in the retention buffer, in addition to the retention buffer's memory. Such memory usage can become significantly higher when retained messages are smaller in size, since more of them can then fit in the retention buffer.
Caution If you set the receiver configuration option ordered_delivery to 1, the receiver must deliver messages to your application in sequence number order. The receiver holds out-of-order messages in an ordered list cache until messages arrive to fill the sequence number gaps. If an out-of-order message arrives with a sequence number that creates a message gap greater than the value of retransmit_message_caching_proximity, the receiver creates a burst loss event and terminates the Late Join recovery operation. You can increase the value of the proximity option and restart the receiver, but a burst loss is a significant event and you should investigate your network and message system components for failures.
5.1.2. Late Join With UMP
Late Join can be implemented in conjunction with UMP's persistent store feature, however in this configuration, it functions somewhat differently. After a Late-Join-enabled receiver has been created, resolved a topic, and become registered with a store, it may then request older messages. This request is handled by the store, which unicasts the retransmission messages. If the store does not have these messages, it requests them of the source (assuming option retransmission-request-forwarding is enabled), thus initiating Late Join.
Unlike with a persistent store, a source/topic using UMQ's queue feature will service Late Join requests in the same manner used by UMS.
5.1.3. Late Join Options Summary
Following is a summary of Late join configuration options. Please refer to UM Configuration Guide for full descriptions of these options.
| scope (object) | option |
|---|---|
| source | late_join |
| source | retransmit_retention_age_threshold |
| source | retransmit_retention_size_limit |
| source | retransmit_retention_size_threshold |
| receiver | use_late_join |
| receiver | retransmit_initial_sequence_number_request |
| receiver | retransmit_message_caching_proximity |
| receiver | retransmit_request_generation_interval |
| receiver | retransmit_request_interval |
| receiver | retransmit_request_maximum |
| receiver | retransmit_request_outstanding_maximum |
5.1.4. Using Default Late Join Options
To implement Late Join with default options, set the Late Join configuration options to activate the feature on both a source and receiver in the following manner.
-
Create a configuration file with source and receiver Late Join activation options set to 1. For example, file cfg1.cfg containing the two lines:
source late_join 1 receiver use_late_join 1 -
Run an application that starts a Late-Join-enabled source. For example:
lbmsrc -c cfg1.cfg -P 1000 topicName -
Wait a few seconds, then run an application that starts a Late-Join-enabled receiver. For example:
lbmrcv -c cfg1.cfg -v topicName
The output for each should closely resemble the following.
LBMSRC
    $ lbmsrc -c cfg1.cfg -P 1000 topicName
     LOG Level 5: NOTICE: Source "topicName" has no retention settings (1 message retained max)
     Sending 10000000 messages of size 25 bytes to topic [topicName]
     Receiver connect [TCP:10.29.3.77:34200]
LBMRCV
    $ lbmrcv -c cfg1.cfg -v topicName
     Immediate messaging target: TCP:10.29.3.77:4391
     [topicName][TCP:10.29.3.76:4371][2]-RX-, 25 bytes
     1.001 secs. 0.0009988 Kmsgs/sec. 0.1998 Kbps
     [topicName][TCP:10.29.3.76:4371][3], 25 bytes
     1.002 secs. 0.0009982 Kmsgs/sec. 0.1996 Kbps
     [topicName][TCP:10.29.3.76:4371][4], 25 bytes
     1.003 secs. 0.0009972 Kmsgs/sec. 0.1994 Kbps
     [topicName][TCP:10.29.3.76:4371][5], 25 bytes
     1.003 secs. 0.0009972 Kmsgs/sec. 0.1994 Kbps
Note that the source only retained 1 Late Join message (due to default retention settings) and that this message appears as a retransmit (-RX-). Also note that it is possible to sometimes receive 2 RX messages in this scenario (see Retransmitting Only Recent Messages.)
5.1.5. Specifying a Range of Messages to Retransmit
To receive more than one or two Late Join messages, increase the source's retransmit_retention_size_threshold from its default value of 0. Once this threshold is exceeded, the source now allows the next new message entering the retention buffer to bump out the oldest one. Note that this threshold's units are bytes (which includes a small overhead per message).
While the retention threshold endeavors to keep the buffer size close to its value, it does not set hard upper limit for retention buffer size. For this, the retransmit_retention_size_limit configuration option (also in bytes) sets this boundary.
Follow the steps below to demonstrate how a source can retain about 50MB of messages, but no more than 60MB:
-
Create a second configuration file (cfg2.cfg) with the following options:
source late_join 1 source retransmit_retention_size_threshold 50000000 source retransmit_retention_size_limit 60000000 receiver use_late_join 1 -
Run lbmsrc -c cfg2.cfg -P 1000 topicName.
-
Wait a few seconds and run lbmrcv -c cfg2.cfg -v topicName.
The output for each should closely resemble the following.
LBMSRC
    $ lbmsrc -c cfg2.cfg -P 1000 topicName
     Sending 10000000 messages of size 25 bytes to topic [topicName]
     Receiver connect [TCP:10.29.3.76:34444]
LBMRCV
    $ lbmrcv -c cfg2.cfg -v topicName
     Immediate messaging target: TCP:10.29.3.76:4391
     [topicName][TCP:10.29.3.77:4371][0]-RX-, 25 bytes
     [topicName][TCP:10.29.3.77:4371][1]-RX-, 25 bytes
     [topicName][TCP:10.29.3.77:4371][2]-RX-, 25 bytes
     [topicName][TCP:10.29.3.77:4371][3]-RX-, 25 bytes
     [topicName][TCP:10.29.3.77:4371][4]-RX-, 25 bytes
     1.002 secs. 0.004991 Kmsgs/sec. 0.9981 Kbps
     [topicName][TCP:10.29.3.77:4371][5], 25 bytes
     1.002 secs. 0.0009984 Kmsgs/sec. 0.1997 Kbps
     [topicName][TCP:10.29.3.77:4371][6], 25 bytes
     1.002 secs. 0.0009983 Kmsgs/sec. 0.1997 Kbps
     [topicName][TCP:10.29.3.77:4371][7], 25 bytes
Note that lbmrcv received live messages with sequence numbers 7, 6, and 5, and RX messages going from 4 all the way back to Sequence Number 0.
5.1.6. Retransmitting Only Recent Messages
Thus far we have worked with only source late join settings, but suppose that you want to receive only the last 10 messages. To do this, configure the receiver option retransmit_request_maximum option to set how many messages to request backwards from the latest message.
Follow the steps below to demonstrate setting this option to 10.
-
Add the following line to cfg2.cfg and rename it cfg3.cfg.
receiver retransmit_request_maximum 10
-
Run lbmsrc -c cfg3.cfg -P 1000 topicName.
-
Wait a few seconds and run lbmrcv -c cfg3.cfg -v topicName.
The output for each should closely resemble the following.
LBMSRC
    $ lbmsrc -c cfg3.cfg -P 1000 topicName
     Sending 10000000 messages of size 25 bytes to topic [topicName]
     Receiver connect [TCP:10.29.3.76:34448]
LBMRCV
    $ lbmrcv -c cfg3.cfg -v topicName
     Immediate messaging target: TCP:10.29.3.76:4391
     [topicName][TCP:10.29.3.77:4371][13]-RX-, 25 bytes
     [topicName][TCP:10.29.3.77:4371][14]-RX-, 25 bytes
     [topicName][TCP:10.29.3.77:4371][15]-RX-, 25 bytes
     [topicName][TCP:10.29.3.77:4371][16]-RX-, 25 bytes
     [topicName][TCP:10.29.3.77:4371][17]-RX-, 25 bytes
     [topicName][TCP:10.29.3.77:4371][18]-RX-, 25 bytes
     [topicName][TCP:10.29.3.77:4371][19]-RX-, 25 bytes
     [topicName][TCP:10.29.3.77:4371][20]-RX-, 25 bytes
     [topicName][TCP:10.29.3.77:4371][21]-RX-, 25 bytes
     [topicName][TCP:10.29.3.77:4371][22]-RX-, 25 bytes
     [topicName][TCP:10.29.3.77:4371][23]-RX-, 25 bytes
     1.002 secs. 0.01097 Kmsgs/sec. 2.195 Kbps
     [topicName][TCP:10.29.3.77:4371][24], 25 bytes
     1.002 secs. 0.0009984 Kmsgs/sec. 0.1997 Kbps
     [topicName][TCP:10.29.3.77:4371][25], 25 bytes
     1.002 secs. 0.0009984 Kmsgs/sec. 0.1997 Kbps
     [topicName][TCP:10.29.3.77:4371][26], 25 bytes
Note that 11, not 10, retransmits were actually received. This can happen because network and timing circumstances may have one RX already in transit while the specific RX amount is being processed. (Hence, please note that it is not possible to guarantee one and only one RX message for every possible Late Join recovery.)
5.1.7. Configuring Late Join for Large Numbers of Messages
Suppose you have a receiver that comes up at midday and must gracefully catch up on the large number of messages it has missed. The following discussion explains the relevant Late Join options and how to use them.
5.1.7.1. retransmit_request_generation_interval (receiver)
This option sets the maximum interval (default 10,000ms) between when a receiver first sends a retransmission request and when the receiver gives up on receiving any more RXs (if any at all were received). The receiver then delivers received RXs, and commences delivering live messages.
For requested messages not received, the receiver generates either an individual message loss report, or, if receiver option delivery_control_maximum_burst_loss is exceeded, a burst loss report.
Set this option high enough so that all requested Late Join messages can be retransmitted to the receiver. Although the default 10-second value works in many situations, extremely high volumes of Late Join messages may require more time.
As an alternative, you can set this option to the longest expected Late Join recovery time. To estimate Late Join recovery time, see Estimating Recovery Time in the Configuration Guide.
5.1.7.2. retransmit_request_outstanding_maximum (receiver)
When a receiver comes up and begins requesting Late Join messages, it does not simply request messages starting at Sequence Number 0 through 1000000. Rather, it requests the messages a little at a time, depending upon retransmit_request_outstanding_maximum. For example, when set to the default of 200, the receiver requests the first 200 messages (Sequence Number 0 - 199). Upon receiving Sequence Number 0, it then requests the next grouping, starting at Sequence Number 200, and so on.
Note that in some environments, the default of 200 messages may be too high and overwhelm receivers with RXs, which can cause loss in a live LBT-RM stream. However, higher values can also increase the rate of RXs received.
5.1.7.3. retransmit_message_caching_proximity (receiver)
Long recoveries of active sources can create memory cache problems due to the processing of both new and retransmitted messages. This option provides a method to control caching and cache size during recovery.
It does this by comparing the option value (default 2147483647) to the difference between the newest (live) received sequence number and the latest received RX sequence number. If the difference is less than the option's value incoming live new messages are cached. Otherwise, new messages are dropped and not cached (they can be requested later as retransmissions).
The default value of retransmit_message_caching_proximity encourages caching and should be optimal for most receivers.
If your source sends faster than it retransmits, caching is beneficial, as it ensures new data is received only once, thus reducing recovery time. If the source retransmits faster than it sends, which is the optimal condition, you can lower the value of this option to use less memory during recovery, with little performance impact.
5.1.7.4. retransmit_message_map_tablesz (source)
This option has been deprecated.
This option specifies the size of the hash table the source uses to store Late Join messages.
-
A larger table can store more messages more efficiently, but takes up more memory.
-
A smaller table uses less memory, but costs more CPU time as more messages are retained.
For example, if the table size is left at its default of 131, bringing up a receiver requesting 1 million Late Join messages can take over 5 minutes. If you increase the table size to 131113, the receiver will need only 8 seconds to become fully caught up.
5.2. Off-Transport Recovery (OTR)
Off-Transport Recovery (OTR) is a lost-message-recovery feature that provides a level of hedging against the possibility of brief and incidental unrecoverable loss at the transport level or from a gateway. This section describes the OTR feature.
5.2.1. OTR Overview
When a transport cannot recover lost messages, OTR engages and looks to the source for message recovery. It does this by accessing the source's retention buffer (used also by the Late Join feature) to re-request messages that no longer exist in a transport's transmission window or other places such as a UMP store or redundant source.
OTR functions in a manner very similar to that of Late Join, but differs mainly in that it activates in message loss situations rather than following the creation of a receiver, and shares only the source late_join option setting.
Upon detecting loss, a receiver using TCP, TCP-LB, LBT-IPC or LBT-RDMA initiates OTR by sending repeated, spaced, OTR requests to the source, until it recovers lost messages or a timeout period elapses.
OTR operates independently from transport-level recovery mechanisms such as NAKs for LBT-RU or LBT-RM. When you enable OTR for a receiver with use_otr, the otr_request_initial_delay starts as soon as the delivery controller detects a sequence gap. OTR recovery initiates if the gap is not resolved by the end of the delay interval. OTR recovery can occur before, during or after transport-level recovery attempts.
When a receiver initiates OTR, the intervals between OTR requests increases twofold after each request, until the maximum interval is reached (assuming the receiver is still waiting to receive the retransmission). You use configuration options otr_request_minimum_interval and otr_request_maximum_intervalto set the initial (minimum) and maximum intervals, respectively.
The source retransmits lost messages to the recovered receiver via unicast.
5.2.2. OTR With UMP
You can implement OTR in conjunction with UMP's persistent store feature, however in this configuration, it functions somewhat differently. If an OTR-enabled receiver registered with a store detects a sequence gap in the live stream and that gap is not resolved by other means within the next otr_request_initial_delay, the receiver requests those messages from the store(s). If the store does not have some of the requested messages, they will be requested from the source. Regardless of whether the messages are recovered from a store or from the source, OTR delivers all recovered messages the LBM_MSG_OTR flag, unlike Late Join, which uses the LBM_MSG_RETRANSMIT flag.
Unlike with a persistent store, a source/topic using UMQ's queue feature services OTR requests in the same manner used by UMS.
5.2.3. OTR Options Summary
The following set of configuration options govern OTR functionality. Please refer to the Ultra Messaging Configuration Guide for full descriptions of these options. You can click the individual links below for each option's description.
| scope (object) | option |
|---|---|
| source | late_join |
| source | retransmit_retention_age_threshold |
| source | retransmit_retention_size_limit |
| source | retransmit_retention_size_threshold |
| receiver | use_otr |
| receiver | otr_request_duration |
| receiver | otr_request_initial_delay |
| receiver | otr_request_log_alert_cooldown |
| receiver | otr_request_maximum_interval |
| receiver | otr_request_minimum_interval |
| receiver | otr_request_outstanding_maximum |
5.3. Request/Response Model
This section discusses the following topics.
5.3.1. Request Message
UM provides three ways to send a request message.
-
lbm_send_request() to send a request to a topic via a source object. Uses the standard source-based transports (TCP, LBT-RM, LBT-RU).
-
lbm_multicast_immediate_request() to send a request to a topic as a multicast immediate message. See Multicast Immediate Messaging.
-
lbm_unicast_immediate_request() to send a request to a topic as a unicast immediate message. See Multicast Immediate Messaging.
The request function returns a request object and defines an application callback for responses that allows the receiving application to send a response directly to the requesting application via a special TCP connection instead of a normal data transport. The requesting application -- not UM -- determines how many responses it needs. Therefore, it must delete the request object when it no longer wants to receive responses by calling lbm_request_delete(). It discards any responses that arrive after the request object has been deleted.
5.3.2. Response Message
An application responds to an UM request message by calling lbm_send_response(). Contained within that request message's header is a response object, which serves as a return address to the requester. UM passes the response object to lbm_send_response(). Since the response object is part of the message header, it is deleted at the same time that the message is deleted. Therefore, if the sending of the response cannot be done within the responder's receive callback, the message must be retained and subsequently deleted.
5.3.3. TCP Management
UM creates and manages the special TCP connections for responses, maintaining a list of active response connections . When an application sends a response, UM scans that list for an active connection to the destination. If it doesn't find a connection for the response, it creates a new connection and adds it to the list. After the lbm_send_response() function returns, UM schedules the response_tcp_deletion_timeout, which defaults to 2 seconds. If a second request comes in from the same application before the timer expires, the responding application simply uses the existing connection and restarts the deletion timer.
It is conceivable that a very large response could take more than the response_tcp_deletion_timeout default (2 seconds) to send to a slow-running receiver. In this case, UM automatically increases the deletion timer as needed to ensure the last message completes.
5.3.4. Configuration
See the UM Configuration Guide for the descriptions of the Request/Response configuration options.
Note: If your application is running within an UM context where the configuration option, request_tcp_bind_request_port has been set to zero, request port binding has been turned off, which also disables the Request/Response feature.
Note: The Request/Response model only works with the unicast topic resolution daemon (lbmrd) across local LANs that use Network Address Translation (NAT) if you use the default value (0.0.0.0) for request_tcp_interface.
5.3.5. Example Applications
UM includes two example applications that illustrate Request/Response.
-
lbmreq.c - application that sends requests on a given topic (single source) and waits for responses. See also the Java example, lbmreq.java, and the .NET example, lbmreq.cs.
-
lbmresp.c - application that waits for requests and sends responses back on a given topic (single receiver). See also the Java example, lbmresp.java, and the .NET example, lbmresp.cs.
We can demonstrate a series of 5 requests and responses with the following procedure.
-
Run lbmresp -v topicname
-
Run lbmreq -R 5 -v topicname
LBMREQ
Output for lbmreq should resemble the following.
$ lbmreq -R 5 -q topicname
Event queue in use
Using TCP port 4392 for responses
Delaying requests for 1000 milliseconds
Sending request 0
Starting event pump for 5 seconds.
Receiver connect [TCP:10.29.1.78:4958]
Done waiting for responses. 1 responses (25 bytes) received. Deleting request. Sending request 1
Starting event pump for 5 seconds.
Done waiting for responses. 1 responses (25 bytes) received. Deleting request. Sending request 2
Starting event pump for 5 seconds.
Done waiting for responses. 1 responses (25 bytes) received. Deleting request. Sending request 3
Starting event pump for 5 seconds.
Done waiting for responses. 1 responses (25 bytes) received. Deleting request. Sending request 4
Starting event pump for 5 seconds.
Done waiting for responses. 1 responses (25 bytes) received. Deleting request.
Quitting...
LBMRESP
Output for lbmresp should resemble the following.
$ lbmresp -v topicname
Request [topicname][TCP:10.29.1.78:14371][0], 25 bytes
Sending response. 1 responses of 25 bytes each (25 total bytes).
Done sending responses. Deleting response.
Request [topicname][TCP:10.29.1.78:14371][1], 25 bytes
Sending response. 1 responses of 25 bytes each (25 total bytes).
Done sending responses. Deleting response.
Request [topicname][TCP:10.29.1.78:14371][2], 25 bytes
Sending response. 1 responses of 25 bytes each (25 total bytes).
Done sending responses. Deleting response.
Request [topicname][TCP:10.29.1.78:14371][3], 25 bytes
Sending response. 1 responses of 25 bytes each (25 total bytes).
Done sending responses. Deleting response.
Request [topicname][TCP:10.29.1.78:14371][4], 25 bytes
Sending response. 1 responses of 25 bytes each (25 total bytes).
Done sending responses. Deleting response.
[topicname][TCP:10.29.1.78:14371], End of Transport Session
5.4. Self Describing Messaging
The UM Self-Describing Messaging (SDM) feature provides an API that simplifies the creation and use of messages by your applications. An SDM message contains one or more fields and each field consists of the following.
-
A name
-
A type
-
A value
Each named field may appear only once in a message. If multiple fields of the same name and type are needed, array fields are available. A field in a nested message may have the same name as a field in the outer message.
SDM is particularly helpful for creating messages sent across platforms by simplifying the creation of data formats. SDM automatically performs platform-specific data translations, eliminating Endianess conflicts.
Using SDM also simplifies message maintenance because the message format or structure can be independent of the source and receiver applications. For example, if your receivers query SDM messages for particular fields and ignore the order of the fields within the message, a source can change the field order if necessary with no modification of the receivers needed.
Use the following links to access a complete reference of SDM functions, field types and message field operations.
-
C Application Programmer's Interface -- click on the Files tab at the top and select lbmsdm.h.
-
Java Application Programmer's Interface -- select com.latencybusters.lbm.sdm under Packages.
-
.NET Application Programmer's Interface -- select the com.latencybusters.lbm.sdm Namespace.
5.5. Pre-Defined Messaging
The UM Pre-Defined Messaging (PDM) feature provides an API similar to the SDM API, but allows you to define messages once and then use the definition to create messages that may contain self-describing data. Eliminating the need to repeatedly send a message definition increases the speed of PDM over SDM. The ability to use arrays created in a different programming language also improves performance.
The PDM library lets you create, serialize, and deserialize messages using pre-defined knowledge about the possible fields that may be used. You can create a definition that a) describes the fields to be sent and received in a message, b) creates the corresponding message, and c) adds field values to the message. This approach offers several performance advantages over SDM, as the definition is known in advance. However, the usage pattern is slightly different than the SDM library, where fields are added directly to a message without any type of definition.
A PDM message contains one or more fields and each field consists of the following.
-
A name
-
A type
-
A value
Each named field may appear only once in a message. If multiple fields of the same name and type are needed, array fields are available. A field in a nested message may have the same name as a field in the outer message.
See the C, Java, and .NET Application Programmer's Interfaces for complete references of PDM functions, field types and message field operations. The C API also has information and code samples about how to create definitions and messages, set field values in a message, set the value of array fields in a message, serialize, deserialize and dispose of messages, and fetch values from a message. See the following API documentation:
-
C Application Programmer's Interface -- click on the Files tab at the top and select lbmpdm.h.
-
Java Application Programmer's Interface -- select com.latencybusters.lbm.pdm under Packages.
-
.NET Application Programmer's Interface -- select the com.latencybusters.lbm.pdm Namespace.
5.5.1. Typical PDM Usage Patterns
The typical PDM usage patterns can usually be broken down into two categories: sources (which need to serialize a message for sending) and receivers (which need to deserialize a message to extract field values). However, for optimum performance for both sources and receivers, first set up the definition and a single instance of the message only once during a setup or initialization phase, as in the following example workflow:
-
Create a definition and set its id and version.
-
Add field information to the definition to describe the types of fields to be in the message.
-
Create a single instance of a message based on the definition.
Set up a source to do the following:
-
Add field values to the message instance.
-
Serialize the message so that it can be sent.
Likewise, set up a receiver to do the following:
-
Deserialize the received bytes into the message instance.
-
Extract the field values from the message.
5.5.2. Getting Started
PDM APIs are provided in C, Java, and C#, however, the examples in this section are Java based.
5.5.2.1. PDM Code Example, Source
Translating the Typical PDM Usage Patterns to Java for a source produces the following:
private PDMDefinition defn;
private PDMMessage msg;
private PDMFieldInfo fldInfo100;
private PDMFieldInfo fldInfo101;
private PDMFieldInfo fldInfo102;

public void setupPDM() {
    //Create the definition with 3 fields and using int field names
    defn = new PDMDefinition(3, true);

    //Set the definition id and version
    defn.setId(1001);
    defn.setMsgVersMajor((byte)1);
    defn.setMsgVersMinor((byte)0);

    //Create information for a boolean, int32, and float fields (all required)
    fldInfo100 = defn.addFieldInfo(100, PDMFieldType.BOOLEAN, true);
    fldInfo101 = defn.addFieldInfo(101, PDMFieldType.INT32, true);
    fldInfo102 = defn.addFieldInfo(102, PDMFieldType.FLOAT, true);

    //Finalize the definition and create the message
    defn.finalizeDef();
    msg = new PDMMessage(defn);
}

public void sourceUsePDM() {
    //Call the function to setup the definition and message
    setupPDM();

    //Example values for the message
    boolean fld100Val = true;
    int fld101Val = 7;
    float fld102Val = 3.14F;

    //Set each field value in the message
    msg.setFieldValue(fldInfo100, fld100Val);
    msg.setFieldValue(fldInfo101, fld101Val);
    msg.setFieldValue(fldInfo102, fld102Val);

    //Serialize the message to bytes
    byte[] buffer = msg.toBytes();
}
5.5.2.2. PDM Code Example, Receiver
Translating the Typical PDM Usage Patterns to Java for a receiver produces the following:
private PDMDefinition defn;
private PDMMessage msg;
private PDMFieldInfo fldInfo100;
private PDMFieldInfo fldInfo101;
private PDMFieldInfo fldInfo102;

public void setupPDM() {
    //Create the definition with 3 fields and using int field names
    defn = new PDMDefinition(3, true);

    //Set the definition id and version
    defn.setId(1001);
    defn.setMsgVersMajor((byte)1);
    defn.setMsgVersMinor((byte)0);

    //Create information for a boolean, int32, and float field (all required)
    fldInfo100 = defn.addFieldInfo(100, PDMFieldType.BOOLEAN, true);
    fldInfo101 = defn.addFieldInfo(101, PDMFieldType.INT32, true);
    fldInfo102 = defn.addFieldInfo(102, PDMFieldType.FLOAT, true);

    //Finalize the definition and create the message
    defn.finalizeDef();
    msg = new PDMMessage(defn);
}

public void receiverUsePDM(byte[] buffer) {
    //Call the function to setup the definition and message
    setupPDM();

    //Values to be retrieved from the message
    boolean fld100Val;
    int fld101Val;
    float fld102Val;

    //Deserialize the bytes into a message
    msg.parse(buffer);

    //Get each field value from the message
    fld100Val = msg.getFieldValueAsBoolean(fldInfo100);
    fld101Val = msg.getFieldValueAsInt32(fldInfo101);
    fld102Val = msg.getFieldValueAsFloat(fldInfo102);
}
5.5.2.3. PDM Code Example Notes
In the examples above, the setupPDM() function is called once to set up the PDM definition and message. It is identical in both the source and receiver cases and simply sets up a definition that contains three required fields with integer names (100, 101, 102). Once finalized, it can create a message that leverages its pre-defined knowledge about these three required fields. The source example adds the three sample field values (a boolean, int32, and float) to the message, which is then serialized to a byte array. In the receiver example, the message parses a byte array into the message and then extracts the three field values.
5.5.3. Using the PDM API
The following code snippets expand upon the previous examples to demonstrate the usage of additional PDM functionality (but use "..." to eliminate redundant code).
5.5.3.1. Reusing the Message Object
Although the examples use a single message object (which provides performance benefits due to reduced message creation and garbage collection), it is not explicitly required to reuse a single instance. However, multiple threads should not access a single message instance.
5.5.3.2. Number of Fields
Although the number of fields above is initially set to 3 in the PDMDefinition constructor, if you add more fields to the definition with the addFieldInfo method, the definition grows to accommodate each field. Once the definition is finalized, you cannot add additional field information because the definition is now locked and ready for use in a message.
5.5.3.3. String Field Names
The examples above use integer field names in the setupPDM() function when creating the definition. You can also use string field names when setting up the definition. However, you still must use a FieldInfo object to set or get a field value from a message, regardless of field name type. Notice that false is passed to the PDMDefinition constructor to indicate string field names should be used. Also, the overloaded addFieldInfo function uses string field names (.Field100.) instead of the integer field names.
...
public void setupPDM() {
    //Create the definition with 3 fields and using string field names
    defn = new PDMDefinition(3, false);
    ...
    //Create information for a boolean, int32, and float field (all required)
fldInfo100 = defn.addFieldInfo("Field100", PDMFieldType.BOOLEAN, true);
    fldInfo101 = defn.addFieldInfo("Field101", PDMFieldType.INT32, true);
    fldInfo102 = defn.addFieldInfo("Field102", PDMFieldType.FLOAT, true);
    ...
}
...
5.5.3.4. Retrieving FieldInfo from the Definition
At times, it may be easier to lookup the FieldInfo from the definition using the integer name (or string name if used). This eliminates the need to store the reference to the FieldInfo when getting or setting a field value in a message, but it does incur a performance penalty due to the lookup in the definition to retrieve the FieldInfo. Notice that there are no longer FieldInfo objects being used when calling addFieldInfo and a lookup is being done for each call to msg.getFieldValueAs* to retrieve the FieldInfo by integer name.
private PDMDefinition defn;
private PDMMessage msg;

public void setupPDM() {
    ...
    //Create information for a boolean, int32, and float field (all required)
    defn.addFieldInfo(100, PDMFieldType.BOOLEAN, true);
    defn.addFieldInfo(101, PDMFieldType.INT32, true);
    defn.addFieldInfo(102, PDMFieldType.FLOAT, true);
    ...
}

public void receiverUsePDM(byte[] buffer) {
    ...
    //Get each field value from the message
    fld100Val = msg.getFieldValueAsBoolean(defn.getFieldInfo(100));
    fld101Val = msg.getFieldValueAsInt32(defn.getFieldInfo(101));
    fld102Val = msg.getFieldValueAsFloat(defn.getFieldInfo(102));
}
5.5.3.5. Required and Optional Fields
When adding field information to a definition, you can indicate that the field is optional and may not be set for every message that uses the definition. Do this by passing false as the third parameter to the addFieldInfo function. Using required fields (fixed-required fields specifically) produces the best performance when serializing and deserializing messages, but causes an exception if all required fields are not set before serializing the message. Optional fields allow the concept of sending "null" as a value for a field by simply not setting that field value on the source side before serializing the message. However, after parsing a message, a receiver should check the isFieldValueSet function for an optional field before attempting to read the value from the field to avoid the exception mentioned above.
...
private PDMFieldInfo fldInfo103;
...
public void setupPDM() {
    ...
//Create information for a boolean, int32, and float field (all required)
    // as well as an optional int8 field
fldInfo100 = defn.addFieldInfo(100, PDMFieldType.BOOLEAN, true);
    fldInfo101 = defn.addFieldInfo(101, PDMFieldType.INT32, true);
    fldInfo102 = defn.addFieldInfo(102, PDMFieldType.FLOAT, true);
    fldInfo103 = defn.addFieldInfo(103, PDMFieldType.INT8, false);
    ...
}

public void sourceUsePDM() {
    ...
    //Set each field value in the message
    // except do not set the optional field
    msg.setFieldValue(fldInfo100, fld100Val);
    msg.setFieldValue(fldInfo101, fld101Val);
    msg.setFieldValue(fldInfo102, fld102Val);
...
}
...
private PDMFieldInfo fldInfo103;
...
public void setupPDM() {
    ...
//Create information for a boolean, int32, and float field (all required)
    // as well as an optional int8 field
    fldInfo103 = defn.addFieldInfo(103, PDMFieldType.INT8, false);
    ...
}
public void receiverUsePDM(byte[] buffer) {
    ...
    byte fld103Val;
    ...

    if(msg.isFieldValueSet(fldInfo103)) {
        fld103Val = msg.getFieldValueAsInt8(fldInfo103);
    }
}
5.5.3.6. Fixed String and Fixed Unicode Field Types
A variable length string typically does not have the performance optimizations of fixed-required fields. However, by indicating "required", as well as the field type FIX_STRING or FIX_UNICODE and specifying an integer number of fixed characters, PDM sets aside an appropriate fixed amount of space in the message for that field and treats it as an optimized fixed-required field. Strings of a smaller length can still be set as the value for the field, but the message allocates the specified fixed number of bytes for the string. Specify unicode strings in the same manner (with FIX_UNICODE as the type) and in "UTF-8" format.
...
private PDMFieldInfo fldInfo104;
...
public void setupPDM() {
    ...
    fldInfo104 = defn.addFieldInfo(104, PDMFieldType.FIX_STRING, 12, true);
    ...
}

public void sourceUsePDM() {
    ...
    String fld104Val = "Hello World!";

    //Set each field value in the message
    // except do not set the optional field
    msg.setFieldValue(fldInfo100, fld100Val);
    msg.setFieldValue(fldInfo101, fld101Val);
    msg.setFieldValue(fldInfo102, fld102Val);
    msg.setFieldValue(fldInfo104, fld104Val);
...
}
...
private PDMFieldInfo fldInfo104;
...
public void setupPDM() {
    ...
    fldInfo104 = defn.addFieldInfo(104, PDMFieldType.FIX_STRING, 12, true);
    ...
}
public void receiverUsePDM(byte[] buffer) {
    ...
    String fld104Val;
    ...

    fld104Val = msg.getFieldValueAsString(fldInfo104);
}
5.5.3.7. Variable Field Types
The field types of STRING, UNICODE, BLOB, and MESSAGE are all variable length field types. They do not require a length to be specified when adding field info to the definition. You can use a BLOB field to store an arbitrary binary objects (in Java as an array of bytes) and a MESSAGE field to store a PDMMessage object, which enables "nesting" PDMMessages inside other PDMMessages. Creating and using a variable length string field is nearly identical to the previous fixed string example.
...
private PDMFieldInfo fldInfo105;
...
public void setupPDM() {
    ...
    fldInfo105 = defn.addFieldInfo(105, PDMFieldType.STRING, true);
    ...
}

public void sourceUsePDM() {
    ...
    String fld105Val = "variable length value";
    ...
    msg.setFieldValue(fldInfo105, fld105Val);
...
}
...
private PDMFieldInfo fldInfo105;
...
public void setupPDM() {
    ...
    fldInfo105 = defn.addFieldInfo(105, PDMFieldType.STRING, true);
    ...
}
public void receiverUsePDM(byte[] buffer) {
    ...
    String fld105Val;
    ...

    fld105Val = msg.getFieldValueAsString(fldInfo105);
}
Retrieve the BLOB field values with the getFieldValueAsBlob function, and the MESSAGE field values with the getFieldValueAsMessage function.
5.5.3.8. Array Field Types
For each of the scalar field types (fixed and variable length), a corresponding array field type uses the convention *_ARR for the type name (ex: BOOLEAN_ARR, INT32_ARR, STRING_ARR, etc). This lets you set and get Java values such as an int[] or string[] directly into a single field. In addition, all of the array field types can specify a fixed number of elements for the size of the array when they are defined, or if not specified, behave as variable size arrays. Do this by passing an extra parameter to the addFieldInfo function of the definition.
To be treated as a fixed-required field, an array type field must be required as well as be specified as a fixed size array of fixed length elements. For instance, a required BOOLEAN_ARR field defined with a size of 3 would be treated as a fixed-required field. Also, a required FIX_STRING_ARR field defined with a size of 5 and fixed string length of 7 would be treated as a fixed-required field. However, neither a STRING_ARR field nor a BLOB_ARR field are treated as a fixed length field even if the size of the array is specified, since each element of the array can be variable in length. In the example below, field 106 and field 108 are both treated as fixed-required fields, but field 107 is not because it is a variable size array field type.
...
private PDMFieldInfo fldInfo106;
private PDMFieldInfo fldInfo107;
private PDMFieldInfo fldInfo108;
...
public void setupPDM() {
    ...
    //Create information for a boolean, int32, and float field (all required)
    // as well as an optional int8 field
    ...
    //A required, fixed size array of 3 boolean elements
    fldInfo106 = defn.addFieldInfo(106, PDMFieldType.BOOLEAN_ARR, true, 3);
    //An optional, variable size array of int32 elements
    fldInfo107 = defn.addFieldInfo(107, PDMFieldType.INT32_ARR, false);
    //A required, fixed size array of 2 element which are each 5 character strings
    fldInfo108 = defn.addFieldInfo(108, PDMFieldType.FIX_STRING_ARR, 5, true, 2);
    ...
}

public void sourceUsePDM() {
...

    //Example values for the message
    ...
    boolean fld106Val[] = {true, false, true};
    int fld107Val[] = {1, 2, 3, 4, 5};
    String fld108Val[] = {"aaaaa", "bbbbb"};

    //Set each field value in the message
    ...
    msg.setFieldValue(fldInfo106, fld106Val);
    msg.setFieldValue(fldInfo107, fld107Val);
    msg.setFieldValue(fldInfo108, fld108Val);

    ...
}
...
private PDMFieldInfo fldInfo106;
private PDMFieldInfo fldInfo107;
private PDMFieldInfo fldInfo108;
...
public void setupPDM() {
    ...
    //Create information for a boolean, int32, and float field (all required)
    // as well as an optional int8 field
    ...
    //A required, fixed size array of 3 boolean elements
    fldInfo106 = defn.addFieldInfo(106, PDMFieldType.BOOLEAN_ARR, true, 3);
    //An optional, variable size array of int32 elements
    fldInfo107 = defn.addFieldInfo(107, PDMFieldType.INT32_ARR, false);
    //A required, fixed size array of 2 element which are each 5 character strings
    fldInfo108 = defn.addFieldInfo(108, PDMFieldType.FIX_STRING_ARR, 5, true, 2);
    ...
}

public void receiverUsePDM(byte[] buffer) {
    ...

    //Values to be retrieved from the message
    ...
    boolean fld106Val[];
    int fld107Val[];
    String fld108Val[];

    //Deserialize the bytes into a message
    msg.parse(buffer);

    //Get each field value from the message
    ...
    fld106Val = msg.getFieldValueAsBooleanArray(fldInfo106);
    if(msg.isFieldValueSet(fldInfo107)) {
        fld107Val = msg.getFieldValueAsInt32Array(fldInfo107);
    }
    fld108Val = msg.getFieldValueAsStringArray(fldInfo108);

}
5.5.3.9. Definition Included In Message
Optionally, a PDM message can also include the definition when it is serialized to bytes. This enables receivers to parse a PDM message without having pre-defined knowledge of the message, although including the definition with the message affects message size and performance of message deserialization. Notice that the setIncludeDefinition function is called with an argument of true for a source that serializes the definition as part of the message.
private PDMDefinition defn;
private PDMMessage msg;

public void setupPDM() {
    //Create the definition with 3 fields and using int field names
    defn = new PDMDefinition(3, true);

    ...

    //Finalize the definition and create the message
    defn.finalizeDef();
    msg = new PDMMessage(defn);

//Set the flag to indicate that the definition should also be serialized
    msg.setIncludeDefinition(true);
}

...
For a receiver, the setupPDM function does not need to set any flags for the message but rather should define a message without a definition, since we assume the source provides the definition. If a definition is set for a message, it will attempt to use that definition instead of the definition on the incoming message (unless the ids are different).
private PDMDefinition defn;
private PDMMessage msg;

public void setupPDM() {
    //Don.t define a definition

    //Create a message without a definition since the incoming message will have it

    msg = new PDMMessage();
}

...
5.5.3.10. The PDM Field Iterator
You can use the PDM Field Iterator to check all defined message fields to see if set, or to extract their values. You can extract a field value as an Object using this method, but due to the casting involved, we recommend you use the type specific get method to extract the exact value. Notice the use of field.isValueSet to check to see if the field value is set and the type specific get methods such as getBooleanValue and getFloatValue.
...

public void setupPDM() {
    //Create the definition with 3 fields and using int field names
    defn = new PDMDefinition(3, true);

    //Set the definition id and version
    defn.setId(1001);
    defn.setMsgVersMajor((byte)1);
    defn.setMsgVersMinor((byte)0);

    //Create information for a boolean, int32, and float field (all required)
    // as well as an optional int8 field
    fldInfo100 = defn.addFieldInfo(100, PDMFieldType.BOOLEAN, true);
    fldInfo101 = defn.addFieldInfo(101, PDMFieldType.INT32, true);
    fldInfo102 = defn.addFieldInfo(102, PDMFieldType.FLOAT, true);
    fldInfo103 = defn.addFieldInfo(103, PDMFieldType.INT8, false);
    fldInfo104 = defn.addFieldInfo(104, PDMFieldType.FIX_STRING, 12, true);
    fldInfo105 = defn.addFieldInfo(105, PDMFieldType.STRING, true);
    //A required, fixed size array of 3 boolean elements
    fldInfo106 = defn.addFieldInfo(106, PDMFieldType.BOOLEAN_ARR, true, 3);
    //An optional, variable size array of int32 elements
    fldInfo107 = defn.addFieldInfo(107, PDMFieldType.INT32_ARR, false);
    //A required, fixed size array of 2 element which are each 5 character strings
    fldInfo108 = defn.addFieldInfo(108, PDMFieldType.FIX_STRING_ARR, 5, true, 2);

    //Finalize the definition and create the message
    defn.finalizeDef();
    msg = new PDMMessage(defn);
}

public void receiveAndIterateMessage(byte[] buffer) {
    msg.parse(buffer);
    PDMFieldIterator iterator = msg.createFieldIterator();
    PDMField field = null;
    while(iterator.hasNext()) {
        field = iterator.next();
        System.out.println("Field set? " +field.isValueSet());
        switch(field.getIntName()) {
            case 100:
                boolean val100 = field.getBooleanValue();
                System.out.println(
                        "Field 100's value is: " + val100);
                break;
            case 101:
                int val101 = field.getInt32Value();
                System.out.println(
                        "Field 101's value is: " + val101);
                break;
            case 102:
                float val102 = field.getFloatValue();
                System.out.println(
                        "Field 102's value is: " + val102);
                break;
            default:
                //Casting to object is possible but not recommended
                Object value = field.getValue();
                int name = field.getIntName();
                System.out.println(
                        "Field " + name + "'s value is: " + value);
        }
    }
}
Sample Output (106, 107, 108 are array objects as expected):
Field set? true
Field 100's value is: true
Field set? true
Field 101's value is: 7
Field set? true
Field 102's value is: 3.14
Field set? false
Field 103's value is: null
Field set? true
Field 104's value is: Hello World!
Field set? true
Field 105's value is: Variable
Field set? true
Field 106's value is: [Z@527736bd
Field set? true
Field 107's value is: [I@10aadc97
Field set? true
Field 108's value is: [Ljava.lang.String;@4178460d
5.5.3.11. Using the Definition Cache
The PDM Definition Cache assists with storing and looking up definitions by their id and version. In some scenarios, it may not be desirable to maintain the references to the message and the definition from a setup phase by the application. A source could optionally create the definition during the setup phase and store it in the definition cache. At a later point in time, it could retrieve the definition from the cache and use it to create the message without needing to maintain any references to the objects.
public void createAndStoreDefinition() {
    PDMDefinition myDefn = new PDMDefinition(3, true);
    //Set the definition id and version
    myDefn.setId(2001);
    myDefn.setMsgVersMajor((byte)1);
    myDefn.setMsgVersMinor((byte)0);

    //Create information for a boolean, int32, and float field (all required)
    myDefn.addFieldInfo(100, PDMFieldType.BOOLEAN, true);
    myDefn.addFieldInfo(101, PDMFieldType.INT32, true);
    myDefn.addFieldInfo(102, PDMFieldType.FLOAT, true);

    myDefn.finalizeDef();

    PDMDefinitionCache.getInstance().put(myDefn);
}

public void createMessageUsingCache() {
    PDMDefinition myFoundDefn = PDMDefinitionCache.getInstance().get(2001, 1, 0);
    if(myFoundDefn != null) {
        PDMMessage myMsg = new PDMMessage(myFoundDefn);
        //Get FieldInfo from defn and then set field values in myMsg
        //...
    }
}
A more advanced use of the PDM Definition Cache is by a receiver which may need to receive messages with different definitions and the definitions are not being included with the messages. The receiver can create the definitions in advance and then set a flag that allows automatic lookup into the definition cache when parsing a message (which is not on by default). Before receiving messages, the receiver should do something similar to createAndStoreDefinition (shown below) to set up definitions and put them in the definition cache. Then the flag to allow automatic lookup should be set as shown below in the call to setTryToLoadDefFromCache(true). This allows the PDMMessage to be created without a definition and still successfully parse a message by leveraging the definition cache.
public void createAndStoreDefinition() {
    PDMDefinition myDefn = new PDMDefinition(3, true);
    //Set the definition id and version
    myDefn.setId(2001);
    myDefn.setMsgVersMajor((byte)1);
    myDefn.setMsgVersMinor((byte)0);

    //Create information for a boolean, int32, and float field (all required)
    myDefn.addFieldInfo(100, PDMFieldType.BOOLEAN, true);
    myDefn.addFieldInfo(101, PDMFieldType.INT32, true);
    myDefn.addFieldInfo(102, PDMFieldType.FLOAT, true);

    myDefn.finalizeDef();

    PDMDefinitionCache.getInstance().put(myDefn);

    //Create and store other definitions
    //...
}

public void receiveKnownMessages(byte[] buffer) {
    PDMMessage myMsg = new PDMMessage();
    //Set the flag that enables messages to try
    // looking up the definition in the cache automatically
    // when parsing a byte buffer
    myMsg.setTryToLoadDefFromCache(true);
    myMsg.parse(buffer);

    if(myMsg.getDefinition().getId() == 2001
            && myMsg.getDefinition().getMsgVersMajor() == 1
            && myMsg.getDefinition().getMsgVersMinor() == 0) {

        PDMDefinition myDefn = PDMDefinitionCache.getInstance().get(2001, 1, 0);
        PDMFieldInfo fldInfo100 = myDefn.getFieldInfo(100);
        PDMFieldInfo fldInfo101 = myDefn.getFieldInfo(101);
        PDMFieldInfo fldInfo102 = myDefn.getFieldInfo(102);

        boolean fld100Val;
        int fld101Val;
        float fld102Val;

        //Get each field value from the message
        fld100Val = myMsg.getFieldValueAsBoolean(fldInfo100);
        fld101Val = myMsg.getFieldValueAsInt32(fldInfo101);
        fld102Val = myMsg.getFieldValueAsFloat(fldInfo102);

        System.out.println(fld100Val + " " + fld101Val + " " + fld102Val);
    }
}
5.5.4. Migrating from SDM
Applications using SDM with a known set of message fields are good candidates for migrating from SDM to PDM. With SDM, the source typically adds fields to an SDM message without a definition. But, as shown above in the PDM examples, creating/adding a PDM definition before adding field values is fairly straightforward.
However, certain applications may be incapable of building a definition in advance due to the ad-hoc nature of their messaging needs, in which case a self-describing format like SDM may be preferred.
5.5.4.1. Simple Migration Example
The following source code shows a basic application that serializes and deserializes three fields using SDM and PDM. The setup method in both cases initializes the object instances so they can be reused by the source and receiver methods.
The goal of the sourceCreateMessageWith functions is to produce a byte array by setting field values in a message object. With SDM, actual Field classes are created, values are set, the Field classes are added to a Fields class, and then the Fields class is added to the SDMessage. With PDM, FieldInfo objects are created during the setup phase and then used to set specific values in the PDMMessage.
The goal of the receiverParseMessageWith functions is to produce a message object by parsing the byte array and then extract the field values from the message. With SDM, the specific field is located and casted to the correct field class before getting the field value. With PDM, the appropriate getFieldValueAs function is called with the corresponding FieldInfo object created during the setup phase to extract the field value.
public class Migration {

    //SDM Variables
    private LBMSDMessage srcSDMMsg;
    private LBMSDMessage rcvSDMMsg;

    //PDM Variables
    private PDMDefinition defn;
    private PDMFieldInfo fldInfo100;
    private PDMFieldInfo fldInfo101;
    private PDMFieldInfo fldInfo102;
    private PDMMessage srcPDMMsg;
    private PDMMessage rcvPDMMsg;


public static void main(String[] args) {
        Migration app = new Migration();
        System.out.println("Setting up PDM Definition and Message");
        app.setupPDM();
        System.out.println("Setting up SDM Messages");
        app.setupSDM();

        byte[] sdmBuffer;
        sdmBuffer = app.sourceCreateMessageWithSDM();
        app.receiverParseMessageWithSDM(sdmBuffer);

        byte[] pdmBuffer;
        pdmBuffer = app.sourceCreateMessageWithPDM();
        app.receiverParseMessageWithPDM(pdmBuffer);

    }

    public void setupSDM() {
        rcvSDMMsg = new LBMSDMessage();
        srcSDMMsg = new LBMSDMessage();
    }

    public void setupPDM() {
        //Create the definition with 3 fields and using int field names
        defn = new PDMDefinition(3, false);

        //Set the definition id and version
        defn.setId(1001);
        defn.setMsgVersMajor((byte)1);
        defn.setMsgVersMinor((byte)0);

        //Create information for a boolean, int32, and float field (all required)
        // as well as an optional int8 field
        fldInfo100 = defn.addFieldInfo("Field100", PDMFieldType.INT8, true);
        fldInfo101 = defn.addFieldInfo("Field101", PDMFieldType.INT16, true);
        fldInfo102 = defn.addFieldInfo("Field102", PDMFieldType.INT32, true);

        //Finalize the definition and create the message
        defn.finalizeDef();
        srcPDMMsg = new PDMMessage(defn);
        rcvPDMMsg = new PDMMessage(defn);
    }

    public byte[] sourceCreateMessageWithSDM() {
        byte[] buffer = null;

        LBMSDMField fld100 = new LBMSDMFieldInt8("Field100", (byte)0x42);
        LBMSDMField fld101 = new LBMSDMFieldInt16("Field101", (short)0x1ead);
        LBMSDMField fld102 = new LBMSDMFieldInt32("Field102", 12345);
        LBMSDMFields fset = new LBMSDMFields();

        try {
            fset.add(fld100);
            fset.add(fld101);
            fset.add(fld102);
        } catch (LBMSDMException e) {
            System.out.println ( e );
        }


        srcSDMMsg.set(fset);
        try {
            buffer = srcSDMMsg.data();
        } catch (IndexOutOfBoundsException e) {
            System.out.println ( "SDM Exception occurred during build of message:" );
            System.out.println ( e.toString() );
        } catch (LBMSDMException e) {
            System.out.println ( e.toString() );
        }
        return buffer;

    }

    public byte[] sourceCreateMessageWithPDM() {
        //Set each field value in the message
        srcPDMMsg.setFieldValue(fldInfo100, (byte)0x42);
        srcPDMMsg.setFieldValue(fldInfo101, (short)0x1ead);
        srcPDMMsg.setFieldValue(fldInfo102, 12345);

        //Serialize the message to bytes
        byte[] buffer = srcPDMMsg.toBytes();
        return buffer;
    }

    public void receiverParseMessageWithSDM(byte[] buffer) {
        //Values to be retrieved from the message
        byte fld100Val;
        short fld101Val;
        int fld102Val;

        //Deserialize the bytes into a message
        try {
            rcvSDMMsg.parse(buffer);
        } catch (LBMSDMException e) {
            System.out.println(e.toString());
        }

        LBMSDMField fld100 = rcvSDMMsg.locate("Field100");
        LBMSDMField fld101 = rcvSDMMsg.locate("Field101");
        LBMSDMField fld102 = rcvSDMMsg.locate("Field102");

        //Get each field value from the message
        fld100Val = ((LBMSDMFieldInt8)fld100).get();
        fld101Val = ((LBMSDMFieldInt16)fld101).get();;
        fld102Val = ((LBMSDMFieldInt32)fld102).get();;


        System.out.println("SDM Results: Field100=" + fld100Val +
                ", Field101=" + fld101Val +
                ", Field102=" + fld102Val);

    }

    public void receiverParseMessageWithPDM(byte[] buffer) {
        //Values to be retrieved from the message
        byte fld100Val;
        short fld101Val;
        int fld102Val;

        //Deserialize the bytes into a message
        rcvPDMMsg.parse(buffer);

        //Get each field value from the message
        fld100Val = rcvPDMMsg.getFieldValueAsInt8(fldInfo100);
        fld101Val = rcvPDMMsg.getFieldValueAsInt16(fldInfo101);
        fld102Val = rcvPDMMsg.getFieldValueAsInt32(fldInfo102);


        System.out.println("PDM Results: Field100=" + fld100Val +
                ", Field101=" + fld101Val +
                ", Field102=" + fld102Val);

    }

}
Notice that with sourceCreateMessageWithSDM function, the three fields (name and value) are created and added to the fset variable, which is then added to the SDM message. On the other hand, the sourceCreateMessageWithPDM function uses the FieldInfo object references to add the field values to the message for each of the three fields.
Also notice that the receiverParseMessageWithSDM requires a cast to the specific field class (like LBMSDMFieldInt8) once the field has been located. After the cast, calling the get method returns the expected value. On the other hand the receiverParseMessageWithPDM uses the FieldInfo object reference to directly retrieve the field value using the appropriate getFieldValueAs* method.
5.5.4.2. SDM Raw Classes
Several SDM classes with Raw in their name could be used as the value when creating an LBMSDMField. For example, an LBMSDMRawBlob instance could be created from a byte array and then that the LBMSDMRawBlob could be used as the value to a LBMSDMFieldBlob as shown in the following example.
       byte[] blob = new byte[25];
        LBMSDMRawBlob rawSDMBlob = new LBMSDMRawBlob(blob);
        try {
            LBMSDMField fld103 = new LBMSDMFieldBlob("Field103",rawSDMBlob);
        } catch (LBMSDMException e1) {
            System.out.println(e1);
        }
The actual field named "Field103" is created in the try block using the rawSDMBlob variable which has been created to wrap the blob byte array. This field can be added to a LBMSDMFields object, which then uses it in a LBMSDMessage.
In PDM, there are no "Raw" classes that can be created. When setting the value for a field for a message, the appropriate variable type should be passed in as the value. For example, setting the field value for a BLOB field would mean simply passing the byte array directly in the setValue method as shown in the following code snippet since the field is defined as type BLOB.
private PDMFieldInfo fldInfo103;

public void setupPDM() {
        ...
        fldInfo103 = defn.addFieldInfo("Field103", PDMFieldType.BLOB, true);
        ...
    }
...
        byte[] blob = new byte[25];
        srcPDMMsg.setFieldValue(fldInfo103, blob);
The PDM types of DECIMAL, TIMESTAMP, and MESSAGE expect a corresponding instance of PDMDecimal, PDMTimestamp, and PDMMessage as the field value when being set in the message so those types do require an instantiation instead of using a native Java type. For example, if "Field103" had been of type PDMFieldType.DECIMAL, the following code would be used to set the value.
PDMDecimal decimal = new PDMDecimal((long)2, (byte)32);
srcPDMMsg.setFieldValue(fldInfo103, decimal);
5.6. Multicast Immediate Messaging
As an alternative to the normal, source-based UM messaging model, Multicast Immediate Messaging (MIM) offers advantages to short-lived topics and applications that cannot tolerate a delay between source creation and the sending of the first message. See the UM Knowledgebase article, Delay Before Sending for background on this delay and other head-loss mitigation techniques.
Multicast Immediate Messaging avoids delay by eliminating the topic resolution process. MIM accomplishes this by:
-
Configuring transport information into sending and receiving applications.
-
Including topic strings within each message.
MIM is well-suited to applications where a small number of messages are sent to a topic. By eliminating topic resolution, MIM also reduces one of the causes of head-loss, defined as the loss of initial messages sent over a new transport session. Messages sent before topic resolution is complete will be lost.
MIM is typically not used for normal streaming data because messages are somewhat less efficiently handled than source-based messages. Inefficiencies derive from larger message sizes due to the inclusion of the topic name, and on the receiving side, the MIM delivery controller hashing of topic names to find receivers, which consumes some extra CPU. If you have a high-message-rate stream, you should use a source-based method and not MIM. If head-loss is a concern and delay before sending is not feasible, then consider using late join (although this replaces head-loss with some head latency).
Note: Multicast Immediate Messaging can use Datagram Bypass Layer (DBL) acceleration in conjunction with DBL-enabled Myricom® 10-Gigabit Ethernet NICs for Linux and Microsoft® Windows®. DBL is a kernel-bypass technology that accelerates sending and receiving UDP traffic. See Transport Acceleration Options for more information.
This section discusses the following topics.
5.6.1. Temporary Transport Session
MIM uses the same reliable multicast algorithms as LBT-RM. When a sending application sends a message with lbm_multicast_immediate_message(), MIM creates a temporary transport session. Note that no topic-level source object is created.
MIM automatically deletes the temporary transport session after a period of inactivity defined by mim_src_deletion_timeout which defaults to 30 seconds. A subsequent send creates a new transport session. Due to the possibility of head-loss in the switch, it is recommended that sending applications use a long deletion timeout if they continue to use MIM after significant periods of inactivity.
MIM forces all topics across all sending applications to be concentrated onto a single multicast address to which ALL applications listen, even if they aren't interested in any of the topics. Thus, all topic filtering must happen in UM.
MIM can also be used to send an UM request message with lbm_multicast_immediate_request(). For example, an application can use MIM to request initialization information right when it starts up. MIM sends the response directly to the initializing application, avoiding the topic resolution delay inherent in the normal source-based lbm_send_request() function.
5.6.1.1. MIM Notifications
MIM notifications differ in the following ways from normal UM source-based sending.
-
When a sending application's MIM transport session times out and is deleted, the receiving applications do not receive an EOS notification.
-
Applications with a source notification callback are not informed of a MIM sender. Since source notification is basically a hook into the topic resolution system, this should not come as a surprise.
-
MIM sending supports the non-blocking flag. However, it does not provide an LBM_SRC_EVENT_WAKEUP notification when the MIM session becomes writable again.
-
MIM sends unrecoverable loss notifications to a context callback, not to a receiver callback. See Loss Handling.
5.6.2. Receiving Immediate Messages
MIM does not require any special type of receiver. It uses the topic-based publish/subscribe model so an application must still create a receiver for a topic to receive MIM messages.
Note: If needed, an application can send topic-less messages using MIM. A MIM sender passes in a NULL string instead of a topic name. The message goes out on the MIM multicast address and is received by all other receivers. A receiving application can use lbm_context_rcv_immediate_msgs() to set the callback procedure and delivery method for non-topic immediate messages.
5.6.2.1. Wildcard Receivers
When an application receives an immediate message, it's topic is hashed to see if there is at least one regular (non-wildcard) receiver object listening to the topic. If so, then MIM delivers the message data to the list of receivers.
However, if there are no regular receivers for that topic in the receive hash, MIM runs the message topic through all existing wildcard patterns and delivers matches to the appropriate wildcard receiver objects without creating sub-receivers. The next MIM message received for the same topic will again be run through all existing wildcard patterns. This can consume significant CPU resources since it is done on a per-message basis.
5.6.2.2. Loss Handling
The receiving application can set up a context callback to be notified of MIM unrecoverable loss (lbm_mim_unrecloss_function_cb). It is not possible to do this notification on a topic basis because the receiving UM has no way of knowing which topics were affected by the loss.
Note: The UM API's statistics functions and the UM Monitoring API do not provide access to MIM transport session statistics.
5.6.3. MIM Configuration
As of UM 3.1, MIM supports ordered delivery. As of UM 3.3.2, the MIM configuration option, mim_ordered_delivery defaults to ordered delivery. A byproduct of MIM ordered delivery is cross-topic ordering, which normal source-based UM senders cannot guarantee.
See the UM Configuration Guide for the descriptions of the MIM configuration options.
Note: Setting mim_incoming_address to 0.0.0.0 turns off MIM.
5.6.4. MIM Example Applications
UM includes two example applications that illustrate MIM.
-
lbmimsg.c - application that sends immediate messages as fast as it can to a given topic (single source). See also the Java example, lbmimsg.java and the .NET example, lbmimsg.cs.
-
lbmireq.c - application that sends immediate requests to a given topic (single source) and waits for responses.
5.6.4.1. lbmimsg.c
We can demonstrate the default operation of Immediate Messaging with lbmimsg and lbmrcv.
-
Run lbmrcv -v topicName
-
Run lbmimsg topicName
The lbmrcv output should resemble the following.
Immediate messaging target: TCP:10.29.1.78:14391
1     secs.  0     Kmsgs/sec.  0     Kbps
1     secs.  0     Kmsgs/sec.  0     Kbps
1     secs.  0     Kmsgs/sec.  0     Kbps
[topicName][LBTRM:10.29.1.78:14390:644c8862:224.10.10.21:14401][0], 25 bytes
[topicName][LBTRM:10.29.1.78:14390:644c8862:224.10.10.21:14401][1], 25 bytes
[topicName][LBTRM:10.29.1.78:14390:644c8862:224.10.10.21:14401][2], 25 bytes
[topicName][LBTRM:10.29.1.78:14390:644c8862:224.10.10.21:14401][3], 25 bytes
[topicName][LBTRM:10.29.1.78:14390:644c8862:224.10.10.21:14401][4], 25 bytes
[topicName][LBTRM:10.29.1.78:14390:644c8862:224.10.10.21:14401][5], 25 bytes
[topicName][LBTRM:10.29.1.78:14390:644c8862:224.10.10.21:14401][6], 25 bytes
Each line in the lbmrcv output is a message received, showing the topic name, transport type, receiver IP:Port, multicast address and message number.
5.6.4.2. lbmireq.c
Sending an UM request by MIM can be demonstrated with lbmireq and lbmrcv, which shows a single request being sent by lbmireq and received by lbmrcv. (lbmrcv sends no response.)
-
Run lbmrcv -v topicName
-
Run lbmireq topicName
lbmrcv
The lbmrcv output should resemble the following.
$ lbmrcv -v topicName
Immediate messaging target: TCP:10.29.1.78:14391
1     secs.  0     Kmsgs/sec.  0     Kbps
1     secs.  0     Kmsgs/sec.  0     Kbps
1     secs.  0     Kmsgs/sec.  0     Kbps
[topicName][LBTRM:10.29.1.78:14390:92100885:224.10.10.21:14401][0], Request
1     secs.  0     Kmsgs/sec.  0     Kbps
1     secs.  0     Kmsgs/sec.  0     Kbps
1     secs.  0     Kmsgs/sec.  0     Kbps
1     secs.  0     Kmsgs/sec.  0     Kbps
1     secs.  0     Kmsgs/sec.  0     Kbps
1     secs.  0     Kmsgs/sec.  0     Kbps
lbmireq
The lbmireq output should resemble the following.
$ lbmireq topicName
Using TCP port 4392 for responses
Sending 1 requests of size 25 bytes to target <> topic <topicName>
Sending request 0
Sent request 0. Pausing 5 seconds.
Done waiting for responses. 0 responses (0 bytes) received. Deleting request
Quitting...
Lingering for 5 seconds...
5.7. Spectrum
UM Spectrum, which refers to a "spectrum of channels", allows a source application to allocate any number of channels using lbm_src_channel_create() on which to send (lbm_src_send_ex())different messages of the same topic. A receiving application can subscribe receivers to one or more channels with either lbm_rcv_subscribe_channel or lbm_wrcv_subscribe_channel. Since each channel requires a different receiver callback, the receiver application can achieve more granular filtering of messages. Moreover, messages are received in-order across channels since all messages are part of the same topic stream.
The same level of filtering can be accomplished with a topic space design that creates separate topics for each channel, however, UM cannot guarantee the delivery of messages from multiple sources/topics in any particular order. Not only can UM Spectrum deliver the messages over many channels in the order they were sent by the source, but it also reduces topic resolution traffic since UM advertises only topics, not channels.
See also the C API documentation.
5.7.1. Performance Pluses
The use of separate callbacks for different channels improves filtering and also relieves the source application of the task of including filtering information in the message data.
Java and .NET performance also receives a boost because messages not of interest can be discarded before they transition to the Java or .NET level.
5.7.2. Configuration Options
Spectrum's default behavior delivers messages on any channels the receiver has subscribed to on the callbacks specified when subscribing, and all other messages on the receiver's default callback. This behavior can be changed with the following configuration options.
-
null_channel_behavior - behavior for messages delivered with no channel information.
-
unrecognized_channel_behavior - behavior for messages delivered with channel information but are on a channel for which the receiver has not registered interest.
-
channel_map_tablesz - controls the size of the table used by a receiver to store channel subscriptions.
5.8. Hot Failover
UM Hot Failover (HF) lets you implement sender redundancy in your applications. You can create multiple HF senders in different UM contexts, or, for even greater resiliency, on separate machines. There is no hard limit to the number of HF sources, and different HF sources can use different transport types.
Hot Failover receivers filter out the duplicate messages and deliver one message to your application. Thus, sources can drop a few messages or even fail completely without causing message loss, as long as the HF receiver receives each message from at least one source.
The following diagram displays Hot Failover operation.
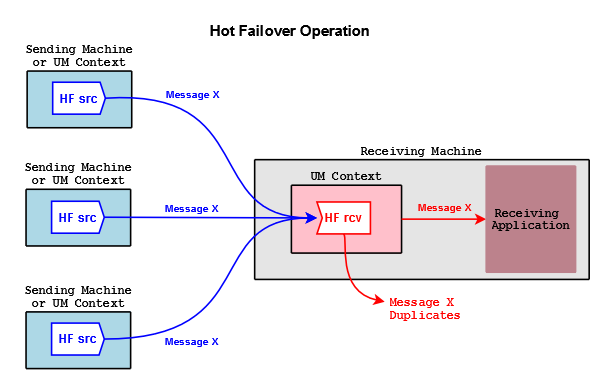
In the figure above, HF sources send copies of Message X. An HF receiver delivers the first copy of Message X it receives to the application, and discards subsequent copies coming from the other sources.
5.8.1. Implementing Hot Failover Sources
You create Hot Failover sources with lbm_hf_src_create(). This returns a source object with internal
state information that lets it send HF messages. You delete HF sources with the lbm_src_delete() function.
HF sources send HF messages via lbm_hf_src_send_ex() or
lbm_hf_src_sendv_ex(). These functions take a sequence
number, supplied via the exinfo object, that HF receivers use to
identify the same message sent from different HF sources. The exinfo has an hf_sequence_number, with a
flag (LBM_SRC_SEND_EX_FLAG_HF_32 or LBM_SRC_SEND_EX_FLAG_HF_64) that identifies whether it's a 32- or
64-bit number. Each HF source sends the same message content for a given sequence number,
which must be coordinated by your application.
If the source needs to restart its sequence number to an earlier value (e.g. start of
day; not needed for normal wraparound), delete and re-create the source and receiver
objects. Without re-creating the objects, the receiver sees the smaller sequence number,
assumes the data is duplicate, and discards it. In (and only in) cases where this cannot
be done, use lbm_hf_src_send_rcv_reset().
Note: Your application must synchronize calling
lbm_hf_src_send_ex()orlbm_hf_src_sendv_ex()with all threads sending on the same source. (One symptom of not doing so is messages appearing at the receiver as inside intentional gaps and being erroneously discarded.)
Please be aware that non-HF receivers created for an HF topic receive multiple copies of each message. We recommend you establish local conventions regarding the use of HF sources, such as including "HF" in the topic name.
For an example source application, see lbmhfsrc in the UM Examples Page.
5.8.2. Implementing Hot Failover Receivers
You create HF receivers with lbm_hf_rcv_create(), and
delete them using lbm_hf_rcv_delete() and lbm_hf_rcv_delete_ex().
Incoming messages have an hf_sequence_number field containing the sequence number, and a message flag (LBM_MSG_FLAG_HF_32 or LBM_MSG_FLAG_HF_64) noting the bit size.
Note: Previous UM versions used sequence_number for HF message identification. This field holds a 32-bit value and is still set for backwards compatibility, but if the HF sequence numbers are 64-bit lengths, this non-HF sequence number is set to 0. Also, you can retrieve the original (non-HF) topic sequence number via
lbm_msg_retrieve_original_sequence_number()or, in Java and .NET, viaLBMMessage.osqn().
For the maximum time period to recover lost messages, the HF receiver uses the minimum of the LBT-RM and LBT-RU NAK generation intervals (transport_lbtrm_nak_generation_interval, transport_lbtru_nak_generation_interval). Each transport protocol is configured as normal, but the lost message recovery timer is the minimum of the two settings.
Some lbm_msg_t objects coming from HF receivers may be flagged as having "passed through" the HF receiver. This means that the message has not been ordered with other HF messages. These messages have the LBM_MSG_FLAG_HF_PASS_THROUGH flag set. UM flags messages sent from HF sources using lbm_src_send() in this manner, as do all non-HF sources. Also, UM flags EOS, no source notification, and requests in this manner as well.
For an example receiver application, see lbmhfrcv in the UM Examples Page.
5.8.3. Implementing Hot Failover Wildcard Receivers
To create an HF wildcard receiver, set option hf_receiver to
1, then create a wildcard receiver with lbm_wildcard_rcv_create(). This actually creates individual HF
receivers on a per-topic basis, so that each topic can have its own set of HF sequence
numbers. Once the HF wildcard receiver detects that all sources for a particular topic
are gone it closes the individual topic HF receivers and discards the HF sequence
information (unlike a standard HF receiver). You can extend or control the delete timeout
period of individual HF receivers with option resolver_no_source_linger_timeout.
5.8.4. Java and .NET
For information on implement the HF feature in a Java application, go to UM Java API and see the documentation for classes LBMHotFailoverReceiver and LBMHotFailoverSource.
For information on implement the HF feature in a .NET application, go to UM .NET API and navigate to Namespaces -> com.latencybusters.lbm -> LBMHotFailoverReceiver and LBMHotFailoverSource.
5.8.5. Using Hot Failover with UMP
When implementing Hot Failover with UMP, you must consider the following impact on hardware resources:
-
Additional storage space required for a UMP disk store
-
Higher disk activity
-
Higher network activity
-
Increased application complexity regarding message filtering
Also note that you must enable UME explicit ACKs and Hot Failover duplicate delivery in each Hot Failover receiving application.
For detailed information on using Hot Failover with UMP, see the Knowledge Base article UMP Hot Failover.
5.8.6. Hot Failover Intentional Gap Support
UM supports intentional gaps in HF message streams. Your HF sources can supply message sequence numbers with number gaps up to 1073741824. HF receivers automatically detect the gaps and consider any missing message sequence numbers as not sent and do not attempt recovery for these missing sequence numbers. See the following example.
HF source 1 sends message sequence numbers: 10, 11, 12, 13, 25, 26, 38
HF source 2 sends message sequence numbers: 10, 11, 12, 13, 25, 26, 38

HF receiver 1 receives message sequence numbers in order with no pause between any messages:
                                            10, 11, 12, 13, 25, 26, 38
5.8.7. Hot Failover Optional Messages
Hot Failover sources can send optional messages that HF receivers can be configured to
receive or not receive ( hf_optional_messages). HF receivers detect an optional message by
checking lbm_msg_t.flags for LBM_MSG_FLAG_HF_OPTIONAL. HF
sources indicate an optional message by passing LBM_SRC_SEND_EX_FLAG_HF_OPTIONAL in the
lbm_src_send_ex_info_t.flags field to lbm_hf_src_send_ex() or lbm_hf_src_sendv_ex(). In the examples below, optional messages
appear with an "o" after the sequence number.
HF source 1 sends message sequence numbers: 10, 11, 12, 13o, 14o, 15, 16o, 17o, 18o, 19o, 20
HF source 2 sends message sequence numbers: 10, 11, 12, 13o, 14o, 15, 16o, 17o, 18o, 19o, 20

HF receiver 1 receives:                     10, 11, 12, 13o, 14o, 15, 16o, 17o, 18o, 19o, 20
HF receiver 2, configured to ignore optional messages, receives:
                                            10, 11, 12,           15,                     20
5.8.8. Using Hot Failover with Ordered Delivery
An HF receiver takes some of its operating parameters directly from the receive topic attributes. The ordered_delivery setting indicates the ordering for the HF receiver. Please see Ordered Delivery for information on the different modes of delivery order.
Note: UM supports Arrival Order with HF only when all sources use the same transport type.
5.8.9. Hot Failover Across Multiple Contexts
If you have a receiving application on a multi-homed machine receiving HF messages from HF sources, you can set up the Hot Failover Across Contexts (HFX) feature. This involves setting up a separate UM context to receive HF messages over each NIC and then creating an HFX Object, which drops duplicate HF messages arriving over all contexts. Your receiving application then receives only one copy of each HF message. The HFX feature achieves the same effect across multiple contexts as the normal Hot Failover feature does within a single context.
The following diagram displays Hot Failover operation across UM contexts.
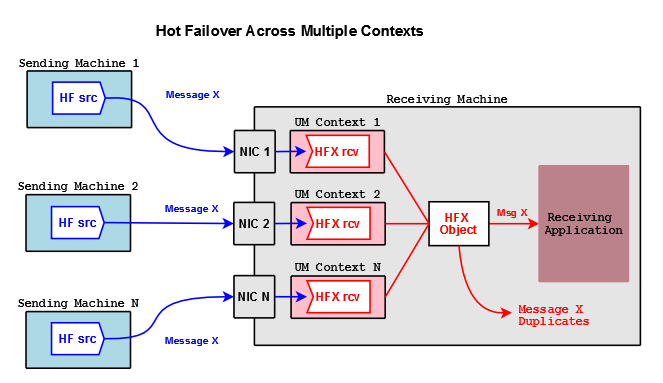
For each context that receives HF messages, create one HFX Receiver per topic. Each HFX Receiver can be configured independently by passing in a UM Receiver attributes object during creation. A unique client data pointer can also be associated with each HFX Receiver. The HFX Object is a special Ultra Messaging object and does not live in any UM context.
Note: You never have to call
lbm_topic_lookup()for a HFX Receiver. If you are creating HFX Receivers along with normal UM receivers for the same topic, do not interleave the calls. For example, calllbm_hfx_create()andlbm_hfx_rcv_create()for the topic. Then calllbm_topic_lookup()andlbm_rcv_create()for the topic to create the normal UM receivers.
The following outlines the general procedure for HFX.
-
Create an HFX Object for every HF topic of interest with
lbm_hfx_create(), passing in an attributes object created withlbm_hfx_attr_create()to specify any attributes desired. -
Create a context for the first NIC receiving HF messages with
lbm_context_create(). -
Create a HFX Receiver for every HF topic with
lbm_hfx_rcv_create(), passing in UM Receive Topic Attributes. -
Repeat steps 2 and 3 for all NICs receiving HF message
-
Receive messages. The HFX Object identifies and drops all duplicates, delivering messages through a single callback (and optional event queue) specified when you created the HFX Object.
Delete each HFX Receiver with lbm_hfx_rcv_delete() or
lbm_hfx_rcv_delete_ex(). Delete the HFX Object with lbm_hfx_delete().
Note: When writing source-side HF applications for HFX, be aware that HFX receivers do not support hf_sequence, 64-bit sequence numbers, the
lbm_hf_src_send_rcv_reset()function, or HF wildcard receivers.
-
Hot Failover Operation Options for HFX Configuration Options.
-
LBMHFX*.java in UM Java API.
-
LBMHFX*.cs in UM .NET API.